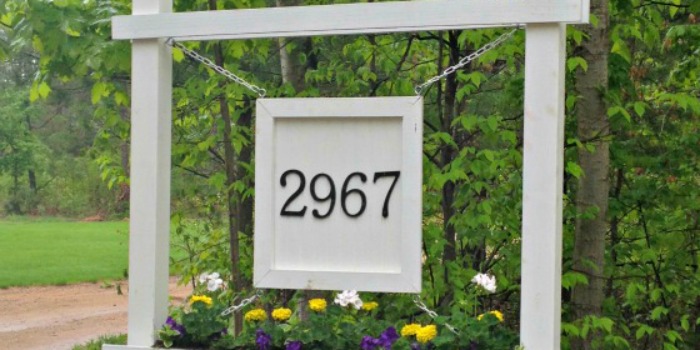

A house number sign should do more than whisper your address from somewhere behind an overgrown shrub. It should be visible from the street, complement your home, andbecause useful projects are better with flowershold a cheerful little garden.
This DIY house number sign and planter box combines a vertical wooden address panel with a compact container for flowers, herbs, or trailing greenery. The finished project adds curb appeal without demanding advanced woodworking skills, a workshop full of mysterious machines, or a televised renovation budget.
The design below uses common dimensional lumber, straightforward cuts, exterior-rated fasteners, and a simple mounting system. You can paint it to match your front door, stain it to highlight the wood grain, or give it a modern black-and-natural-wood finish. Most importantly, the numbers remain large, readable, and safely above the plants instead of disappearing into a botanical jungle.
Why Build a House Number Sign With a Planter?
A combined address sign and planter solves two exterior-design problems at once. It makes your house number easier to find while filling an empty wall beside the front door, garage, porch, or driveway entrance.
Visibility matters for more than curb appeal. Fire departments and municipalities commonly recommend large, high-contrast address numbers that can be seen clearly from the road. Many local guidelines call for characters at least 4 inches tall, although requirements vary according to location, building setback, and local code. Reflective or illuminated numbers can improve visibility after dark. Before cutting wood, confirm the rules in your city or county.
A planter adds color and softens the hard lines of the sign. It also makes seasonal decorating easy. Petunias can welcome summer, ornamental peppers can handle fall, and evergreen clippings can take over during winter. The sign stays put while its floral wardrobe changes throughout the year.
Reasons This Project Works Well
- It improves the visibility of your street address.
- It adds vertical interest to a plain exterior wall.
- It can be customized for modern, farmhouse, cottage, coastal, or traditional homes.
- It uses beginner-friendly woodworking techniques.
- It creates a small planting area without taking up porch or walkway space.
- It makes a memorable housewarming gift, assuming the recipient has not moved again by the time you finish it.
Recommended Size and Design
This plan creates a vertical sign approximately 36 inches tall and 9 1/4 inches wide. A 16-inch planter box attaches near the bottom, leaving enough open space above it for three or four address numbers.
The dimensions are flexible. Lay the numbers on the uncut backboard before committing to the final height. A four-digit address may fit comfortably on a 36-inch board, while five digits or especially wide numbers may require a 42- or 48-inch panel.
Keep at least 1 inch between the numbers and maintain consistent spacing. The planter should sit low enough that mature plants will not cover the address. Remember that a tiny trailing plant purchased in spring may become a green waterfall by July. Plants are ambitious that way.
Materials and Tools
Materials
- One cedar 1-by-10 board, at least 36 inches long
- One cedar 1-by-6 board, approximately 6 feet long
- One exterior-rated 1-by-2 board for a support cleat
- Exterior wood glue
- 1 1/2-inch exterior screws or galvanized finish nails
- 2-inch exterior screws for attaching the planter
- Mounting screws appropriate for wood framing, masonry, brick, or siding
- Metal house numbers, preferably 4 to 6 inches tall
- Exterior primer and paint, or exterior wood stain and sealer
- Plastic window-box liner or heavy plastic liner, optional
- Landscape screen or plastic mesh
- Quality outdoor potting mix
- Container-friendly plants
Tools
- Tape measure
- Pencil and combination square
- Circular saw, miter saw, or handsaw
- Drill and driver bits
- 1/4-inch or 3/8-inch drill bit for drainage holes
- Clamps
- Random-orbit sander or sanding block
- 120- and 180-grit sandpaper
- Level
- Paintbrush, small roller, or staining pad
- Safety glasses, hearing protection, and dust mask
Choosing the Best Wood
Cedar is an excellent choice because it is relatively light, attractive, easy to cut, and naturally resistant to decay. Redwood offers similar benefits but may be harder to find or more expensive in some regions. Pine and fir are budget-friendly, but they generally deteriorate faster when repeatedly exposed to damp soil and outdoor weather.
If you use pine, prime every face, edge, cut end, and screw hole before final assembly. The back and bottom deserve the same protection as the visible surfaces. Water has an annoying habit of finding the one place you forgot to seal.
Cut List for the House Number Planter
The following cut list produces a box measuring approximately 16 inches wide, 5 1/2 inches deep, and 6 1/4 inches tall:
- Backboard: One 1-by-10 board at 36 inches
- Planter front: One 1-by-6 board at 16 inches
- Planter back: One 1-by-6 board at 16 inches
- Planter bottom: One 1-by-6 board at 16 inches
- Planter sides: Two 1-by-6 pieces at 4 inches
- Support cleat: One 1-by-2 piece at approximately 15 inches
Because actual lumber dimensions differ from nominal names, measure your boards before cutting. A board sold as a 1-by-6 is usually about 3/4 inch thick and 5 1/2 inches wide.
How to Build a House Number Sign and Planter Box
Step 1: Test the Layout
Place the backboard on a flat work surface. Position the planter components near the bottom and arrange the house numbers above them. Use painter’s tape or a pencil to mark the general location of each element.
Stand back several feet and inspect the proportions. The numbers should be the visual priority. Decorative plants are charming, but paramedics should not have to solve a floral escape room to identify your address.
Step 2: Cut the Wood
Measure each piece separately and mark the waste side of the cutting line. Use a square to draw straight lines across the boards. Clamp the lumber securely before making each cut.
After cutting, dry-fit the planter. The front and back pieces run the full 16-inch length. The 4-inch side pieces fit between them, and all four walls rest on top of the 16-inch bottom board.
Step 3: Sand Every Piece
Sand faces and edges with 120-grit paper, then finish visible areas with 180-grit. Soften sharp corners slightly without rounding them into oblivion. Remove sanding dust with a vacuum and clean cloth.
This is also the best time to inspect the boards for cracks, loose knots, cupping, or other defects. Place the best-looking face of the backboard forward and orient the planter pieces so their attractive sides face outward.
Step 4: Assemble the Planter Box
Apply a thin bead of exterior wood glue along the bottom edges of the front, back, and side pieces. Position them on the bottom board and clamp the assembly.
Predrill screw holes near the ends of each board to reduce splitting. Secure the front and back to the side pieces with exterior screws or galvanized nails. Then drive screws upward through the bottom board into the walls.
Check the box for square by measuring diagonally from corner to corner. When both diagonal measurements match, the planter is square. When they do not, gently shift the box before the glue sets instead of declaring that asymmetry is part of the design.
Step 5: Add Drainage
Drill several drainage holes through the bottom of the planter. Space them evenly and make sure water can leave the box rather than collecting against the backboard or wall.
Drainage holes are essential because saturated potting mix reduces air around plant roots and can contribute to root problems. Use a lightweight commercial potting mix instead of ordinary garden soil, which can become compacted and drain poorly in a container.
Cover the holes with small pieces of plastic mesh or landscape screen to slow the loss of potting mix. Do not add a layer of gravel in an attempt to improve drainage. University horticulture guidance notes that coarse material at the bottom can create a perched water zone and make drainage worse rather than better.
For easier maintenance, place a removable plastic window-box liner inside the wooden planter. Drill corresponding holes in the liner and wood. A liner reduces direct soil contact, makes seasonal replanting cleaner, and can extend the useful life of the box.
Step 6: Attach the Planter to the Backboard
Place the support cleat horizontally across the backboard where the bottom rear edge of the planter will rest. Check it with a level, apply exterior glue, and fasten it from the back of the sign.
Set the planter on the cleat. Drive several 2-inch exterior screws through the back of the sign and into the planter’s rear wall. Predrill carefully and keep screws away from the upper edge, where they could interfere with planting.
The cleat supports the planter’s weight instead of asking a few screws to perform heroic acts every time wet soil becomes heavier after a storm.
Step 7: Prime, Paint, or Stain
If painting, prime bare wood before applying two compatible exterior finish coats. Proper cleaning, sanding, and priming improve adhesion and help an exterior coating last longer. Coat the front, back, sides, bottom, drainage holes, and cut ends.
If staining, choose an exterior product intended for horizontal and vertical outdoor wood. A stain or sealer with ultraviolet protection can help preserve the appearance of cedar exposed to sunlight.
Allow every coat to dry according to the manufacturer’s instructions. Do not rush to assemble hardware over tacky paint unless fingerprints and permanently attached cardboard are part of your artistic vision.
Step 8: Install the House Numbers
Use a level or straightedge to align the numbers vertically or horizontally. Make a paper template when the hardware includes hidden mounting posts. Tape the template to the board, check the spacing, and mark each hole with an awl.
Predrill to the depth recommended by the number manufacturer. Add a piece of painter’s tape to the drill bit as a depth indicator. Install the numbers and confirm that they contrast strongly with the background.
Black numbers on light wood, white numbers on a dark painted panel, or brushed metal on matte black are easy-to-read combinations. Avoid thin script numerals and overly decorative fonts. Address signs should be legible from the street, not merely elegant from 18 inches away.
Step 9: Mount the Finished Sign
The planted sign will be heavier than it looks, especially immediately after watering. Mount it into structural framing or use fasteners rated for the wall material and total load.
For wood siding, locate studs or solid blocking when possible. For brick, concrete, or masonry, use appropriately sized masonry anchors. Do not rely on lightweight picture-hanging hardware, adhesive strips, or hopeful thinking.
Add small exterior spacers behind the sign to create an air gap. This helps the back dry after rain and gives drainage water somewhere to go. Position the sign where runoff will not stain siding or create a permanent damp patch.
Before drilling through siding, flashing, stucco, or masonry, confirm the correct attachment and waterproofing method for your home. An experienced contractor can help when the wall assembly is unfamiliar.
How to Plant the Address Planter
Choose plants according to the actual light near the sign. “Front porch” is not a light condition. Observe the location throughout the day and determine whether it receives full sun, partial sun, bright shade, or deep shade.
Plant Ideas for Sunny Locations
- Calibrachoa
- Petunias
- Sweet alyssum
- Verbena
- Trailing lantana
- Compact ornamental grasses
- Thyme, oregano, or other sun-loving herbs
Plant Ideas for Shady Locations
- Impatiens
- Wax begonias
- Coleus
- Small ferns
- Trailing lobelia
- Sweet potato vine in restrained quantities
For a polished arrangement, use the familiar “thriller, filler, spiller” approach: one upright focal plant, several mounding plants, and one trailing plant near the front edge. Choose varieties with similar light and moisture requirements so one plant is not begging for water while another is quietly drowning.
Fill the planter with moistened potting mix, stopping about an inch below the rim. Loosen crowded roots, place the plants, fill around them, and water thoroughly until excess water exits the drainage holes.
Containers can dry quickly in hot or windy conditions, particularly when they are small and mounted against a warm wall. Check the mix regularly by pressing a finger about an inch below the surface. Water when it feels dry rather than following an inflexible calendar.
Perennial plants should be selected with local winter conditions in mind. The USDA Plant Hardiness Zone Map can help identify plants likely to survive typical minimum temperatures in your area, although roots in aboveground containers may experience colder conditions than roots in the ground.
Design Variations
Modern Black Address Planter
Paint the backboard matte or satin black and install brushed stainless-steel numbers. Leave the cedar planter natural for contrast, or paint the entire unit one color for a clean architectural appearance.
Farmhouse-Style Sign
Use a medium-brown stain, simple black numbers, and white flowers. Add narrow trim around the backboard, but keep decorative details away from the address itself.
Horizontal House Number Planter
Turn the design sideways and mount the numbers in a row above a longer planter. This configuration works well beneath a porch light or beside a wide garage door.
Freestanding Address Sign
Attach the backboard to exterior-rated posts secured in a weighted planter or properly installed in the ground. A freestanding sign may be useful when the house sits far from the road, but it must remain visible from both directions and comply with local setback rules.
Low-Maintenance Faux Plant Version
Use high-quality outdoor artificial greenery when the location receives no useful light or regular watering is unrealistic. Drill drainage holes anyway so rainwater cannot collect inside the box.
Common Mistakes to Avoid
- Using numbers that are too small: Choose size and contrast for street visibility, not close-up photography.
- Mounting the planter too high: Mature plants can cover the address.
- Skipping drainage holes: A planter without drainage becomes a tiny wooden swamp.
- Filling the box with garden soil: Use container potting mix for better drainage and aeration.
- Leaving cut ends unfinished: End grain readily absorbs moisture and needs protection.
- Using indoor screws: Ordinary fasteners can corrode and stain the wood.
- Mounting only to thin siding: Wet soil adds considerable weight, so use structural support.
- Choosing plants before checking sunlight: A sun-loving petunia will not negotiate with a dark porch.
- Blocking the numbers with décor: Seasonal bows, wreaths, and vines should frame the address, not conceal it.
Maintenance Tips
Inspect the sign each spring and fall. Tighten loose hardware, clean dirt from drainage holes, and look for peeling finish or darkened wood around joints. Touch up exposed areas before moisture reaches deeper into the material.
Remove dead flowers and trim aggressive trailing plants away from the address. Replace tired annuals instead of continuing a month-long negotiation with three crispy stems.
Depending on sun and weather exposure, painted or stained surfaces may need periodic recoating. South- and west-facing signs typically receive more ultraviolet stress than signs protected by a porch roof.
During freezing weather, empty the planter or use a liner that can be removed. Trapped water can freeze, expand, and stress joints. Winter arrangements made from evergreen branches, pine cones, and weather-resistant accents provide color without requiring active roots.
Practical Experiences and Lessons From Building an Address Planter
The most common lesson from projects like this is that planning the layout takes longer than expectedand saves more time than any power tool. It is tempting to cut a handsome board, attach a box, and start drilling holes for numbers immediately. That approach works beautifully until the final digit lands half an inch above the planter. Arranging every component on the full-size board first prevents the visual equivalent of parking a car diagonally across two spaces.
Another useful experience is to plant for the size the flowers will become, not the size they are at the garden center. A freshly planted box can look slightly sparse. Two weeks later, it begins to fill in. Six weeks later, a vigorous spiller may be searching for neighboring property to annex. Leaving room between plants improves airflow and keeps the house numbers visible through the growing season.
Drainage tends to expose construction shortcuts. A box may look perfect during assembly, but the first heavy watering reveals whether the bottom slopes correctly, the holes are open, and water can escape without running down the wall. Testing the empty planter with a watering can before adding soil is worthwhile. It is much easier to drill an extra hole while the box is empty than while holding several pounds of wet potting mix and reconsidering every decision that led to that moment.
A removable liner is one of the most practical upgrades. It allows the plants and potting mix to be lifted out as a unit, making repainting and winter storage much cleaner. It also reduces the amount of damp soil touching the wooden walls. The liner should not be watertight, however. Matching drainage holes are still necessary.
Mounting deserves more attention than most decorative tutorials suggest. The sign itself may feel light on the workbench, but potting mix absorbs water. Plants grow, roots expand, and someone eventually waters the box with the enthusiasm of a firefighter. A support cleat beneath the planter and structural mounting screws behind the backboard provide far more confidence than a couple of small brackets.
Color decisions can also change after the sign moves outdoors. A soft gray that looks sophisticated in the garage may disappear against gray siding. A natural cedar panel may not provide enough contrast for brass numbers. Before applying the finish, hold the numbers and a sample board against the house and view them from the street in morning light, afternoon light, and darkness. A small porch light or low-voltage fixture may make a dramatic difference after sunset.
Predrilling is another small step that repeatedly proves its value. Cedar is workable, but narrow side pieces can split when screws are driven near their ends. Pilot holes, clamps, and moderate driver speed produce cleaner joints. Driving every screw at maximum power may feel efficient, but it can bury heads, crush fibers, and turn a neat planter into an archaeological site of overdriven hardware.
Finishing before installing the numbers usually creates a cleaner result. Paint can collect around mounted numerals, while stain can leave uneven halos. Finish the wood, allow it to cure, and then install the hardware. Keep a small labeled container of leftover finish for future touch-ups. Exterior projects collect scratches with impressive creativity, particularly during mounting.
Finally, the best address planter is not necessarily the most elaborate. Readable numbers, sound drainage, secure mounting, and healthy plants matter more than decorative trim. A simple cedar board with bold black numerals and one box of white flowers can look more intentional than a complicated sign crowded with scrollwork, slogans, hooks, ribbons, and enough accessories to open a small gift shop.
Conclusion
Building a house number sign and planter box is a manageable weekend project that combines woodworking, gardening, and practical home improvement. The basic structure requires only straight cuts, simple joinery, exterior finishes, and careful mounting. Yet the finished piece can transform an overlooked wall into a welcoming focal point.
Start with rot-resistant wood, use large high-contrast numbers, provide generous drainage, and choose plants suited to the available sunlight. A removable liner and support cleat will make the project easier to maintain, while a durable exterior coating will help it handle rain and sun.
The result is more than front porch décor. It helps visitors and emergency responders identify the property, gives seasonal plants a place to perform, and tells the neighborhood that someone here owns both a drill and a respectable amount of potting mix.


