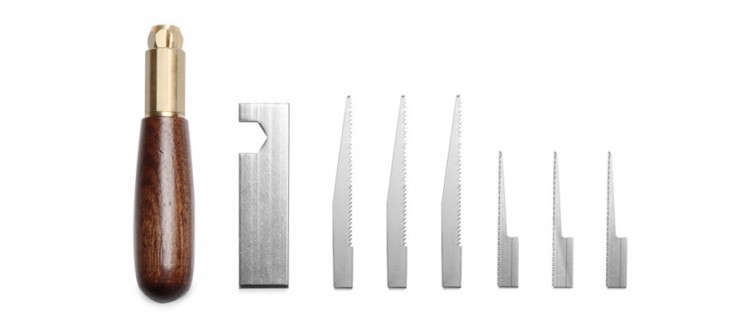

A pumpkin carving set is the tiny toolbox that stands between you and a jack-o’-lantern that looks like it lost a fight with a raccoon. Sure, you could grab a kitchen knife, a soup spoon, and the confidence of someone who has watched three online tutorials. But if you want cleaner lines, safer cuts, better details, and fewer “well, it was supposed to be a cat” moments, a proper pumpkin carving kit is worth having.
The best pumpkin carving set is not just a seasonal novelty tossed into the Halloween aisle next to candy corn and questionable rubber spiders. It is a practical collection of specialized pumpkin carving tools designed for control, precision, and safety. Whether you are making a classic triangle-eyed jack-o’-lantern, a spooky haunted house silhouette, or an ambitious portrait of your dog wearing a witch hat, the right tools make the job easier and a lot more fun.
In this guide, we will break down what a pumpkin carving set includes, how to choose one, how to use it safely, and how to get better results without turning your kitchen table into a crime scene from a very orange detective show.
What Is a Pumpkin Carving Set?
A pumpkin carving set is a collection of tools made specifically for cutting, scooping, shaping, etching, and decorating pumpkins. Unlike standard kitchen knives, many pumpkin carving tools use small serrated blades, short handles, scoops, drills, pokers, scrapers, and detail tools that help you work through pumpkin skin and flesh with more control.
Most beginner kits include a pumpkin saw, a scoop, a poker wheel or puncture tool, and several printed stencils. More advanced kits may include stainless steel sculpting loops, clay-style modeling tools, etching blades, small drills, transfer tools, and storage cases. Some professional-style sets even look like they belong in a sculptor’s studio, which makes sense because advanced pumpkin carving is basically sculpture with an expiration date.
Why a Pumpkin Carving Set Is Better Than a Kitchen Knife
The old-school approach is simple: grab the biggest knife in the drawer and hope the pumpkin respects your authority. Unfortunately, pumpkins do not respect authority. They roll, wobble, resist, and occasionally make you question your life choices.
A dedicated pumpkin carving set is usually safer and more precise because the tools are designed for the texture of pumpkin skin and flesh. Small serrated saws cut with a controlled back-and-forth motion instead of requiring heavy force. Scrapers thin the pumpkin wall evenly. Etching tools remove only the outer skin for glowing effects. Detail saws make curves, teeth, windows, whiskers, and spooky eyebrows possible without needing heroic wrist strength.
That does not mean every cheap kit is amazing. Some flimsy plastic-handled tools bend, crack, or surrender halfway through the first pumpkin. A good carving set should feel sturdy, comfortable, and manageable in the hand. If the tool flexes like a noodle when you press it against a pumpkin, it belongs in the “decorative but suspicious” category.
What Should Be Included in a Good Pumpkin Carving Kit?
1. Pumpkin Scoop or Scraper
The scoop is the unsung hero of pumpkin carving. It removes seeds, strings, and pulp from the inside of the pumpkin. A strong scoop with a serrated or slightly sharp edge can also thin the pumpkin wall, making carving easier and allowing light to shine through more evenly.
2. Serrated Pumpkin Saw
This is the main cutting tool in many kits. A pumpkin saw is usually smaller and more flexible than a kitchen knife. It is ideal for cutting the lid, opening the bottom, and carving basic shapes. The best ones cut cleanly without requiring too much pressure.
3. Detail Saw
A smaller saw handles curves, corners, and tiny features. If your design includes teeth, stars, leaves, letters, or suspiciously dramatic bat wings, this tool earns its place.
4. Poker Tool or Pattern Transfer Tool
This tool helps transfer stencil designs onto the pumpkin. You tape the pattern to the pumpkin and poke small holes along the design lines. Once the paper comes off, you have a dotted guide to follow. It is like connecting the dots, except the dots are on a vegetable and your neighbors will judge the final result.
5. Etching or Sculpting Tools
Etching tools scrape away the pumpkin’s outer skin without cutting all the way through. This creates shaded designs that glow softly when lit from inside. These tools are excellent for more artistic pumpkins, including portraits, lettering, moon shapes, leaves, and decorative patterns.
6. Drill or Punch Tools
Some kits include small drill-style tools or punches for making perfect circles. These are great for polka-dot pumpkins, starry skies, owl eyes, monster pores, and designs that look much harder than they actually are.
7. Stencils
Stencils are especially useful for beginners. A good pumpkin carving set may include classic faces, cats, ghosts, bats, haunted houses, skulls, and kid-friendly patterns. Reusable or downloadable stencils expand your options every year.
How to Choose the Best Pumpkin Carving Set
Look for Sturdy Materials
Stainless steel blades and reinforced handles usually last longer than thin plastic tools. If you plan to carve several pumpkins each Halloween, invest in a reusable set instead of the cheapest single-use kit. A durable pumpkin carving kit saves money over time and keeps your tools from snapping in the middle of a masterpiece.
Prioritize Comfortable Handles
Pumpkin carving can take longer than expected, especially when ambition arrives wearing a cape. Comfortable, non-slip handles reduce hand fatigue and improve control. Rubberized or textured grips are helpful because pumpkin pulp is slippery, and slippery tools are where Halloween fun starts making emergency-room eye contact.
Match the Set to Your Skill Level
Beginners should look for a simple kit with a scoop, serrated saw, detail saw, poker, and stencils. Intermediate carvers may want etching tools and sculpting loops. Advanced users can add linoleum cutters, clay sculpting tools, small drills, and professional carving knives. You do not need twenty-seven tools if you only plan to carve a happy face. But if you want a pumpkin that looks like it has a backstory and unresolved family drama, more tools help.
Check for Easy Cleaning and Storage
Pumpkin flesh dries quickly and can cling to tools. Choose a set that is easy to rinse and dry. A storage case is a bonus because it keeps sharp tools organized and prevents the annual tradition of finding a tiny saw at the bottom of the junk drawer in April.
Pumpkin Carving Safety Tips
Pumpkin carving is fun, but it involves sharp tools, slippery surfaces, and excited humans. That combination deserves respect. Before carving, set up a clean, dry, well-lit workspace. Wash and dry the pumpkin, tools, cutting surface, and your hands. Moisture can cause slipping, and slipping is not the kind of Halloween surprise anyone ordered.
Always cut away from your body and keep your supporting hand out of the blade path. Use small, controlled movements instead of forcing a blade through the pumpkin. If a tool gets stuck, stop and reposition it rather than pushing harder. Younger children should draw designs, scoop seeds, place stickers, or help choose the stencil while adults handle sharp cutting tools.
For lighting, battery-powered tea lights, LED candles, and glow sticks are safer than open flames. They also reduce heat inside the pumpkin, which can help slow drying. If you use a real candle, place the pumpkin on a stable, fire-safe surface away from curtains, dried leaves, costumes, and anything else that turns “festive” into “oops.”
How to Use a Pumpkin Carving Set Step by Step
Step 1: Pick the Right Pumpkin
Choose a pumpkin with a firm shell, no soft spots, and a flat base so it does not wobble. A healthy green stem often signals freshness, but do not carry the pumpkin by the stem. That is the pumpkin equivalent of lifting a suitcase by a decorative ribbon.
Step 2: Wash and Dry the Pumpkin
Wipe the outside with a damp cloth and dry it thoroughly. Starting with a clean pumpkin helps your design transfer better and may reduce early spoilage.
Step 3: Cut from the Bottom or Top
Many people cut a lid around the stem, but cutting from the bottom has advantages. It keeps the stem intact, makes it easier to place the pumpkin over a light, and often gives you better access to the seeds and pulp. If you cut a top lid, angle the blade inward so the lid does not fall through.
Step 4: Scoop and Thin the Walls
Use the scoop to remove seeds and stringy pulp. Then scrape the inner wall behind your design until it is about half an inch to one inch thick. A thinner wall is easier to carve and creates a brighter glow.
Step 5: Transfer the Design
Draw freehand with a washable marker or tape a stencil to the pumpkin and poke along the design lines. Simple designs are best for beginners. Large eyes, wide mouths, and bold shapes are forgiving. Tiny letters and lace patterns are for people who enjoy danger and have excellent snacks nearby.
Step 6: Carve Slowly
Use the serrated saw for big shapes and the detail saw for small areas. Start in the center of the design and work outward to prevent weak sections from breaking. Remove carved pieces gently. If a piece sticks, cut around it again instead of yanking it like you are opening a stubborn pickle jar.
Step 7: Clean the Edges
Use a scraper or detail tool to neaten rough cuts. Etching tools can add texture, eyebrows, wrinkles, fur, tree bark, or moonlight effects. This is where a basic jack-o’-lantern starts developing personality.
Step 8: Light and Display
Place an LED candle or battery light inside and test the glow in a dark room. Adjust thin areas if needed. Then display your pumpkin somewhere cool, dry, and protected from heavy rain or direct heat.
Beginner Pumpkin Carving Ideas
If this is your first time using a pumpkin carving set, start with simple designs that look good even if the lines are not perfect. Classic jack-o’-lantern faces are popular for a reason. Triangle eyes, a round nose, and a toothy grin deliver instant Halloween charm with minimal stress.
Other beginner-friendly ideas include a crescent moon, stars, a ghost silhouette, a cat face, a bat shape, house numbers, a simple spider web, or a word like “BOO.” For kids, try painted pumpkins with carved accents, sticker-decorated pumpkins, or pumpkins with drilled dots that glow like tiny lanterns.
Advanced Pumpkin Carving Ideas
Once you are comfortable with basic carving tools, try etching and sculpting. Etched pumpkins can create depth without cutting all the way through. You can scrape the skin lightly for a soft glow or carve deeper for brighter highlights. This technique works beautifully for leaves, flowers, haunted forests, animal faces, and vintage-style Halloween art.
For a dramatic display, combine multiple pumpkins. One large pumpkin can be the centerpiece, while smaller pumpkins form a scene around it. Try a spooky village, a family of monsters, a row of glowing ghosts, or a pumpkin “choir” with different mouth shapes. They may not sing, but they will look like they are about to complain about the weather.
How to Make Your Carved Pumpkin Last Longer
Carved pumpkins naturally break down because cutting exposes the moist interior to air, microbes, and insects. To keep your jack-o’-lantern fresh longer, carve it close to the day you plan to display it. Store it in a cool place when not on display, and keep it away from direct sun or heat.
After carving, remove as much pulp as possible. Wipe cut surfaces clean and consider applying a thin layer of petroleum jelly to exposed edges to slow drying. Some carvers use a mild disinfecting rinse, but always handle cleaning solutions carefully, never mix chemicals, and rinse or wipe surfaces according to the product’s directions. For the simplest approach, keep the pumpkin clean, cool, and dry, then accept that every jack-o’-lantern is temporary. That is part of the magicand part of the compost pile’s future plans.
Common Pumpkin Carving Mistakes
Using Too Much Force
If you are pushing hard, the tool may be wrong, dull, or stuck. Pumpkin carving should be controlled, not heroic. Let the saw motion do the work.
Choosing a Design That Is Too Complicated
A detailed dragon sounds wonderful until the pumpkin wall collapses and suddenly you have an abstract lizard cloud. Choose a pattern that matches your patience level.
Skipping the Wall-Thinning Step
Thick pumpkin walls make carving harder and reduce the glow. A good scraper makes a huge difference.
Carving Too Early
If you carve a week before Halloween and expect perfection on the big night, your pumpkin may have other plans. Carve one to three days before display for the freshest look.
Leaving Tools Dirty
Rinse and dry tools after use. Pumpkin residue can dry into stubborn orange glue, and nobody wants to begin next Halloween with archaeology.
Pumpkin Carving Set vs. DIY Tools
You can carve a pumpkin with household items, but a pumpkin carving set is usually easier for beginners. A sturdy spoon can scoop seeds, a paring knife can cut small shapes, and a melon baller can make circles. However, specialized pumpkin saws, scrapers, and etching tools provide better control and reduce the need for brute force.
The smartest approach is often a combination. Use a pumpkin carving set for most tasks, then add household tools when useful. A washable marker, masking tape, push pins, paper towels, a damp towel under the pumpkin, and LED lights can turn a basic kit into a complete carving station.
Who Should Buy a Pumpkin Carving Set?
A pumpkin carving set is useful for families, Halloween party hosts, teachers, craft lovers, home decorators, and anyone who wants better results with less frustration. It is especially helpful if you carve more than one pumpkin per year. A reusable set also makes a thoughtful seasonal gift, especially paired with stencils, LED candles, and a large pumpkin that looks ready for fame.
If you only carve one small pumpkin once every five years, a basic low-cost kit may be enough. If pumpkin night is a household tradition with cider, costumes, music, and friendly competition, buy a stronger set. Your future self will appreciate not having to perform emergency surgery on a bent plastic saw.
Real-Life Experience: What Using a Pumpkin Carving Set Actually Feels Like
The first thing most people notice when switching from kitchen knives to a pumpkin carving set is the control. A big kitchen knife may look powerful, but it can be awkward on curved pumpkin surfaces. A small serrated pumpkin saw feels less intimidating and makes it easier to follow lines. The movement is slower, but that is the point. Pumpkin carving is not a race unless your doorbell is already ringing and trick-or-treaters are judging your undecorated porch.
In practice, the scoop often becomes the favorite tool. A strong scraper clears the inside faster than a regular spoon and helps thin the carving wall. This step seems boring until you realize it makes every cut easier afterward. When the wall is too thick, even simple eyes can become a wrestling match. When it is thinned properly, the saw glides better, the pieces pop out more cleanly, and the final glow looks brighter.
Stencils are another small upgrade with a big payoff. Freehand carving can be charming, but stencils help beginners create designs that look intentional. The trick is to choose the right stencil for the pumpkin’s size and shape. A tall pumpkin works well for ghosts, haunted houses, and long faces. A round pumpkin is better for classic jack-o’-lanterns, cats, moons, and big grins. Trying to force a wide design onto a narrow pumpkin is how bats become mustaches.
Etching tools add the most creative fun. Instead of cutting all the way through, you scrape away the orange skin to create glowing shadows. This technique is surprisingly forgiving because you can build the design gradually. Light scraping creates a dim glow, while deeper scraping makes brighter areas. It feels more like drawing or sculpting than cutting, which is great for people who want artistic results without fragile cut-out sections.
A good pumpkin carving set also changes the mood of the activity. With better tools, carving becomes less stressful and more social. Kids can help scoop seeds, choose patterns, poke stencil holes, and place lights inside. Adults can handle the sharper tools while still letting everyone feel involved. The final pumpkin does not have to be perfect. In fact, slightly crooked smiles and uneven eyebrows often give jack-o’-lanterns their charm. A pumpkin that looks mildly confused can be just as memorable as one with perfect symmetry.
The biggest lesson from repeated pumpkin carving is simple: prepare more than you think you need to. Cover the table, keep paper towels nearby, use a bowl for seeds, set up lights before carving, and clean tools as you go. Also, roast the seeds if you have time. Nothing says “I am a responsible seasonal adult” like making snacks from the mess you just created.
Final Thoughts on Choosing a Pumpkin Carving Set
A pumpkin carving set is one of those seasonal tools that looks small but makes a big difference. The right kit improves safety, control, creativity, and cleanup. It helps beginners carve recognizable designs and gives experienced Halloween fans room to experiment with shading, sculpting, and dramatic porch displays.
Look for sturdy materials, comfortable handles, useful basics, and tools that match your carving goals. Start simple, carve slowly, keep everything dry, and use LED lights for a safer glow. Most importantly, enjoy the process. Pumpkins are temporary, Halloween comes once a year, and a slightly lopsided jack-o’-lantern still has more personality than most decorative throw pillows.
Note: This article is written from synthesized guidance commonly provided by reputable U.S. safety organizations, extension resources, home publications, food publications, and pumpkin-carving experts. It is fully rewritten for original web publication.


