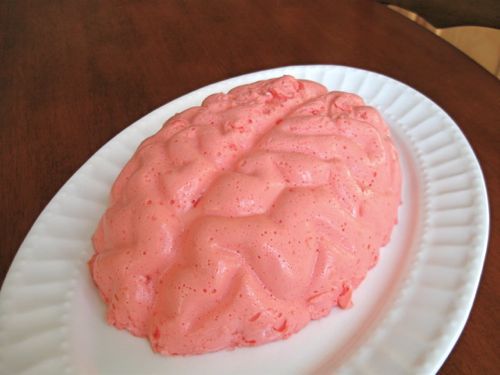

Some desserts enter the room quietly. A brain jello mold does not. It wobbles in like the star of a Halloween party, steals the attention from the cupcakes, and makes at least one guest say, “I hate how much I want to eat that.” That, friends, is the magic of a good Brain Jello Mold Recipe: it is silly, spooky, surprisingly tasty, and easy enough that you do not need a culinary degreejust a brain-shaped mold and a refrigerator willing to do its job.
This recipe creates a creamy pink gelatin brain with a soft, glossy finish and enough jiggle to make your snack table feel delightfully dramatic. It is perfect for Halloween parties, classroom-safe celebrations, spooky movie nights, haunted house snack tables, or any evening when regular dessert feels emotionally underdressed. The flavor is fruity and creamy, the texture is firm enough to unmold cleanly, and the look is creepy in the fun waynot the “why is this in my fridge?” way.
Why This Brain Jello Mold Recipe Works
A successful brain jello mold needs three things: the right amount of gelatin, a creamy ingredient for that eerie brain-like color, and a careful unmolding method. Too much liquid and your brain slumps like it forgot its own name. Too little liquid and it becomes rubbery enough to bounce off the dessert table, which is not ideal unless your party theme is “culinary dodgeball.”
This version uses flavored gelatin, boiling water, cold water, evaporated milk or sweetened condensed milk, and a little extra unflavored gelatin for structure. The extra gelatin helps the dessert hold all those ridges and folds from the mold. The milk gives the jello an opaque, pale pink look instead of a clear jewel-tone finish. That creamy color is what makes the mold look more like a Halloween brain and less like a bowl of fruit punch that joined a theater club.
Ingredients for Brain Jello Mold
Main Ingredients
- 2 boxes strawberry, raspberry, or cherry gelatin, 3 ounces each
- 1 envelope unflavored gelatin, about 2 1/4 teaspoons
- 2 cups boiling water
- 1 cup cold water
- 1 cup evaporated milk, or 3/4 cup sweetened condensed milk for a sweeter version
- 1 teaspoon vanilla extract, optional
- Nonstick cooking spray, neutral oil, or a very light coating of water for the mold
- Red decorating gel or berry syrup, optional for serving
Equipment Needed
- One brain-shaped gelatin mold, plastic or silicone
- Large mixing bowl
- Whisk
- Measuring cups
- Serving platter
- Small towel and warm water for unmolding
How to Make a Brain Jello Mold
Step 1: Prepare the Mold
Rinse the brain mold with cold water, then shake out the excess. If your mold tends to cling, lightly mist it with nonstick cooking spray and wipe away any visible puddles with a paper towel. You want a barely-there coating, not a tiny oil slick. Set the mold on a tray before filling it. This makes it easier to move to the refrigerator without performing a stressful balancing act.
Step 2: Dissolve the Gelatin
In a large bowl, combine the flavored gelatin and the unflavored gelatin. Pour in the boiling water and whisk for at least two minutes, or until the powder fully dissolves. This step matters. Undissolved gelatin can create grainy spots, and nobody wants a lumpy brain unless it is part of a very specific haunted laboratory theme.
Step 3: Add Cold Water and Creaminess
Stir in the cold water. Let the mixture cool for 5 to 10 minutes so it is warm but not steaming hot. Then whisk in the evaporated milk or sweetened condensed milk. Add vanilla extract if you want a softer dessert flavor. The mixture should turn cloudy pink, which is exactly the spooky-yet-dessert-friendly look we want.
Step 4: Fill the Brain Mold
Pour the gelatin mixture slowly into the prepared mold. Tap the mold gently on the counter to release air bubbles. If bubbles rise to the top, skim them with a spoon. Air bubbles are not dangerous, but they can make the surface look less smooth when unmolded.
Step 5: Chill Until Firm
Refrigerate the mold for at least 6 hours, though overnight is best. A deep brain-shaped mold needs more time than a shallow pan of gelatin. Patience here is your secret ingredient. If you rush the chill, your brain may collapse, and while that sounds thematically appropriate, it is not the goal.
Step 6: Unmold the Brain Jello
Dip the outside of the mold in warm water for 10 to 15 seconds, being careful not to let water spill onto the gelatin. Place a damp serving platter upside down over the mold, then flip both together. Gently shake or loosen the edges with clean fingers. The brain should release with a satisfying little wobble. If it refuses, dip the mold briefly in warm water again and try once more.
Step 7: Decorate and Serve
For extra Halloween flair, drizzle a little berry syrup or red decorating gel into the grooves of the brain. Keep it playful and appetizing. A glossy raspberry sauce looks spooky without making the dessert too intense. Serve chilled with whipped cream, gummy worms, berries, or vanilla cookies.
Flavor Variations for a Spooky Dessert Table
Classic Pink Brain
Use strawberry gelatin with evaporated milk. This is the most balanced version: fruity, creamy, lightly sweet, and visually perfect for a Halloween brain jello mold.
Zombie Green Brain
Use lime gelatin and evaporated milk for a greenish brain that looks like it has been waiting in a mad scientist’s fridge. Add a few drops of yellow food coloring if you want a murkier monster shade.
Berry Swirl Brain
Before chilling, spoon a few tablespoons of raspberry jam or strawberry syrup into the mold and swirl gently with a skewer. Do not overmix. You want streaks, not a full fruit smoothie situation.
Chocolate-Covered Brain
Make the basic pink brain, unmold it, and drizzle with thin chocolate syrup just before serving. It sounds strange, but chocolate and strawberry gelatin can work well together when the syrup is used lightly.
Kid-Friendly Candy Brain
Add gummy worms around the platter after unmolding instead of inside the gelatin. Candy inside a large gelatin mold can sometimes shift, sink, or create weak spots, so decorating around the finished brain gives you more control.
Tips for the Best Brain Jello Mold Recipe
Use a Mold with Clear Details
A brain mold with deep ridges creates the best final look. Silicone molds release more easily, while plastic molds often give sharper definition. Either can work, but both should be clean, dry, and lightly prepared before filling.
Do Not Over-Oil the Mold
A tiny amount of spray can help release the gelatin, but too much creates greasy patches. Spray lightly, then wipe the mold so only a thin film remains.
Let the Gelatin Cool Before Adding Milk
Adding evaporated milk or sweetened condensed milk to extremely hot gelatin can affect the smoothness of the mixture. Letting the gelatin cool slightly helps create a more even creamy texture.
Chill Longer Than You Think
Large molds need time. Four hours may work for small cups, but a full brain mold is happier with six hours or overnight. Think of it as beauty sleep for dessert.
Avoid Fresh Pineapple, Kiwi, Papaya, Figs, and Guava
Some fresh fruits contain enzymes that can interfere with gelatin setting. If you want fruit on the platter, use berries, grapes, canned fruit, or fruit that has been cooked and cooled first.
Common Brain Jello Mold Problems and Fixes
Problem: The Jello Did Not Set
This usually happens because there was too much liquid, the gelatin was not fully dissolved, or fresh enzyme-rich fruit was added. For this recipe, measure liquids carefully and whisk the gelatin thoroughly in boiling water before adding anything cold.
Problem: The Brain Broke During Unmolding
The gelatin may not have chilled long enough, or the mold may have needed a little more warm-water help. Next time, chill overnight and loosen the edges gently before flipping.
Problem: The Color Looks Too Bright
Add a little more evaporated milk next time for a softer pink. You can also mix strawberry and peach gelatin for a less neon color.
Problem: The Flavor Is Too Sweet
Use evaporated milk instead of sweetened condensed milk. You can also serve the brain with unsweetened whipped cream or fresh berries to balance the sweetness.
Serving Ideas for Halloween Parties
A brain jello mold is already dramatic, but presentation makes it even better. Place it on a black, white, or silver platter so the color stands out. Add a few gummy worms around the base, scatter candy eyeballs nearby, or spoon raspberry sauce into a small bowl labeled “brain sauce” if your guests appreciate theatrical nonsense.
For a full Halloween dessert table, pair the brain jello with chocolate cupcakes, sugar cookies, caramel apples, popcorn balls, and a bowl of fruit. The brain becomes the centerpiece, while the other treats keep the table balanced. It also works well as a make-ahead dessert because you can prepare it the night before and unmold it shortly before serving.
Storage and Make-Ahead Tips
Keep the brain jello mold refrigerated until serving time. Gelatin desserts hold their shape best when cold. If the party is outdoors or the room is warm, display the mold for a shorter time and return leftovers to the refrigerator promptly. A covered container helps prevent the gelatin from absorbing refrigerator odors, because nobody wants strawberry brain with a hint of leftover onion.
You can make this dessert one day in advance for the best texture. Two days ahead can also work, but the surface may begin to collect moisture. For the cleanest presentation, unmold it the day you plan to serve it.
of Real-Life Experience: Making a Brain Jello Mold Without Losing Your Mind
The first thing you learn when making a brain jello mold is that the recipe is easy, but the drama is built in. The bowl looks innocent. The whisking feels normal. Then you pour the creamy pink mixture into a brain-shaped mold and suddenly your kitchen looks like it is preparing snacks for a friendly cartoon monster. That is part of the charm. This dessert has personality before it even sets.
One helpful experience tip is to put the empty mold on a small tray before pouring in the liquid. A filled gelatin mold is wobbly, slippery, and emotionally unpredictable. If you try to carry it across the kitchen without support, you may discover new dance moves. A tray keeps everything steady and saves you from explaining why the refrigerator shelf is wearing strawberry gelatin.
Another lesson: overnight chilling is worth it. Many recipes say gelatin can set in four hours, and that is true for thinner desserts. But a brain mold is deeper, and the center needs time to firm up. When I have chilled large molds for only a few hours, the outside looked ready while the inside still had the confidence of a puddle. Overnight chilling gives the whole dessert structure, which makes unmolding much less stressful.
The unmolding moment is the big finale. It feels like a tiny kitchen magic trick. Warm water helps loosen the outside, but restraint is important. Too long in warm water can melt the details. Start with 10 seconds, flip, and wait. Sometimes the gelatin releases immediately. Sometimes it pauses dramatically like it has a contract with reality television. If it does not release, use another short dip in warm water rather than shaking it like a maraca.
Serving is where the fun really begins. A brain jello mold always gets a reaction. Kids laugh, adults take photos, and at least one person pretends to be disgusted while reaching for a spoon. The best version is spooky but still appetizing. A little berry syrup in the grooves looks festive; too much can make the dessert look messy. Think “Halloween party centerpiece,” not “crime scene buffet.”
Flavor matters more than people expect. Because the mold gets attention for its appearance, it is tempting to treat taste as an afterthought. Do not. Strawberry, raspberry, and cherry are reliable choices because they pair nicely with the creamy ingredient. Evaporated milk keeps the flavor lighter, while sweetened condensed milk makes it richer and sweeter. For a party with lots of candy, evaporated milk is usually the better balance.
The final experience tip is simple: make it once before the big event if presentation matters. A test run teaches you how your specific mold releases, how long your refrigerator needs, and how much decoration looks right. Even if the first one is imperfect, it will still taste good. Besides, a slightly lopsided brain jello mold is not a failure. It is just a dessert with character, and possibly a backstory.
Conclusion
This Brain Jello Mold Recipe is the kind of Halloween dessert that proves food can be fun without being complicated. With flavored gelatin, a creamy ingredient, a sturdy mold, and enough chilling time, you get a spooky centerpiece that tastes fruity, smooth, and party-ready. The key is balance: firm but not rubbery, creepy but still cute, dramatic but not difficult. Make it ahead, unmold it carefully, decorate it with a light hand, and let the wobble do the talking.
Note: This article synthesizes practical gelatin mold methods, unmolding tips, gelatin dessert customization ideas, fruit-and-gelatin science, and refrigerated food-safety guidance from reputable recipe and food-safety resources including Kraft Heinz/Jell-O, Food Network, Betty Crocker, Allrecipes, McGill Office for Science and Society, FDA, and USDA FSIS.


