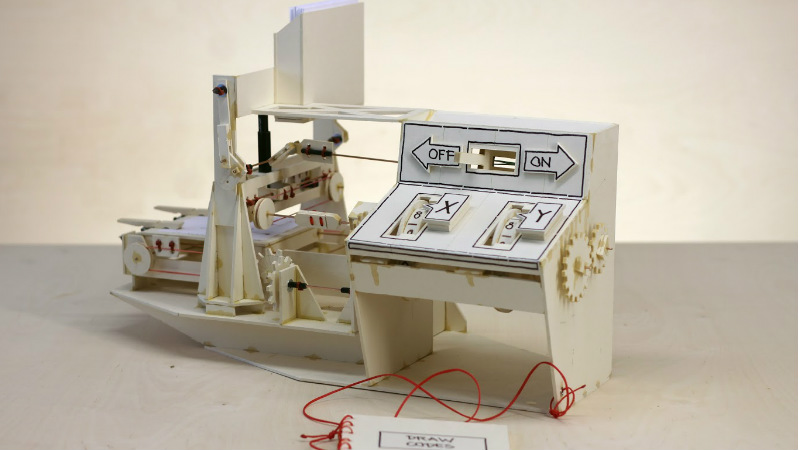

Some machines arrive wearing brushed aluminum, precision bearings, and a price tag that makes your wallet whisper, “Please don’t.” Then there is the tiny plotter made of strings and cardboard: a charming little reminder that invention does not always need a factory floor. Sometimes it needs a hobby knife, a pen, a few pieces of stiff board, a suspicious amount of tape, and the courage to believe that cardboard can behave like engineering material if you ask nicely.
The idea sounds almost too simple. A plotter is a machine that moves a pen across a surface to draw lines, shapes, letters, or artwork. Commercial pen plotters can be precise, polished, and powerful. But a DIY cardboard plotter turns the same basic principle into something more approachable. It strips the machine down to its bones: motion, control, tension, friction, and the delightful drama of getting a pen to obey.
The title “Tiny Plotter Is Made Of Strings And Cardboard” captures exactly why maker culture is so addictive. It is not just about building a drawing robot. It is about proving that familiar materials can become unfamiliar machines. Cardboard becomes a frame. String becomes a motion system. A pen becomes an output tool. Suddenly the junk drawer has ambitions.
What Is a Tiny Cardboard Plotter?
A tiny cardboard plotter is a small drawing machine built from lightweight, inexpensive materials. Instead of relying on heavy metal rails or commercial CNC hardware, it may use cardboard, wood-pulp board, welding rods, rubber bands, string, glue, tape, and basic mechanical linkages. Some versions are fully manual, using dials or sliders to move a pen. Others use motors, microcontrollers, and software to turn digital designs into physical drawings.
At its core, a plotter needs only three jobs: move the pen in one direction, move either the pen or paper in another direction, and lift or lower the pen at the right moments. That is the whole magic trick. Everything else is refinement. Better rails improve accuracy. Better motors improve repeatability. Better software improves control. Better cardboard improves the odds that the machine survives longer than one enthusiastic afternoon.
The famous cardboard plotter associated with artist and maker Niklas Roy showed how far this idea can go. Built from Finnish cardboard, welding rod, super glue, adhesive tape, and tie wraps, it used an all-cardboard interface with dials and a switch. One dial controlled pen movement, another moved the table, and the switch raised or lowered the pen. It was part machine, part art object, and part educational punchline: yes, a “computer-controlled” drawing device can be made from humble stuff.
Why Strings and Cardboard Actually Work
Cardboard has a bad reputation because people picture shipping boxes that collapse under a damp sneeze. But not all cardboard is created equal. Dense paperboard, chipboard, mat board, corrugated sheet, and Finnish cardboard can be surprisingly stiff when cut and layered properly. Add folds, ribs, tabs, and glue, and cardboard starts behaving less like packaging and more like lightweight structure.
Strings are just as underrated. In a plotter, string can transmit motion, create tension, suspend a pen carriage, or pull a sliding mechanism. A string-based drawing robot may look fragile, but tensioned lines can be stable enough for low-speed plotting. The trick is to keep the string taut, reduce stretching, avoid slippage, and design the moving parts so the pen does not wobble like it had too much coffee.
The Physics Behind the Fun
A tiny cardboard plotter is a physics lesson pretending to be a craft project. It teaches mechanical advantage, coordinate systems, friction, backlash, material stiffness, and calibration. If the string stretches, the line curves. If the cardboard bends, the pen drifts. If the pen presses too hard, the machine drags. If the pen barely touches the paper, the drawing looks like it was made by a ghost with commitment issues.
That is what makes these machines so useful for learning. A polished commercial machine hides its engineering problems behind excellent design. A cardboard plotter exposes them. You can see the axle flex. You can hear the string slip. You can watch the pen hesitate at corners. Every flaw is visible, which means every improvement is understandable.
How a String-and-Cardboard Plotter Draws
There are two common ways to think about a tiny DIY plotter. The first is an X-Y plotter, where one axis controls left-right motion and the other controls up-down or paper movement. The second is a polargraph-style plotter, where a pen is suspended by two strings from upper corners. By changing the length of each string, the machine positions the pen across a vertical drawing surface.
In a simple cardboard X-Y plotter, the machine may move the paper under a fixed pen while the pen slides across another axis. This approach resembles the logic of old desktop plotters and printers. It is mechanically friendly because each axis has a fairly clear job. The challenge is making the cardboard rails smooth enough that the movement does not bind.
In a string-based polargraph, two motors or pulleys control the pen carriage. Shorten the left string and lengthen the right string, and the pen moves left. Adjust both together, and it moves up or down. This style scales beautifully because the drawing area can be enlarged by moving the anchor points farther apart and using longer strings. The tradeoff is math. The machine must translate normal X-Y coordinates into string lengths, which is where software earns its snacks.
Materials That Make Sense
A practical tiny plotter made of strings and cardboard does not need exotic parts. The basic structure can be made from stiff cardboard, foam board, mat board, or wood-pulp board. For smoother motion, builders often add metal rods, bamboo skewers, drinking straws, plastic tubes, bearings, rubber bands, or thread spools. The pen holder can be as simple as folded board with a rubber band, though a more stable holder gives cleaner lines.
For an electronic version, common parts include an Arduino-compatible board, stepper motors, motor drivers, a small servo for pen lift, a USB cable, and basic power. Software may convert vector files into G-code or another motion format. Open-source CNC tools such as GRBL are popular because they allow low-cost microcontrollers to interpret motion commands. In other words, a humble cardboard machine can share some DNA with desktop CNC routers and laser cutters, minus the smoke, danger, and stern safety lecture.
Useful Material Choices
For the frame, use the stiffest board available. Corrugated cardboard is easy to find, but it may flex unless doubled or reinforced. Mat board and chipboard are cleaner for precise cuts. For strings, choose thread or cord that does not stretch much. Fishing line can work, but it may slip on smooth pulleys. Braided cord grips better but can add friction. For rails, smooth metal rods or wooden dowels are better than raw cardboard edges.
The pen matters more than beginners expect. Ballpoint pens require pressure and may drag. Felt-tip pens draw easily but can bleed. Gel pens look beautiful but sometimes skip. Fine liners are excellent for plotter art, though they can dry if left uncapped during long experiments. The best pen is usually the one that makes a strong mark with minimal pressure.
From Manual Machine to Drawing Robot
One of the most appealing things about a cardboard plotter is that it can begin as a manual project. Turn a dial, move the pen, lower the tip, draw a line. This version is perfect for classrooms because it makes coordinates tangible. Students do not just hear that a point has an X and Y value; they physically dial those values into existence.
Once the manual idea works, automation becomes the next adventure. Stepper motors can replace hand dials. A servo can lift the pen. Software can send coordinates. Suddenly the plotter can draw logos, line art, handwriting, geometric patterns, or low-resolution illustrations. The same machine that once drew a wobbly square can now produce surprisingly elegant artwork, assuming the builder has bribed the calibration gods.
Why Makers Love Low-Cost Plotters
DIY pen plotters are popular because they sit at the intersection of art, robotics, coding, and mechanical design. They are less intimidating than 3D printers and CNC routers, yet they teach many of the same concepts. There is no hot nozzle, spinning bit, resin vat, or suspicious smell. The output is immediate and friendly: a line on paper.
A cardboard plotter is especially inviting because failure is cheap. If a part bends, cut another. If the frame is crooked, reinforce it. If the pen holder looks like a raccoon assembled it during a power outage, laugh and make version two. Low-cost materials reduce fear. That matters because beginners learn faster when mistakes do not feel expensive.
Educational Value
For STEM education, a tiny cardboard plotter is a compact lesson plan. It introduces coordinate geometry, vector graphics, mechanical tolerances, microcontroller programming, tool paths, and iterative design. For art students, it demonstrates how machines can become collaborators. For hobbyists, it provides a gateway into CNC thinking without needing a garage full of equipment.
The project also teaches a deeper lesson: digital fabrication is not only about expensive tools. It is about relationships between design and motion. A plotter receives instructions, translates them into movement, and leaves a physical trace. Whether the frame is aluminum or cardboard, that basic process is the same.
Common Problems and Clever Fixes
The first problem is flex. Cardboard bends under load, especially when the pen presses down. The fix is reinforcement. Use folded beams, double layers, triangular braces, or glued ribs. A flat sheet is floppy; a folded channel is much stronger. Cardboard loves geometry.
The second problem is friction. Sliding cardboard against cardboard can feel like dragging furniture across carpet. Use smooth rods, straws, tape-covered surfaces, or small wheels where possible. Reduce pen pressure and keep moving parts light.
The third problem is backlash, which happens when a mechanism changes direction and slack appears before motion resumes. Strings, loose joints, and flexible frames can all create backlash. Keep tension consistent, shorten unsupported spans, and avoid floppy connections.
The fourth problem is calibration. A machine may draw circles as eggs, squares as emotional rectangles, or straight lines as scenic routes. Calibration means measuring the real output, adjusting the software or geometry, and trying again. This is not a failure. This is the machine introducing itself.
Specific Examples of What It Can Draw
A tiny plotter made of strings and cardboard is best suited for line-based artwork. It can draw simple logos, block letters, geometric spirals, maze patterns, single-line portraits, technical diagrams, labels, greeting cards, and abstract generative art. With careful tuning, it can reproduce vector drawings exported from design software. With less careful tuning, it can produce what one might generously call “experimental robot handwriting.”
Low-resolution vector graphics are especially appropriate. The fewer pen lifts and sharp corners, the happier the machine will be. Continuous-line drawings are perfect because they reduce the need for a precise pen-lift mechanism. Repeating patterns also work well because small errors can become part of the visual style rather than obvious mistakes.
What This Project Says About Design
The charm of a cardboard plotter is not that it beats a commercial plotter. It does not. A professional machine like an AxiDraw is designed for precision, repeatability, and polished output. A cardboard plotter is designed for discovery. Its purpose is not to replace professional tools but to reveal how they work.
That distinction is important. The tiny plotter is a prototype, a teaching object, and a creative instrument. It invites questions. How much stiffness is enough? How does string tension affect accuracy? What happens when the pen angle changes? Can a paper machine produce digital art? Why does the word “simple” always disappear the moment calibration begins?
Good design is not always about hiding complexity. Sometimes it is about exposing complexity in a way that people can touch, repair, and understand. A plotter made of strings and cardboard does exactly that.
Hands-On Experience: Building and Using a Tiny Cardboard Plotter
The first experience anyone should expect with a tiny cardboard plotter is humility. On paper, the machine looks simple. In your hands, it becomes a tiny negotiation between ambition and gravity. You cut the frame, glue the supports, thread the strings, mount the pen, and think, “This will probably work.” Then the pen digs into the paper, the string slips, the cardboard bows, and the machine draws a diagonal line that looks personally offended.
That is the moment the project becomes interesting. You begin to notice details you ignored at the start. The pen holder needs to grip the pen without squeezing it at an angle. The drawing surface must stay flat. The string must pull smoothly, not scrape against a rough cardboard corner. The pen should touch the paper lightly, almost politely. Every tiny adjustment changes the result.
One practical lesson is to build smaller than your dreams at first. A large plotter sounds exciting, but a small one is easier to debug. Shorter strings stretch less. Smaller frames flex less. Shorter travel makes problems easier to see. A postcard-sized drawing area may not sound heroic, but it lets you learn the machine’s behavior before scaling up.
Another useful experience is testing with simple shapes. Do not begin with a detailed portrait, a city map, or your favorite pet rendered in 9,000 tiny strokes. Start with dots, lines, squares, triangles, and circles. A square tells you whether the axes are straight. A circle tells you whether scaling is even. A repeated zigzag reveals backlash. These boring tests are the vegetables of plotter building: not glamorous, but they help the final artwork grow up strong.
The funniest part is that the plotter develops a personality. Some machines are cautious and slow. Some are jittery. Some make corners with confidence but panic during curves. A cardboard plotter may creak, wobble, and sigh its way through a drawing, yet the final result has a handmade charm that polished machines often lack. The imperfections are not always defects. Sometimes they are the signature of the machine.
If children or students are involved, the experience becomes even better. They immediately understand that the machine is not magic. They can see the string pulling, the pen moving, and the structure flexing. When the drawing fails, they suggest fixes. Add tape. Tighten the string. Move the pen. Reinforce the frame. The project turns troubleshooting into play, which is exactly how engineering should be introduced.
For adult hobbyists, the project is a refreshing break from overcomplicated builds. You do not need a perfectly organized workshop. You need patience, curiosity, and the willingness to cut another cardboard bracket when the first one looks like modern sculpture. The experience is tactile and forgiving. It reminds you that prototyping is supposed to be messy.
The biggest lesson is that precision is not a single part; it is a system. Better motors will not save a floppy frame. Strong cardboard will not fix a loose string. Beautiful software will not help if the pen drags. A tiny plotter teaches the builder to think in systems, where materials, mechanics, electronics, and code all affect the final line.
By the time the machine completes its first recognizable drawing, the satisfaction is enormous. It may be a crooked star, a blocky “Hello World,” or a geometric pattern with one suspicious corner. It does not matter. The pen moved because you built a machine that told it where to go. That feeling is the whole point.
Conclusion
A tiny plotter made of strings and cardboard is more than a quirky maker project. It is a compact demonstration of how machines think, move, fail, and improve. It proves that useful ideas can be tested with cheap materials and that engineering does not have to begin with expensive parts. It can begin with cardboard on a desk, string in your hand, and a pen waiting to become a robot’s voice.
For beginners, this project is a friendly doorway into robotics, CNC motion, and digital fabrication. For teachers, it is a hands-on way to explain coordinates and mechanics. For artists, it is a charming tool for imperfect, machine-assisted drawing. For experienced makers, it is a reminder that creativity often shows up wearing tape and glue.
The tiny cardboard plotter may never replace a professional pen plotter, but it does something just as valuable: it makes the invisible logic of machines visible. And it does so with materials that might otherwise be headed for the recycling bin. That is not just clever. That is wonderfully, stubbornly, cardboard-powered genius.


