
Note: This article is written for educational maker inspiration. Any hands-on electronics work should use low-voltage parts, careful battery handling, and basic safety practices.
Somewhere in a closet, thrift store bin, or dusty garage shelf, a 1990s toy computer is waiting for its second act. It may have a plastic clamshell case, a tiny LCD screen, a cheerful “learning mode,” and a keyboard that once promised to turn kids into miniature office workers before they could spell “spreadsheet.” These devices were sold as educational toys, but many of them were surprisingly close to real computers in spirit: keyboards, displays, speakers, simple processors, cartridges, programming lessons, math quizzes, typing games, and enough beige plastic to summon an entire decade.
Repurposing a toy computer from the 1990s is not just nostalgia with a screwdriver. It is a practical retro computing project, a sustainable electronics reuse idea, and a creative way to build something that feels personal. Instead of buying a brand-new case for a Raspberry Pi, microcontroller, or DIY cyberdeck, makers can transform a vintage toy laptop into a writing terminal, portable retro game machine, serial console, music controller, distraction-free note-taking device, or conversation-starting desk ornament that actually works.
Why 1990s Toy Computers Are Perfect For Repurposing
The 1990s were a golden age for educational electronics. Companies like VTech, Tiger Electronics, Texas Instruments, Casio, and others made learning machines that looked like tiny business laptops. Children could practice spelling, math, geography, typing, and sometimes even basic programming. Models such as the VTech PreComputer line and Power Pad-style learning computers mixed play with a beginner-friendly version of computing culture.
That design makes them unusually attractive to modern tinkerers. First, many have a built-in keyboard. Even if the original electronics are dead, the keyboard matrix can often be reused with a microcontroller. Second, their cases already have room for batteries, circuit boards, speakers, and displays. Third, the styling is charmingly retro. A 1990s toy computer looks like the prop department for a low-budget science-fiction show accidentally designed a school supply. That is not an insult. That is exactly the point.
Unlike many modern gadgets, older toy computers are often easy to open with standard screws. Inside, you may find through-hole components, ribbon cables, a small speaker, membrane key contacts, and a simple LCD. Some devices are too historically interesting to gut, especially if they still work and are rare. But broken, incomplete, or common units can be excellent candidates for an upcycling electronics project.
Start With A Sensible Donor Machine
The best vintage toy laptop for a project is not always the prettiest one. Look for a machine with a sturdy hinge, a comfortable keyboard, enough internal space, and plastic that has not become brittle. Missing battery covers, faded stickers, dead screens, and broken educational software are not deal-breakers. A cracked hinge, melted battery compartment, or warped case may be more trouble than it is worth.
Before modifying anything, test it. Insert fresh batteries only after inspecting the battery terminals. Many 1990s toys spent years with alkaline batteries inside, and battery corrosion can leave white or greenish residue around contacts. Remove batteries carefully, brush away loose corrosion with a soft brush, and avoid touching residue with bare hands. If the toy powers on, consider whether it should be preserved as-is. A working PreComputer-style unit with original manuals may be more valuable as a collectible than as a cyberdeck shell.
If the toy is already dead, the decision becomes easier. You can still save the case, keyboard, speaker grille, buttons, and even decorative badges. Repurposing does not mean everything inside must be replaced. The smartest builds reuse what already works and only upgrade what limits the project.
Project Idea 1: Turn It Into A Raspberry Pi Toy Computer
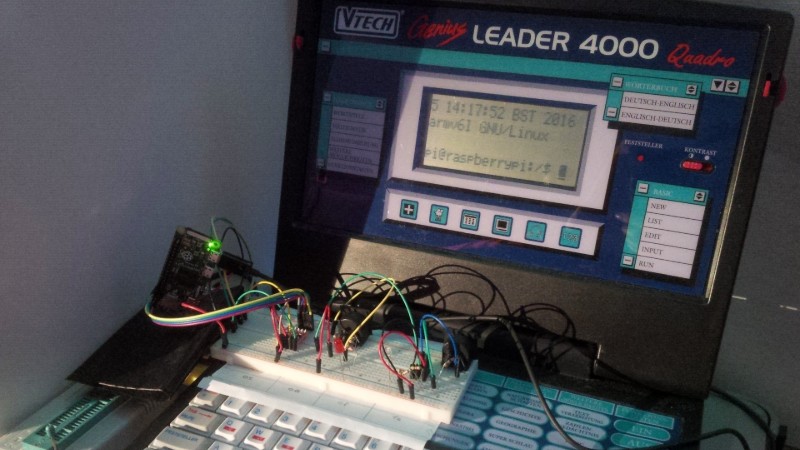
The most popular approach is to install a Raspberry Pi inside the old toy computer case. A Raspberry Pi Zero, Zero 2 W, or similar single-board computer is small enough for many plastic shells and powerful enough for writing, coding, simple web tasks, retro emulation, terminal work, or lightweight Linux projects.
A typical Raspberry Pi toy computer build includes a small LCD or HDMI display, a USB keyboard interface, a rechargeable battery pack, a power switch, and software configured for the intended use. Some makers build a full DIY cyberdeck: a portable computer assembled from separate parts, designed more for personality and utility than mass-market polish. In this role, the 1990s toy shell becomes the star of the show. It gives the project a shape, a story, and a face.
The biggest challenge is space planning. Before cutting plastic, place the screen, Pi, battery, charging board, cables, and keyboard controller inside the shell. Close the lid gently. If it sounds like a plastic sandwich being crushed, revise the layout. A successful build is boringly practical on the inside and delightfully weird on the outside.
Project Idea 2: Reuse The Original Keyboard
The keyboard is often the most rewarding part to salvage. Many toy computers use a keyboard matrix, which means keys are arranged in rows and columns. Instead of giving every key its own wire, the circuit scans combinations of rows and columns to detect which key is pressed. This saves pins and keeps wiring manageable.
A microcontroller such as an Arduino-compatible board, Raspberry Pi Pico, RP2040 board, Teensy, or Pro Micro can read the matrix and send keystrokes to the Raspberry Pi or another computer. Some boards can behave as USB HID devices, meaning the host computer sees them as a regular keyboard. This is a clean way to keep the original keyboard and make the finished machine feel authentic.
Mapping the keyboard takes patience. You identify the row and column pins, press each key, record the result, and build a keymap in code. It is part detective work, part meditation, and part “why does the letter K think it is the Enter key?” The payoff is huge: the toy keeps its original tactile personality while gaining modern functionality.
Project Idea 3: Build A Distraction-Free Writing Terminal
Not every repurposed toy computer needs to browse the web, play games, and pretend to be a tiny laptop from the future. One of the best uses is a distraction-free writing terminal. Pair a small screen with a lightweight Linux setup, terminal text editor, or simple note-taking application. Add a mechanical or membrane keyboard interface, configure auto-save, and you have a quirky little writing machine.
This kind of build suits the personality of a 1990s educational computer. The original device probably taught typing, spelling, or basic logic. Turning it into a modern writing terminal feels like a respectful upgrade. It still helps someone put words on a screen, only now those words can become blog posts, code notes, fiction drafts, or project logs instead of answers to “Which state is shaped like a mitten?”
Project Idea 4: Make A Retro Game Or Emulation Machine
A 1990s toy computer case can also become a retro gaming station. A Raspberry Pi running emulation software can power classic console games, text adventures, or BASIC interpreters. The keyboard makes it especially good for old computer-style games, command-line adventures, and educational software recreations.
For this type of project, screen choice matters. A tiny original LCD may be charming but too limited for modern output. A replacement display, such as a small HDMI or SPI screen, usually makes the project more usable. Some builders preserve the original screen window and mount a modern display behind it. This keeps the vintage look while avoiding the tragic experience of trying to read Linux on a display designed for three quiz answers and a blinking turtle icon.
Project Idea 5: Create A Music, MIDI, Or Shortcut Controller
If the case is small or the keyboard is unusual, consider turning the toy computer into a controller instead of a full computer. A microcontroller can convert keys into MIDI notes, macro shortcuts, media controls, or programmable hotkeys. The built-in speaker grille can hide a small buzzer, amplifier, or status LED. Extra buttons can trigger samples, launch apps, control streaming software, or switch scenes in creative workflows.
This is a great option when the original keyboard is fun but not comfortable enough for long writing. A toy computer full of labeled quiz buttons, number keys, and brightly colored controls can become a wonderfully strange command center. It is like giving your desk a control panel from a children’s spaceship.
What Parts You May Need
Core Electronics
For a full computer build, you may need a Raspberry Pi Zero 2 W, Raspberry Pi 4, Raspberry Pi 5, or another compact single-board computer. For keyboard-only or controller projects, a microcontroller such as a Raspberry Pi Pico, Arduino-compatible board, or RP2040 board may be enough. Choose the simplest board that meets your goal. Overbuilding is fun, but it also creates heat, wiring clutter, and battery problems.
Display
Common display choices include small HDMI screens, composite displays, SPI TFT screens, or e-paper displays. HDMI is often easier for Linux, while SPI screens can save space but require more configuration. E-paper looks beautiful for writing terminals and low-power dashboards, but it is not ideal for fast animation.
Power
Battery power is where many projects become messy. Use reliable rechargeable battery modules, proper charging circuits, and protection boards. Avoid random lithium cells of unknown origin. If you are new to electronics, start with USB power or a commercial power bank before building an internal battery system. A toy computer that smells like hot plastic is not “retro.” It is a warning sign.
Tools
Useful tools include small screwdrivers, a multimeter, flush cutters, soldering equipment, heat-shrink tubing, jumper wires, plastic spudgers, and a label maker or masking tape for marking wires. A 3D printer can help create brackets, but it is not required. Cardboard templates, standoffs, epoxy putty, and patience can also perform minor miracles.
How To Approach The Build Step By Step
1. Document Before Disassembly
Take photos before removing boards, screws, wires, and membranes. Photograph every connector. Keep screws in labeled containers. The future version of you will be very grateful, because the future version of you will not remember which tiny black screw went under the speaker bracket.
2. Decide What To Preserve
Choose what matters most: the original keyboard, the outer case, the display window, the speaker grille, the battery compartment, or the logo. A project becomes cleaner when it has priorities. If you try to preserve everything and upgrade everything, you may create a plastic puzzle with a charging port.
3. Test The Keyboard Matrix
Use a multimeter in continuity mode to identify rows and columns. Press keys and record which pins connect. Once mapped, connect the matrix to a microcontroller and test key detection in a simple program. Do not build the entire machine before confirming the keyboard works. That is how people learn new vocabulary, most of it unsuitable for a family-friendly blog.
4. Fit The Screen
Measure the original display area and decide whether to enlarge it or hide a modern screen behind the existing window. Cutting plastic is permanent, so go slowly. Many builders use painter’s tape to mark cut lines and a file to refine edges. A slightly smaller screen mounted neatly usually looks better than a larger screen installed with the confidence of a raccoon opening a snack bag.
5. Plan Cable Paths And Heat
Short cables are neat, but cables that are too short make repairs miserable. Leave enough slack to open the case. Keep power circuits secure. Make sure the processor has ventilation if it runs warm. Old toy cases were not designed for modern processors, so thermal planning matters.
6. Install Software Around The Purpose
A writing terminal may boot into a text editor. A cyberdeck may launch a terminal dashboard. A retro machine may start in an emulator menu. A controller may need only firmware. The more focused the software, the more finished the project feels.
Preservation Versus Modification
One important question is whether you should modify a working vintage toy computer at all. Some older educational computers are collectible, especially with manuals, boxes, or unusual programming features. If the unit works, consider reversible modifications. Use existing screw posts. Avoid cutting rare parts. Save original boards in a labeled bag. Another maker, collector, or museum-minded hobbyist may thank you someday.
For broken or common units, modification is easier to justify. Repurposing keeps plastic out of the waste stream and gives old electronics a new life. Even when the original circuit board cannot be saved, the case, keys, and mechanical design still have value. Sustainable making is not only about recycling materials. It is also about respecting the design work already embedded in objects.
Common Mistakes To Avoid
The first mistake is buying parts before measuring the case. The second is assuming the original keyboard will behave like a modern USB keyboard without extra work. The third is ignoring power. A build that works beautifully on the bench may fail once it is squeezed into a case with a battery, charger, screen, and cables.
Another mistake is trying to make the device do everything. A 1990s toy computer shell is not a modern ultrabook. It does not need to edit 4K video, mine cryptocurrency, and host a web server while playing chiptunes. Pick one delightful purpose and build toward it. The best projects feel intentional, not overloaded.
Why This Project Still Feels Magical
Repurposing a toy computer from the 1990s works because it blends two powerful emotions: nostalgia and usefulness. The object already has character. It reminds people of school desks, AA batteries, pixelated icons, typing drills, and the optimistic belief that a plastic laptop could prepare you for the future. By installing modern electronics, you complete the promise that the toy only hinted at.
There is also something wonderfully funny about turning a child’s spelling machine into a Linux terminal. The case says “practice multiplication.” The inside says “SSH into a server.” That contrast is the charm. It is not sleek. It is not minimalist. It is better than that: it has a story.
Personal Experience: What It Feels Like To Repurpose A 1990s Toy Computer
The first thing you notice when working on a 1990s toy computer is the smell. Not a bad smell, exactlymore like old plastic, cardboard boxes, and a childhood bedroom that has been sealed in a time capsule. The second thing you notice is how optimistic the design feels. Every button has a purpose. Every sticker promises improvement. Even the tiny speaker seems ready to congratulate you for successfully identifying a synonym.
Opening one of these machines is a small lesson in humility. From the outside, it may look simple. Inside, it becomes a layered puzzle of screws, plastic posts, rubber membranes, ribbon cables, and circuit boards shaped to fit around the case. The designers were not wasting space. They were building to a price, to a toy-safety standard, and to a fantasy: “What if a kid could have a computer of their own?”
During a repurposing project, the emotional tug-of-war starts quickly. Part of you wants to preserve everything. Another part wants to cut a perfect rectangle for a modern screen. You may spend half an hour holding a Raspberry Pi over different corners of the case, pretending this is engineering and not advanced fidgeting. Then, suddenly, the layout makes sense. The screen fits behind the old window. The keyboard wires reach the microcontroller. The speaker grille lines up with a tiny amplifier. The toy begins to feel like a real machine again.
The keyboard mapping stage is where patience earns its badge. You press a key, check continuity, write down a row and column, and repeat. At first it is boring. Then it becomes satisfying. Each discovered key feels like restoring a tiny piece of the original personality. When the first letter appears on a modern screen from a 30-year-old keyboard, it feels absurdly triumphant. It is just one character, but it proves the past and present are talking.
The best moment comes near the end, when the case closes. Not permanently, of course, because you will absolutely reopen it after forgetting one cable. But when it finally closes cleanly and powers on, the project changes from “pile of parts” to “object with a soul.” Friends understand it immediately. They may not care about GPIO pins or keyboard firmware, but they understand the joke and the charm: this toy computer grew up.
That is why these projects are so satisfying. They are not only about performance. A modern tablet is faster, thinner, and easier to use. But a repurposed 1990s toy computer is more memorable. It carries scratches, faded labels, odd key shapes, and the design language of an era that thought computers were both serious tools and magical educational companions. Giving that object a new purpose feels like repairing a small piece of technological history and letting it join the present on its own wonderfully awkward terms.
Conclusion
Repurposing a toy computer from the 1990s is one of the most charming DIY electronics projects you can build. It combines retro computing, sustainability, practical hardware skills, and a healthy appreciation for plastic gadgets that once taught spelling with the confidence of a tiny robot teacher. Whether you create a Raspberry Pi toy computer, a DIY cyberdeck, a writing terminal, a MIDI controller, or a retro gaming machine, the key is to respect the original design while giving it a clear new job.
The best builds are not necessarily the most powerful. They are the ones that preserve the personality of the toy while making it useful again. A 1990s learning laptop may never compete with a modern computer, but that is not the goal. The goal is to turn forgotten hardware into something fun, functional, and full of character. In a world of identical screens, a repurposed toy computer is a reminder that technology can still make people smile before it even boots.


