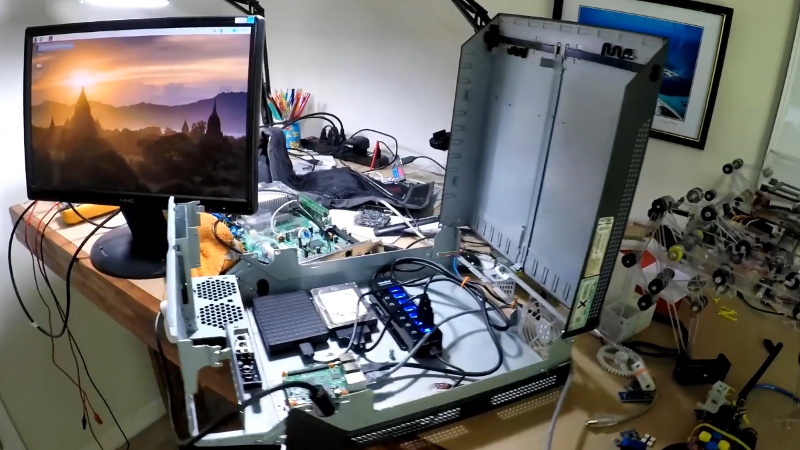

An old desktop PC can spend years gathering dust, occupying roughly the same amount of space as a small ottoman while contributing considerably less to society. Before sending it to the recycling center, however, consider giving its case a second career. A Raspberry Pi NAS built inside a donor PC combines modern, low-power computing with the drive bays, airflow, sturdy construction, and satisfying abundance of screws found in traditional desktop hardware.
The idea is wonderfully practical: remove the obsolete motherboard and processor, retain the enclosure, and install a Raspberry Pi alongside several storage drives. The result looks like an ordinary computer from the outside but operates as a compact network-attached storage server on the inside. It is part restoration project, part home-lab experiment, and part excuse to avoid organizing the box labeled “miscellaneous computer cables.”
The Donor PC NAS That Inspired the Idea
One widely shared version of this project used an older Lenovo desktop as the donor machine. After the original components were removed, the builder installed a Raspberry Pi, two hard drives, and a powered USB hub inside the spacious metal enclosure. A custom 3D-printed mount kept the Raspberry Pi elevated and prevented the underside of the board from touching the conductive case.
That electrical isolation is not a decorative detail. A Raspberry Pi is normally installed on plastic standoffs or inside a purpose-built enclosure. Placing it directly against bare sheet metal can create a short circuit faster than you can say, “I’m sure this electrical tape will hold.” Nylon standoffs, a printed bracket, or a properly secured nonconductive mounting plate should therefore be considered essential.
The donor PC case also solves several problems that appear when a DIY NAS grows beyond one portable drive. It provides proper 2.5-inch or 3.5-inch mounting locations, space for a powered hub or SATA adapter, convenient cable-routing channels, and fan mounting points. Instead of balancing drives beside the Pi like a dangerous game of storage Jenga, everything can live in one serviceable enclosure.
Why Build a Raspberry Pi NAS in an Old PC Case?
Better Physical Protection
Bare circuit boards and loose hard drives are vulnerable to accidental knocks, pulled cables, curious pets, and beverages that have no business being near electronics. A desktop chassis protects the equipment while keeping connections out of sight. It also makes the finished Raspberry Pi NAS easier to move without disconnecting half the household’s digital history.
Real Drive Bays
Conventional PC cases were designed to hold storage devices securely. The drive cages help prevent unnecessary movement, and many enclosures include rubber grommets or mounting rails that reduce vibration. This matters more when several mechanical hard drives are operating together.
NAS-oriented hard drives are designed for sustained workloads and multi-drive environments. Many models include firmware and vibration-management features intended for equipment that remains powered on for long periods. A desktop drive can still be useful in a light-duty home server, especially when repurposing hardware, but purpose-built NAS drives are generally the stronger choice for a new multi-drive installation.
Cooling Without a Tiny Wind Tunnel
Raspberry Pi boards and storage drives both benefit from controlled airflow. A donor case can use a slow 80 mm, 92 mm, or 120 mm fan instead of relying on a tiny high-speed fan with the acoustic charm of an irritated mosquito. The goal is not to turn the enclosure into a refrigerated warehouse. A gentle path that brings cool air across the drives and exhausts warm air is usually enough.
Choosing the Raspberry Pi and Storage Hardware
Raspberry Pi 4: Still a Capable File Server
A Raspberry Pi 4 remains a practical foundation for a basic home NAS because it provides Gigabit Ethernet and two USB 3.0 ports. Those interfaces allow external SSDs or hard drives to deliver speeds suitable for computer backups, shared documents, photo libraries, and direct-play media streaming. Official Raspberry Pi hardware documentation confirms that the Pi 4 includes USB 3.0 connectivity, while official NAS guidance recommends wired Ethernet for the best network performance.
On a Gigabit network, the connection itself has a raw theoretical ceiling of 125 megabytes per second. Protocol overhead, drive performance, USB adapters, filesystem activity, and client hardware reduce the number seen during actual transfers. Well-configured Raspberry Pi 4 NAS builds can nevertheless reach speeds that are close enough to Gigabit Ethernet’s practical limit for large sequential files, although small-file workloads are normally slower. Community tests have reported results ranging from tens of megabytes per second to around 100 megabytes per second under favorable conditions.
Raspberry Pi 5: More Headroom and NVMe Options
A Raspberry Pi 5 offers substantially more processing performance, two USB 3.0 ports, Gigabit Ethernet, and a PCI Express interface. With an M.2 HAT+, it can connect to an NVMe SSD and can even boot from that drive. Raspberry Pi states that its official M.2 HAT+ supports transfers of up to 500 MB/s through the Pi 5’s PCIe 2.0 interface. The network will still limit ordinary Gigabit file transfers, but NVMe storage can make the operating system, databases, containers, and local services feel more responsive.
One sensible arrangement is to use an NVMe SSD for the operating system and applications while reserving the larger hard drives for shared data. This separates frequent system writes from the main storage pool and avoids depending entirely on a microSD card for an always-on server.
Powering Multiple Drives Correctly
Power is one of the most important design decisions. Portable SSDs and some 2.5-inch drives may operate from USB power, but multiple drives can exceed what the Raspberry Pi can reliably provide. The official Raspberry Pi NAS tutorial places external storage on a powered USB hub rather than asking the Pi to supply all drive power itself.
For 3.5-inch hard drives, use a powered SATA-to-USB enclosure, a suitable multi-bay adapter, or a properly wired independent power supply. Reusing the donor computer’s ATX power supply is possible, but it requires careful control of startup behavior, grounding, connectors, and load requirements. Builders without experience working with power supplies should choose a commercial powered storage adapter. Saving a few dollars is less exciting when the NAS begins producing smoke signals.
Installing the Hardware Inside the Donor PC
Begin by removing the obsolete motherboard, expansion cards, and unnecessary cabling. Keep the drive cages, case fans, power button, front-panel LEDs, and any reusable brackets. Clean the enclosure thoroughly because a decade-old desktop can contain enough dust to qualify as a minor geological deposit.
Mount the Raspberry Pi on nonconductive standoffs with space around its USB, Ethernet, and power connectors. Do not rely on a loose sheet of cardboard or a heroic quantity of adhesive tape. Drives should be screwed into their bays, and USB-to-SATA bridges should be supported rather than suspended from their cables.
Route data cables away from fan blades and sharp metal edges. Label each drive and adapter so failed hardware can be identified without tracing every cable by hand. If the case has a functioning front power button, it can be connected through a safe shutdown circuit or GPIO-based controller, but the Pi should not be switched off by simply cutting power while data is being written.
Choosing the NAS Software
Raspberry Pi OS Lite and Samba
The simplest software stack is Raspberry Pi OS Lite with Samba. The Lite edition avoids an unnecessary desktop environment and is designed to run headlessly. Raspberry Pi Imager can configure the hostname, user account, network settings, and SSH access before the system’s first boot.
Samba implements the SMB protocol used for network file sharing across Windows, macOS, and Linux systems. After installing the Samba packages, shared folders and access rules are defined through the server configuration. Samba also provides tools such as testparm for checking configuration syntax before restarting the service.
This approach is excellent for users who enjoy working in Linux and want complete control. It also keeps the system lean. The tradeoff is that disk management, permissions, monitoring, and scheduled jobs must be configured manually.
OpenMediaVault for a Web-Based Dashboard
OpenMediaVault is a Debian-based NAS platform available for x86 and ARM systems. It provides a browser-based interface for creating users, mounting filesystems, managing shared folders, configuring SMB services, checking storage health, and adding selected plugins.
OpenMediaVault is attractive when the server will be administered by someone who would rather click a neatly labeled button than edit smb.conf at 1:00 a.m. It does not eliminate the need to understand storage and permissions, but it makes routine administration more approachable.
Filesystems, Mounting, and Permissions
For a Linux-centered Raspberry Pi NAS, ext4 is a dependable default. The Linux kernel documentation describes ext4 as an evolution of ext3 with scalability and reliability improvements for large filesystems. It is mature, widely supported, and appropriate for straightforward data volumes.
Mount storage by filesystem UUID rather than assuming a drive will always appear as /dev/sda or /dev/sdb. Device letters may change after a reboot or after another USB device is connected. Stable mount points such as /srv/storage/photos and /srv/storage/backups make Samba shares, scripts, and maintenance easier to understand.
Create individual user accounts instead of enabling unrestricted guest access. A shared family-media folder might allow several users to write files, while financial records or private backups should be restricted. Remember that Samba permissions and Linux filesystem permissions must agree. A share advertised as writable will still refuse changes when the underlying directory permissions say otherwise. OpenMediaVault’s documentation specifically warns that filesystem restrictions can override apparent Samba write access.
Monitoring, Backups, and Power Protection
Watch the Drives Before They Retire Themselves
S.M.A.R.T. monitoring can track drive health indicators and warn about developing problems. OpenMediaVault uses smartmontools and can send notifications when relevant values change. Reallocated sectors, pending sectors, unusual temperatures, and failed self-tests deserve attention, although no single health reading can guarantee when a drive will fail.
Schedule short self-tests regularly and longer tests periodically. Also inspect system logs for USB resets, I/O errors, undervoltage warnings, or drives that repeatedly disconnect. A NAS that vanishes from the network every afternoon may not be “quirky.” It may be politely requesting a better power supply.
A NAS Is Not Automatically a Backup
Centralizing files on a Raspberry Pi NAS is convenient, but it does not protect against accidental deletion, ransomware, theft, electrical damage, fire, or failure of the entire enclosure. Even a mirrored drive arrangement is primarily an availability feature, not a complete backup strategy. TrueNAS documentation separates redundant storage from backup and data-protection tasks for the same reason.
A practical target is the 3-2-1 strategy: maintain three copies of important data, store them on at least two types of media or systems, and keep one copy off-site. The Raspberry Pi NAS might hold one local backup, while another USB drive and an encrypted cloud or remote copy complete the plan.
Add a UPS When the Data Matters
A small uninterruptible power supply can keep the Raspberry Pi, storage adapters, and network equipment running during brief outages. With compatible monitoring software, the system can shut down gracefully when battery capacity becomes low. UPS vendors specifically identify controlled shutdown as a way to reduce the risk of data loss and corruption during power disturbances.
Security Rules for a Home Raspberry Pi File Server
Keep the operating system and Samba packages updated, disable unused services, and use strong passwords or SSH keys. Raspberry Pi documentation supports configuring public-key authentication through Imager, allowing remote administration without relying solely on a reusable password.
Do not expose an SMB share directly to the public internet. For remote access, use a properly configured VPN or another authenticated private-network solution. Limit administrative access, keep private shares separate from guest or media folders, and test file restoration instead of merely admiring the backup status screen.
What the Raspberry Pi NAS Can and Cannot Do
This design is well suited to household backups, document storage, photo collections, music libraries, lightweight media serving, and synchronized project folders. It can also run modest supporting services, provided storage duties remain the priority.
It is less suitable for heavy virtualization, many simultaneous users, professional video editing directly over the network, large databases, or frequent real-time media transcoding. The Raspberry Pi is efficient, but a donor PC case does not magically turn it into a rack server. The enclosure merely gives the little board a much larger office.
Living With a Raspberry Pi NAS in a Donor PC: Practical Experiences
The First Week: Cable Management Becomes the Real Project
A typical builder begins with a simple plan: install the Pi, connect two drives, and finish before lunch. The first surprise is that the Raspberry Pi occupies almost no space while its power bricks, SATA bridges, USB cables, fan wiring, and adapters attempt to occupy all available dimensions simultaneously.
The donor case helps, but only when cables are deliberately secured. Short USB 3.0 cables reduce clutter and are less likely to be pulled loose when the side panel is removed. Adhesive tie-down points and reusable hook-and-loop straps are particularly helpful because the layout may change several times. The most elegant arrangement often appears immediately after buying the cable that should have been purchased at the beginning.
The First Large Backup: Speed Expectations Meet Reality
Copying a few documents proves that the share works, but the first multi-hundred-gigabyte backup reveals the real behavior of the system. Large video files may transfer quickly and consistently, while folders containing thousands of tiny images crawl along at a much lower rate. This is normal: every small file introduces metadata operations and protocol overhead.
It is also common to discover that Wi-Fi, not the Raspberry Pi, is the bottleneck. Moving the NAS to wired Gigabit Ethernet can produce a dramatic improvement in consistency. A laptop connected over weak wireless may still be slow, but desktop computers and access points with solid Ethernet links usually obtain the best results.
The First Mysterious Disconnect: Power Matters More Than Software
One of the most educational experiences is troubleshooting a drive that randomly disappears. The immediate instinct is to blame Samba, Linux, the filesystem, or perhaps the alignment of the planets. In many home builds, the actual cause is an underpowered USB hub, a marginal cable, or an adapter that behaves badly when two drives spin up together.
Replacing a questionable hub with a properly powered model can transform an unreliable experiment into an appliance that runs for months without attention. This is why power design should be completed before installing applications and copying irreplaceable data. Stability is a feature, even though it does not arrive in a colorful box labeled “Extreme Gaming NAS Power.”
The First Drive Warning: Monitoring Earns Its Keep
Drive-health notifications may seem unnecessary until one reports growing pending-sector counts or repeated read errors. At that point, the time spent configuring alerts feels extremely reasonable. The ideal response is not panic but verification: confirm that backups are current, run an appropriate self-test, inspect cables, and prepare a replacement if the evidence indicates deterioration.
The donor case makes replacement straightforward because the drives are mounted in ordinary bays. Clear labels help identify the correct disk before anything is unplugged. This sounds obvious, but every unlabeled black hard drive looks remarkably similar while the server is powered down and the family is asking why the movie library has vanished.
The Long-Term Lesson: Simplicity Usually Wins
After the novelty wears off, the most successful Raspberry Pi NAS is usually the one with the fewest unnecessary moving parts. A lightweight operating system, stable mounts, clearly defined shares, automatic security updates, routine health checks, and verified backups provide more value than a dashboard crowded with experimental services.
The donor PC enclosure contributes to that simplicity by turning scattered electronics into one organized machine. It gives the project room to breathe, allows ordinary cooling fans to run quietly, and makes future storage upgrades possible. Most importantly, it converts two pieces of aging technology into something genuinely useful: an efficient home server that stores files without demanding a subscription, a proprietary drive tray, or a place of honor on the living-room shelf.
Conclusion
When a Raspberry Pi NAS makes itself at home in a donor PC, the project becomes more than a board attached to a USB drive. The old enclosure provides secure drive mounting, airflow, cable management, and room for expansion, while the Raspberry Pi supplies an efficient Linux platform for Samba shares, backups, media, and everyday network storage.
The strongest build is not necessarily the one with the most drives or software plugins. It is the one with safe mounting, dependable power, wired networking, sensible permissions, health monitoring, and an independent backup. Build those foundations first, and the forgotten desktop under the workbench may return as one of the most useful computers in the house.
Note: Network storage improves convenience and can add redundancy, but important files should always exist in at least one separate, tested backup location.


