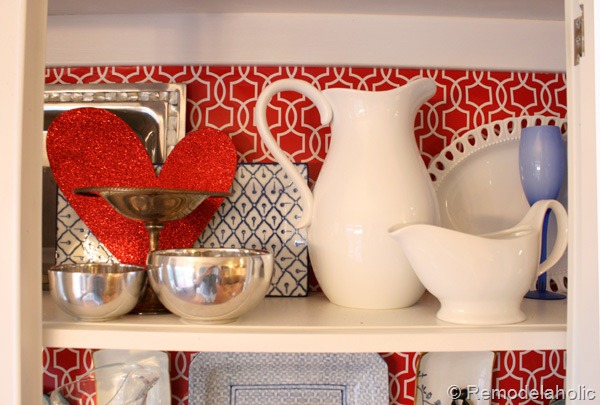

A hutch is one of those hardworking furniture pieces that quietly holds half your life: dishes, mugs, cookbooks, serving bowls, mystery candles, and the good napkins nobody is emotionally ready to use. But when a hutch starts looking heavy, dated, or just plain tired, it can drag down an entire room. The good news? You do not need a full renovation, a new dining set, or a dramatic HGTV-style sledgehammer moment to refresh it.
You can quickly change the look of a hutch with paint, peel-and-stick wallpaper, new hardware, better styling, lighting, or even a simple shelf reset. The best hutch makeover is not always the most complicated one. Sometimes the magic is as small as swapping brass knobs, painting the inside a bold color, or removing a few crowded dishes so the piece can finally breathe.
This guide walks through fast, practical, and stylish ways to update a hutch without turning your dining room into a sawdust-themed obstacle course. Whether your hutch is vintage, farmhouse, traditional, laminate, painted wood, or inherited from a relative who believed everything should be dark cherry, there is a smart way to make it feel fresh again.
Why a Hutch Makeover Works So Well
A hutch naturally becomes a focal point because it is tall, visible, and usually filled with interesting objects. That means even a small update can make the whole room feel different. Unlike replacing flooring or remodeling a kitchen, a hutch makeover is contained. You can refresh one piece and still get a big visual payoff.
The key is deciding what bothers you most. Is the color too dark? Are the shelves cluttered? Does the hardware scream “1997 called and wants its knobs back”? Is the back panel boring? Once you identify the problem, the solution becomes much easier.
Start With a Quick Style Audit
Before grabbing paint, take ten minutes to study your hutch. This tiny pause can save you hours of regret. Look at the shape, finish, hardware, glass doors, shelves, and the items inside. Ask yourself what should stay and what should change.
Questions to Ask Before You Begin
- Does the hutch look too dark, too bulky, or too formal?
- Would the room feel better with contrast, softness, or color?
- Is the wood beautiful enough to preserve?
- Are the shelves styled or simply stuffed?
- Do you want a temporary update or a permanent makeover?
If you love the wood grain, avoid painting the entire piece. Instead, update the back panel, hardware, lighting, or display items. If the finish is damaged or the color clashes with your home, paint may be the fastest route to a completely new personality.
Method 1: Paint the Hutch for the Biggest Change
Paint is the most dramatic way to change the look of a hutch. A dark, formal cabinet can become airy and coastal with warm white paint. A plain thrift-store hutch can become custom-looking with deep green, navy, charcoal, greige, or soft black. Paint gives old furniture a second act, and honestly, some hutches have been waiting decades for their comeback tour.
Choose the Right Paint Color
For a quick hutch makeover, choose a color that works with the room instead of fighting it. White, cream, and greige make a hutch look lighter. Navy, forest green, and black create a high-end statement. Dusty blue, sage, and mushroom beige bring a softer cottage feel. If you are nervous, paint only the inside back panel first. It is like giving your hutch a stylish lining instead of a full wardrobe change.
Prep the Surface Without Overcomplicating It
Good prep is the difference between a beautiful hutch makeover and a future peeling disaster. Remove hardware, take out drawers if there are any, clean the surface with mild soap and water, and let everything dry. Lightly sand glossy areas so primer and paint can grip. You do not need to sand the hutch into another dimension; you just need to dull the surface.
If your hutch is laminate, slick, stained, or very glossy, use a bonding primer. Primer helps paint adhere and creates a more durable finish. For dark wood or dramatic color changes, primer also helps block stains and reduce the number of paint coats needed.
Use a Brush and Mini Roller Combo
A mini foam or fine-finish roller works well on flat panels and sides, while a quality angled brush handles trim, corners, carvings, and detailed edges. Work in thin coats rather than one thick coat. Thick paint may look satisfying for five minutes, but it often leaves drips, ridges, and brush marks that will haunt you like a DIY ghost.
Seal High-Touch Areas
If the hutch doors, shelves, or drawers will get regular use, protect the finish with a clear topcoat or furniture wax recommended for your paint type. Let the paint cure before loading the shelves. Dry paint is not always fully cured paint, and heavy plates can leave marks if you rush the process.
Method 2: Refresh the Back Panel
If you want a fast update without painting the entire hutch, focus on the back panel. This area acts like a built-in backdrop for everything displayed on the shelves. Changing it can make dishes, glassware, books, and decorative objects pop instantly.
Try Peel-and-Stick Wallpaper
Peel-and-stick wallpaper is perfect for renters, commitment-phobes, and anyone who likes a makeover that does not require a three-day emotional journey. Choose grasscloth texture for warmth, botanical prints for charm, geometric patterns for modern style, or subtle stripes for a tailored look.
Measure carefully, cut slowly, and use a smoothing tool or clean cloth to press out bubbles. If the back panel is removable, take it out first. If not, work shelf by shelf. The result can look custom, even though the hardest part may be convincing the wallpaper to stop sticking to your sleeve.
Paint Only the Interior
Painting the inside of a hutch is faster than painting the entire piece and adds depth. A white hutch with a blue interior feels coastal. A wood hutch with a black interior feels modern. A cream hutch with sage inside feels soft and garden-inspired. This trick is especially useful when the exterior wood still looks good but the piece needs energy.
Method 3: Swap the Hardware
Hardware is the jewelry of furniture. If your hutch looks dated, the knobs and pulls may be the reason. Replacing them is one of the quickest ways to change the style without sanding, priming, or apologizing to your floor.
For a modern look, choose matte black, brushed nickel, or simple brass pulls. For a vintage look, try antique brass knobs, ceramic pulls, or glass knobs. For a farmhouse hutch, cup pulls and aged bronze hardware work beautifully. Measure the distance between screw holes before shopping so you do not accidentally buy hardware that requires drilling new holes.
Method 4: Remove Doors or Change the Glass
If your hutch has upper cabinet doors that make it feel heavy, consider removing them. Open shelving instantly lightens the piece and makes it feel more casual. Store the doors safely in case you want to reinstall them later.
If you like the doors but not the look, consider updating the glass. You can apply reeded glass film, frosted film, or patterned privacy film for texture. This is especially helpful if the inside of your hutch is useful but not exactly magazine-ready. We all have at least one shelf that is basically a witness protection program for mismatched mugs.
Method 5: Style the Shelves Like a Designer
Sometimes the hutch itself is not the problem. The problem is what is happening inside it. A hutch packed edge-to-edge with dishes can feel visually heavy. Styling the shelves with breathing room makes the entire piece look more intentional.
Use the Rule of Layers
Place larger items in the back and smaller items in front. Lean plates or cutting boards against the back panel. Add bowls, small framed art, glassware, or a plant for depth. Mix vertical and horizontal shapes so the arrangement does not look flat.
Repeat Colors
Choose two or three main colors and repeat them throughout the shelves. For example, white dishes, wood accents, and blue glass create a calm palette. Cream pottery, brass objects, and greenery create warmth. Repetition makes the display feel organized even when the objects are different.
Leave Empty Space
Empty space is not wasted space. It gives the eye a place to rest and makes your favorite pieces stand out. If every shelf is full, nothing looks special. Remove at least one-third of the items and see how the hutch feels. You may discover that the “makeover” was hiding behind twelve souvenir mugs.
Method 6: Add Lighting
Lighting can make a hutch look expensive surprisingly fast. Battery-powered puck lights, rechargeable LED strips, or small cabinet lights can highlight dishes and glassware. Warm light usually looks more inviting than cool light, especially in dining rooms and kitchens.
Place lights under the top shelf or along the interior sides. Hide cords when possible, or use cordless options for a cleaner look. If your hutch has glass shelves, light will travel beautifully through them and create a soft glow in the evening.
Method 7: Create a Two-Tone Hutch
A two-tone makeover is ideal when you cannot decide between wood and paint. Keep the base wood and paint the upper section. Paint the exterior and leave shelves natural. Paint the back panel and leave the frame untouched. This creates contrast and helps preserve some original character.
One popular approach is a painted body with a natural wood top or shelves. Another is a dark exterior with a light interior. Two-tone designs feel collected and custom, which is excellent news for anyone working with a secondhand hutch and a weekend budget.
Method 8: Change the Function
A hutch does not have to live in a dining room. If the piece no longer works for dishes, give it a new job. Use it as a coffee bar, linen cabinet, craft station, bookcase, entryway storage piece, or home office organizer.
Coffee Bar Hutch
Place mugs, coffee beans, syrups, and a small espresso machine on the lower surface. Use baskets for filters and tea bags. Add hooks under a shelf for mugs if the design allows.
Linen Hutch
Fold towels, stack sheets, and use labeled baskets for smaller items. A hutch in a hallway or bathroom can look charming and solve storage problems at the same time.
Home Office Hutch
Use the shelves for books, file boxes, and supplies. Add closed baskets to hide cords, chargers, and paperwork. Suddenly, the hutch becomes productive instead of just decorative. A round of applause for furniture with a second career.
Quick Hutch Makeover Ideas by Time
If You Have 30 Minutes
Remove clutter, clean the glass, restyle shelves, and swap a few display pieces. Add a plant, framed art, or a stack of pretty bowls. This is the fastest way to make a hutch look cared for.
If You Have 2 Hours
Change the hardware, apply peel-and-stick wallpaper to the back panel, or add rechargeable lighting. These updates are beginner-friendly and do not require major tools.
If You Have a Weekend
Paint the hutch, seal it properly, and restyle it from top to bottom. A weekend makeover can completely transform a dated piece into the best-looking furniture in the room.
Common Mistakes to Avoid
The biggest mistake is skipping cleaning and prep before painting. Furniture collects oils, polish, dust, and kitchen residue, especially if it has lived near cooking areas. Paint does not bond well to grime. Clean first, then sand lightly, then prime when needed.
Another mistake is choosing a color without testing it in the room. Paint can look different depending on light, wall color, and nearby flooring. Test a sample on poster board or inside the hutch before committing.
Finally, do not reload the shelves too soon after painting. Give the finish time to cure. Your plates, vases, and serving bowls will still be there tomorrow, looking innocent but secretly heavy.
Real-Life Experience: What Actually Works When Updating a Hutch
In real homes, the fastest hutch makeovers usually start with editing, not painting. One of the most useful experiences is taking everything out first. It sounds simple, but it changes how you see the piece. When the shelves are empty, you can finally notice the lines, the finish, the back panel, and the proportions. Many people realize the hutch itself is fine; it was just overwhelmed by too much stuff.
A practical approach is to sort items into three groups: keep, store elsewhere, and donate. Everyday dishes can stay if the hutch is functional storage. Special pieces should get the best positions. Random extras, chipped mugs, and lonely saucers can move along with dignity. Once the shelves are lighter, the hutch instantly feels more modern.
Another experience that works well is starting with the least permanent update. Before painting a family heirloom or expensive solid wood piece, try styling changes, new knobs, or a temporary back panel. Peel-and-stick wallpaper or removable fabric panels can help you test color and pattern. If you love the new direction after a few weeks, then paint becomes a more confident choice.
For painted hutches, patience matters more than talent. Most imperfect results come from rushing. Thin coats look better than thick coats. Sanding between primer and paint can make the finish smoother. Letting doors dry fully before closing them prevents sticking. Labeling hardware in small bags saves time when reassembling. These tiny habits are not glamorous, but they are the difference between “custom furniture” and “I fought a cabinet and the cabinet won.”
Color choice also becomes easier when you connect the hutch to something already in the room. A navy hutch can echo a rug. A sage green interior can repeat colors from curtains or artwork. A black hutch can balance black window frames, lighting, or dining chairs. The goal is not to make the hutch match everything perfectly. The goal is to make it look like it was invited to the party on purpose.
Lighting is another underrated upgrade. Even inexpensive battery lights can make glassware sparkle and pottery look more sculptural. In the evening, a softly lit hutch can make a dining room feel finished, cozy, and a little fancy. It is the furniture equivalent of good restaurant lighting: everyone looks better, including the soup bowls.
The most successful hutch makeovers respect both style and function. If you use the hutch every day, keep the practical items reachable. Put heavy dishes on lower shelves. Use baskets for small pieces. Keep fragile decor higher if children or pets are part of the household. A beautiful hutch that annoys you every morning is not a win; it is just a pretty obstacle.
Finally, remember that a hutch can evolve. You can style it seasonally with greenery in spring, woven textures in summer, amber glass in fall, and candles or metallic accents in winter. You do not have to redo the entire piece every time you want a new look. Once the base feels right, small changes keep it fresh all year.
Conclusion
You can quickly change the look of a hutch with updates that range from five-minute styling fixes to full weekend paint transformations. Start by identifying what feels dated: the color, the hardware, the clutter, the back panel, or the function. Then choose the simplest update that solves the problem.
Paint offers the biggest transformation, but it is not the only option. Peel-and-stick wallpaper, new knobs, better lighting, open shelving, glass film, and thoughtful styling can all make a hutch feel fresh, current, and personal. Best of all, you do not have to spend a fortune. With a little planning and a sense of humor, your hutch can go from “please ignore me” to “yes, I am the star of this room.”
SEO Tags


