
Note: This article synthesizes practical information from reputable U.S. aviation, model-aircraft, 3D-printing, drone-safety, and maker resources. No source links are inserted so the content is clean for web publishing.
Indoor flyers live in a wonderfully strange corner of aviation. They are light enough to make a potato chip look overbuilt, delicate enough to fear a sneeze, and clever enough to teach real aerodynamics on a living-room budget. So when a tiny rubber-band-powered airplane loses a propeller blade, the repair is not just a craft project. It is a miniature engineering rescue mission.
The idea behind printed propeller blades repair indoor flyer is simple: use 3D printing to replace or improve damaged propeller blades on a small indoor aircraft. The real magic, however, is in the details. A propeller is not a decoration spinning at the nose of a model. It is an airfoil, a thrust generator, a balancing act, and occasionally a tiny plastic boomerang with opinions. If you print it poorly, it may vibrate, stall, crack, or launch itself into the curtains like it has somewhere more important to be.
But for lightweight indoor flyers, especially rubber-powered free-flight models, printed blades can work surprisingly well. These aircraft operate at low speeds, low torque, and modest rotational stress compared with electric drones or high-RPM RC aircraft. That makes them a rare case where a carefully printed propeller blade can be practical, educational, and even performance-enhancing.
Why Printed Propeller Blades Make Sense for Indoor Flyers
Most people hear “3D printed propeller” and immediately picture disaster. That caution is reasonable. Propellers on electric drones, RC planes, and full-size aircraft experience serious centrifugal loads. Any weak layer line, hidden crack, or imbalance can become a failure point. That is why high-speed propellers are typically molded, reinforced, tested, and treated as safety-critical parts.
Indoor flyers are different. Many rubber-powered models use large, slow-turning propellers. Instead of brute-force RPM, they rely on light weight, low drag, and gentle thrust. A well-trimmed indoor free-flight airplane is less “fighter jet” and more “floating feather with ambition.” Because the loads are lower, a printed blade does not need to survive the same punishment as a racing drone prop.
That does not mean any random print will do. The blade still needs the right shape, pitch, stiffness, weight, and balance. A flat, heavy, rough, or warped blade can ruin flight performance. In indoor flying, one extra gram can feel like packing a bowling ball for a picnic. The repair must be light, clean, and symmetrical.
Understanding the Propeller Before You Repair It
A propeller blade is essentially a rotating wing. As it spins, its airfoil shape and pitch angle push air backward, creating thrust forward. On a rubber-powered indoor flyer, the propeller must convert stored energy from the wound rubber motor into smooth, efficient airflow. The better it does this, the longer and more gracefully the airplane flies.
Pitch Matters
Pitch is the angle of the blade relative to the airflow. Too much pitch can overload the rubber motor, causing a dramatic burst of torque followed by disappointment. Too little pitch may spin quickly without producing enough thrust. For an indoor flyer, the goal is controlled, steady power rather than a short heroic sprint into the basketball hoop.
Weight Matters Even More
Indoor models are extremely sensitive to weight. Traditional blades are often made from balsa, thin plastic, aluminum sheet, or carefully shaped lightweight material. A printed replacement must stay thin and efficient. Thick 3D printed blades may look sturdy, but they can reduce performance by adding unnecessary mass at the worst possible location: the spinning nose.
Balance Is Not Optional
A propeller with one heavier blade will shake the model, waste energy, stress the shaft, and make trimming harder. The airplane may still fly, but it will fly like it just drank three espressos. After printing replacement propeller blades, balance testing is essential.
Best Materials for Printed Indoor Flyer Propeller Blades
Material choice depends on the model, printer, and desired performance. For small indoor flyers, the most common options are PLA, PLA+, PETG, and lightweight PLA. Each has strengths and trade-offs.
PLA
PLA is easy to print, dimensionally stable, and widely available. It works well for experimenting, especially with very thin blades. The downside is brittleness and lower heat resistance. If a PLA blade is left near a sunny window or in a hot car, it may discover abstract sculpture.
PLA+
PLA+ is often tougher than standard PLA while remaining easy to print. It can be a good choice for hobbyists who want a slightly more durable blade without adjusting printer settings too dramatically.
PETG
PETG offers better toughness and heat resistance than standard PLA. It is less brittle and can handle flexing better, although it may be stringier to print. For propeller blades that need gentle shaping or annealing, PETG is a strong candidate.
Lightweight PLA
Lightweight PLA can reduce mass, which is extremely attractive for indoor aircraft. However, foaming filaments require careful tuning, and surface finish may vary. For competition-grade indoor flyers, testing is the only honest judge.
How to Design Replacement Printed Propeller Blades
The easiest path is to copy the original blade size, shape, and pitch as closely as possible. If the original blade was damaged but not completely destroyed, measure it before removing anything. Record blade length, width, root shape, hub attachment method, and pitch angle.
If the original blade is gone, start conservatively. Use the existing propeller hub dimensions and estimate the blade profile based on similar indoor flyers. A blade with modest pitch, rounded leading edges, and thin cross-section is usually safer than an aggressive blade that tries to turn a rubber-powered model into a ceiling fan.
Recommended Design Features
- Thin blade profile to reduce weight and drag
- Smooth leading edge to improve airflow
- Rounded tip to reduce turbulence
- Reinforced root area where the blade attaches to the hub
- Matched left and right blades for balance
- Gentle pitch suitable for slow indoor flight
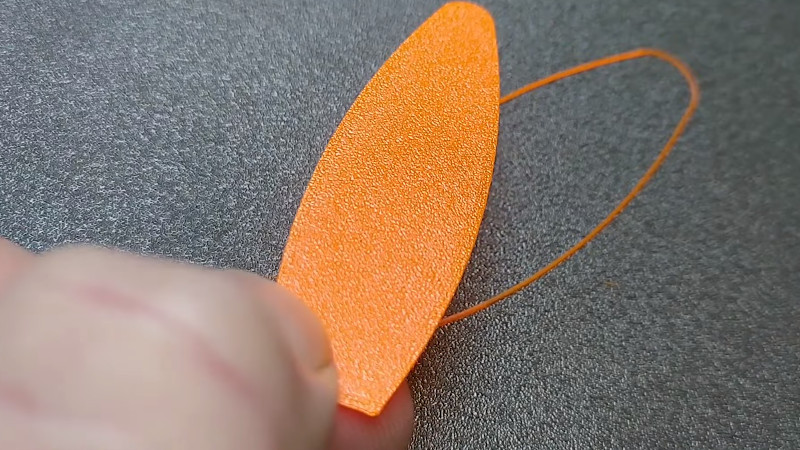
For very light indoor flyers, some makers print blades flat on the build plate, then form the curve afterward. This method can produce thin parts with clean surfaces. The blade is printed as a flat shape, then gently heated and curved around a form such as a glass jar, metal can, or custom jig. The result is a lightweight blade with a permanent twist or camber.
Printing Tips for Better Propeller Blade Repairs
Printing propeller blades is not the time to treat your slicer like a mystery box. Small changes in layer height, perimeter count, and orientation can change strength and weight.
Print Orientation
For thin indoor blades, printing flat on the bed is often practical. It produces a smooth face and keeps the blade lightweight. The trade-off is that strength across layers and stiffness must be tested. For higher-stress propellers, different orientations may be required, but indoor rubber-powered flyers benefit from low mass above all.
Layer Height
A fine layer height helps create a smoother surface. Propellers dislike roughness because rough blades waste energy and can behave unpredictably. A layer height around 0.10 to 0.16 mm is often a reasonable starting point for small blades.
Wall and Infill Settings
For very thin blades, the part may be mostly walls rather than traditional infill. The design should avoid bulky internal structure. The goal is not to make the blade indestructible; it is to make it light, smooth, and strong enough for the job.
Bed Adhesion
Because thin parts can curl, good bed adhesion is important. A clean bed, correct temperature, and suitable adhesive surface help maintain blade accuracy. If the blade warps during printing, do not pretend it is “aerodynamic personality.” Reprint it.
Annealing and Forming Printed Propeller Blades
Annealing is a heat-treatment process that can improve stiffness, heat resistance, and dimensional stability in some 3D printed plastics. For propeller blade repair, annealing can also help set a curved blade shape. The basic idea is to print the blade flat, tape it to a curved form, heat it gently, then let it cool in that shape.
A common maker approach is to use high-temperature tape, such as Kapton tape, to hold a blade against a glass jar or cylindrical form. The blade is heated carefully in an oven for a short period, then allowed to cool before removal. This can create a permanent curve that mimics the pitch and camber of a traditional indoor propeller blade.
Temperature control is critical. Too little heat may do nothing. Too much heat may deform the part into something that looks like a potato chip trying yoga. Always test with scrap pieces of the same filament before committing your final blades.
Safety Tips for Heat Forming
- Use a dedicated thermometer instead of trusting oven dials blindly.
- Test small samples first to understand shrinkage and warping.
- Do not overheat plastics or create fumes in an unventilated area.
- Let parts cool fully before removing them from the forming jig.
- Wear gloves when handling hot forms or heated parts.
Repair Process: Step-by-Step Guide
Step 1: Inspect the Damage
Before printing anything, inspect the entire propeller assembly. Look for cracks in the hub, bent shafts, loose bearings, glue failure, and damaged rubber hooks. Replacing a blade will not solve a crooked shaft. That is like buying new shoes for a wobbly table.
Step 2: Measure the Original Blade
Measure blade length, root width, maximum chord, thickness, and pitch angle. If both blades are damaged, use photos, plans, or a similar propeller as reference. Take notes. Future you will appreciate present you for not relying on memory and optimism.
Step 3: Model or Download a Blade Template
Create a simple blade profile in CAD software or adapt an existing model. For indoor flyers, a simple thin blade often works better than a complicated airfoil copied from a drone propeller. Keep the design light and easy to adjust.
Step 4: Print Test Blades
Print several versions with slight differences in thickness or pitch. Tiny indoor aircraft are fussy, and testing is faster than guessing. Label your test blades by weight and design version.
Step 5: Shape or Anneal the Blades
If printing flat, form the blade around a curved surface using controlled heat. Match both blades as closely as possible. Unequal pitch between blades can create vibration and uneven thrust.
Step 6: Attach the Blades
Use a lightweight adhesive appropriate for the material and hub. Cyanoacrylate glue may work for some setups, while epoxy may be better for others, though epoxy adds weight. Apply the smallest amount needed. In indoor flying, glue blobs are ballast wearing a disguise.
Step 7: Balance the Propeller
Mount the propeller on a simple balancer or smooth shaft. If one side drops repeatedly, remove a tiny amount of material from the heavier blade or add a minuscule correction to the lighter side. Balance slowly and patiently.
Step 8: Test at Low Power
Do not immediately wind the rubber motor to maximum turns. Start with a low-power test. Watch for wobble, vibration, unusual noise, or blade flex. If anything looks wrong, stop and inspect.
Step 9: Trim the Aircraft Again
A new printed propeller may produce different thrust from the original. That means the aircraft may need fresh trimming. Adjust thrust angle, wing position, tail settings, or rubber selection carefully. The reward is smooth, repeatable indoor flight.
Common Mistakes When Repairing Indoor Flyer Propellers
Making the Blade Too Heavy
The most common mistake is overbuilding. A thick printed blade may survive a crash but ruin flight performance. For indoor flyers, light and efficient beats rugged and chunky.
Ignoring Surface Finish
A rough printed surface creates drag. Light sanding or careful printing can improve airflow. However, sanding must be gentle because thin blades are easy to damage.
Skipping Balance Testing
Balance problems waste power and stress the model. Even a tiny difference matters on a delicate aircraft. Always balance after repair.
Using High-RPM Assumptions
Indoor rubber-powered props are not drone props. Drone propeller design principles are useful, but the operating conditions are different. A blade that works beautifully on a quadcopter may be much too heavy or aggressive for a slow indoor flyer.
Forgetting Safety
Even small propellers can cut skin or damage eyes. Keep hands clear, wear eye protection during testing, and never spin questionable printed propellers near people or pets. Cats already believe they own the airspace.
When You Should Replace Instead of Repair
Repairing with printed propeller blades is fun, but it is not always the best answer. Replace the entire propeller if the hub is cracked, the shaft is bent, the blade root cannot be secured, or the aircraft uses high RPM electric power. Printed blades are most suitable for low-load indoor flyers, experimental models, and educational projects.
If the aircraft is heavier, faster, or flown near people, treat the propeller as a safety-critical component. Commercial molded propellers are inexpensive, consistent, and tested for the loads they are expected to carry. A printed propeller may be clever, but clever does not automatically mean safe.
Performance Benefits of Printed Propeller Blade Repair
When done well, printed propeller blades can do more than restore flight. They can improve performance. A custom blade can be tuned for a specific rubber motor, aircraft weight, flying space, and desired climb pattern. That level of customization is one of the biggest advantages of 3D printing.
For example, a school gym flyer may need gentle thrust and a wide turning circle. A living-room micro flyer may need a smaller propeller with lower torque. A competition-style indoor duration model may benefit from extremely light blades and precise pitch. Printing allows quick iteration without carving multiple balsa blades by hand.
The process also teaches important lessons. Builders learn about thrust, drag, torque, pitch, weight distribution, material behavior, and repair discipline. In other words, one broken propeller becomes a tiny aerospace classroom. The tuition is mostly filament and patience.
Maintenance Tips After Repair
After installing printed propeller blades, inspect them before every flying session. Look for stress marks, cracks, loose glue joints, warping, or changes in pitch. Indoor flyers may seem gentle, but repeated winding, landings, and impacts can weaken small parts.
- Store the aircraft away from heat and direct sunlight.
- Keep spare printed blades labeled by design version.
- Recheck balance after hard landings.
- Do not fly with visible cracks.
- Record successful print settings for future repairs.
500-Word Experience Section: Lessons From Repairing a Printed Propeller Indoor Flyer
The first real lesson from repairing an indoor flyer with printed propeller blades is humility. On paper, the job looks easy: print two tiny blades, glue them on, wind the rubber motor, and enjoy graceful circles under the ceiling lights. In practice, the airplane immediately reminds you that aerodynamics has a strict no-nonsense policy. A blade that is half a millimeter thicker than planned can change the climb. A glue joint that looks harmless can throw off balance. A pitch angle that seems “close enough” can make the model drift, dive, or perform a dramatic wall inspection.
One useful experience is to print more blades than you think you need. The first pair is rarely perfect. The second pair is usually better. By the third or fourth pair, you begin noticing how small changes affect performance. A slightly wider blade may give better initial thrust but shorten the motor run. A lighter blade may improve duration but flex too much. A smoother blade may reduce drag enough to make trimming necessary again. This trial-and-error process is not wasted time; it is the point of the project.
Another practical discovery is that forming the curve matters as much as printing the shape. Flat printed blades may look neat on the bench, but an indoor propeller needs pitch and camber. Using a jar, can, or printed jig to form both blades consistently can make a huge difference. The best results usually come from slow, controlled adjustments rather than aggressive bending. Thin plastic remembers abuse. Treat it gently, and it rewards you with smooth thrust. Force it, and it responds with cracks, warps, or silent betrayal during the next flight.
Balancing is where many repairs succeed or fail. A repaired propeller should spin freely without one blade always falling to the bottom. If it does, the heavier blade needs correction. The adjustment should be tiny. Sanding too much turns the repair into a comedy of overcorrection. A good habit is to balance, test, inspect, and balance again after the glue fully cures.
Trimming after the repair is also essential. A printed propeller may create more thrust than the original, especially if the pitch is slightly more efficient. That sounds like good news until the model climbs too steeply, stalls, and flutters down with the dignity of a dropped napkin. Adjusting thrust angle, tailplane incidence, or rubber winding turns can bring the flight back under control.
The biggest takeaway is that printed propeller blade repair is not merely a replacement technique. It is a tuning method. It lets builders experiment with blade shape, weight, pitch, and material in a way that traditional repairs often do not. For indoor flyers, where every fraction of a gram matters, this flexibility is powerful. The project rewards patience, careful observation, and a willingness to laugh when the first test flight ends behind the bookshelf.
Conclusion
Printed propeller blades can be an excellent repair solution for indoor flyers when the aircraft is light, slow, and powered by modest rubber torque. The key is respecting the propeller as a real aerodynamic component, not just a spinning accessory. Good results come from lightweight design, careful material selection, controlled forming, accurate balancing, and patient flight trimming.
For high-speed drones or powerful RC aircraft, 3D printed propellers remain risky unless properly engineered and tested. But for a delicate indoor flyer, a printed blade can revive a damaged model and open the door to creative performance tuning. It is a charming blend of old-school aeromodelling and modern desktop manufacturing: balsa-era flight meets slicer settings, and somehow, the little airplane wins.


