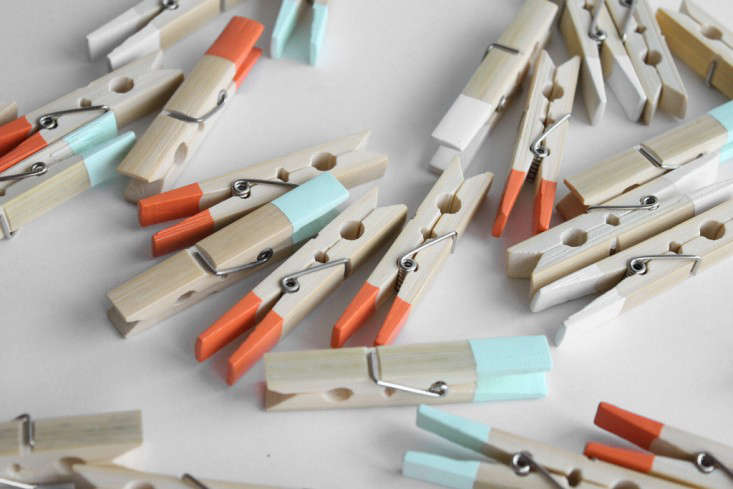

Paint-dipped clothespins are proof that a tiny craft supply can walk into a room wearing a fresh coat of color and suddenly act like it owns the place. Simple wooden clothespins, the kind hiding in laundry rooms, junk drawers, classroom bins, and dollar-store craft aisles, can become cheerful gift clips, photo holders, party labels, desk organizers, plant markers, holiday decorations, and tiny bursts of personality with nothing more than paint, patience, and a surface you do not mind accidentally decorating.
The beauty of this project is its balance: it is inexpensive enough for beginners, flexible enough for serious DIY lovers, and charming enough to make people ask, “Where did you buy those?” That is when you get to smile mysteriously and say, “Oh, I made them,” which is one of the great small pleasures of modern crafting.
This guide covers how to make paint-dipped clothespins, what paints and sealers work best, how to choose color combinations, where to use them, and how to avoid common mistakes. Whether you are planning a baby shower, upgrading your home office, making classroom supplies, or giving your fridge magnets a personality transplant, painted clothespins are a surprisingly useful little project.
What Are Paint-Dipped Clothespins?
Paint-dipped clothespins are wooden clothespins that have been partially coated in paint, usually on one end, to create a clean dipped-color effect. Instead of painting the entire clothespin, you leave part of the natural wood visible. That contrast between raw wood and color gives the finished piece a modern, handmade look. Think “farmhouse meets craft table,” but without needing a barn or a design degree.
The dipped style can be crisp and geometric, soft and watercolor-like, glittery, ombré, metallic, pastel, neon, or seasonal. You can dip only the tips, paint half the pin, create diagonal color blocks, or layer several tones. The project works especially well with wooden spring clothespins because the flat surfaces are easy to paint and the spring still allows the pin to function normally.
Why This Tiny Craft Is So Popular
Paint-dipped clothespins are popular because they check almost every DIY box. They are affordable, quick, customizable, beginner-friendly, and useful after the paint dries. Unlike some crafts that look cute for eight minutes and then migrate to a drawer of forgotten ambition, these pins can actually do jobs around the house.
Use them to clip snack bags, hang photos, organize receipts, label party food, attach gift tags, mark seedlings, display kids’ artwork, hold place cards, or decorate wreaths. They are also easy to make in batches, which makes them ideal for weddings, holiday prep, classrooms, craft fairs, and last-minute “I need this to look intentional” moments.
Supplies You Will Need
You do not need a professional studio to make paint-dipped clothespins. A table, a shoebox, and a willingness to get one finger slightly painted will do nicely.
Basic Materials
- Wooden clothespins
- Acrylic craft paint or washable craft paint
- Small cups, jars, or paper plates
- Painter’s tape or washi tape
- Wax paper, parchment paper, or a drying rack
- Small paintbrushes or foam brushes
- Fine-grit sandpaper
- Clear sealer, such as acrylic sealer, Mod Podge, or water-based polycrylic
- Optional: glitter, metallic paint, magnets, twine, labels, or stamps
Choosing the Best Clothespins
Wooden clothespins are the best choice because paint adheres to wood more easily than slick plastic. Look for pins that feel smooth, open and close evenly, and do not have rough splinters near the edges. Standard-size spring clothespins are great for everyday use, while mini clothespins are adorable for banners, scrapbooks, table cards, and gift packaging.
If your clothespins feel rough, lightly sand them before painting. This tiny step improves the finish and helps prevent brush drag. Sanding also removes small wood fibers that can make paint look bumpy. The goal is not to sculpt the Sistine Chapel out of laundry hardware; just smooth the surface enough that the paint behaves.
What Kind of Paint Works Best?
Acrylic craft paint is the most practical choice for paint-dipped clothespins. It is widely available, comes in a huge range of colors, works well on wood, dries relatively quickly, and cleans up with water while wet. For projects with young children, choose non-toxic, water-based paints and look for recognized art-material safety labels. Even when using kid-friendly paint, adults should supervise the project, especially with small clothespins, springs, sealers, and glitter.
Washable paint can work for children’s projects, but it may not be as durable as acrylic craft paint. If the finished clothespins will be handled often, used as chip clips, or displayed for months, acrylic paint plus a clear sealer gives a longer-lasting result. For outdoor or porch use, choose exterior-rated paint and a protective outdoor sealer, although even then, tiny wooden pins are not exactly patio furniture. Treat them kindly.
How to Make Paint-Dipped Clothespins
The process is simple, but the difference between “cute handmade” and “why is this stuck to my table?” is mostly preparation. Follow these steps for neat, durable, colorful results.
Step 1: Prepare Your Workspace
Cover your table with newspaper, kraft paper, parchment paper, or an old vinyl tablecloth. Paint has a talent for finding the one uncovered square inch of surface you care about. Keep a damp cloth nearby for quick cleanup, and set out a place for the clothespins to dry before you begin.
Good ventilation matters, especially if you are using spray sealer, stronger paint, or a large batch of supplies. Open a window, use a fan to move air out of the room, and always follow the label instructions on your paint and sealer.
Step 2: Sand and Wipe the Clothespins
Give each wooden clothespin a quick pass with fine-grit sandpaper. Focus on rough edges and the flat sides where paint will go. After sanding, wipe away dust with a dry cloth. Dust trapped under paint can create a gritty texture, and nobody wants a clothespin that feels like it spent the weekend at the beach.
Step 3: Tape Off the Dipped Area
For a crisp dipped look, use painter’s tape to mark the paint line. Wrap the tape around each clothespin at the point where you want the color to stop. You can tape straight across for a classic dipped end, diagonally for a modern look, or at different heights for a playful set.
Press the tape firmly along the edges to reduce bleeding. Because clothespins are small and wood grain is not perfectly flat, a tiny bit of paint may still sneak underneath. That is called “handmade character,” and it is cheaper than therapy.
Step 4: Dip or Brush on the Paint
There are two main methods. The first is true dipping: pour paint into a small cup and dip the clothespin end into it. Let the excess drip back into the cup, then gently wipe the back edge if needed. The second method is faux dipping: use a brush to paint the section below the tape. Brushing gives you more control and wastes less paint, especially when working with several colors.
If the paint is thick, add a drop or two of water and stir. Do not over-thin it, or the paint may soak unevenly into the wood. Two thin coats usually look better than one heavy coat. Heavy coats can create ridges, glue the spring area, or dry with tacky spots.
Step 5: Dry Without Smudging
Clip the clothespins to the edge of a cardboard box, a wire rack, a skewer, or a piece of string while they dry. This keeps the painted section from sticking to the table. You can also lay them on wax paper, but move them slightly after the first few minutes so paint does not form a stubborn little foot at the bottom.
Let the first coat dry before adding a second coat. Drying time depends on paint thickness, humidity, and room temperature. Warm, dry air speeds things up; thick paint and humid weather make everything feel like it is drying in a bowl of soup.
Step 6: Remove the Tape
Remove the tape while the final coat is dry to the touch but not fully hardened. Pull slowly and gently. If paint lifts, touch up the edge with a small brush. For extra-sharp lines, use a craft knife to lightly score along the tape edge before peeling, but only if you are comfortable handling sharp tools.
Step 7: Seal the Paint
Once the paint is completely dry, apply a clear sealer if the clothespins will be handled often. Mod Podge works well for decorative indoor pieces, while a clear acrylic spray or water-based polycrylic can add more protection. Use thin coats and let each coat dry according to the product label. Avoid thick sealer layers, which can make small clothespins sticky or interfere with the spring.
If you plan to use the clothespins near food packaging, use them on the outside of bags or labels only. Do not let painted or sealed surfaces touch food directly unless every material used is specifically labeled food-safe.
Color Ideas for Paint-Dipped Clothespins
The color palette is where this project starts showing off. You can match your home decor, holiday theme, brand colors, party invitations, nursery colors, or mood. Some days that mood is “soft sage and cream.” Other days it is “neon pink because Monday tried me.”
Modern Neutral Set
Use white, black, warm gray, beige, and muted clay. These colors look polished on a home office message board, pantry labels, or minimalist gift wrap. Pair them with kraft paper and cotton twine for a simple, boutique-style finish.
Rainbow Set
Paint each clothespin a different color: red, orange, yellow, green, blue, indigo, and violet. Rainbow clothespins are excellent for kids’ artwork displays, classroom behavior charts, color-matching games, and cheerful photo garlands.
Holiday Set
For Christmas, use deep green, red, gold, and white. For Halloween, try orange, black, purple, and candy-corn stripes. For Easter, use pastel pink, lavender, mint, and butter yellow. For the Fourth of July, go with navy, red, white, and metallic silver.
Wedding or Party Set
Paint mini clothespins in the wedding palette and use them for escort cards, favor tags, photo displays, or dessert labels. Metallic gold, champagne, dusty rose, eucalyptus green, and navy look especially elegant.
Ombré Set
Choose one color and mix several lighter versions by adding white paint. Paint each clothespin a slightly different shade. When clipped in a row, the gradual color shift looks intentional, stylish, and much more complicated than it actually is.
Creative Ways to Use Paint-Dipped Clothespins
Once you make one batch, you may start seeing clothespin opportunities everywhere. This is normal. Do not be alarmed unless you begin judging restaurant napkin clips for their color balance.
Photo Garland
String twine, ribbon, or thin wire across a wall, mantel, or dorm room corner. Clip photos, postcards, tickets, notes, or small artwork using your painted clothespins. This is one of the easiest ways to create a personal display without frames.
Gift Wrap Upgrade
Clip a painted clothespin onto a gift bag or wrapped box to hold a tag, dried flower, candy cane, or tiny card. The clothespin becomes part of the gift and can be reused later.
Pantry and Kitchen Labels
Use paint-dipped clothespins to label baskets, snack bags, coffee filters, tea packets, or lunch bags. Add names or categories with a fine-tip paint pen. For kitchen use, seal them well and keep them dry.
Plant Markers
Write herb or seedling names on the unpainted wood side and clip the pins to small stakes. They look especially charming in indoor herb pots. For outdoor gardens, use a weather-resistant sealer and expect natural wear over time.
Desk Organization
Glue small magnets to the back of painted clothespins and use them on a magnetic board or refrigerator. They can hold reminders, receipts, shopping lists, appointment cards, or the takeout menu you pretend you do not use every Friday.
Party Food Signs
Clip mini labels to serving trays or jars. They are perfect for brunches, birthdays, showers, cookie tables, and potlucks where someone always asks, “Is this spicy?” Now the clothespin can answer for you.
Common Mistakes and How to Fix Them
Paint Bleeding Under the Tape
Bleeding happens when tape is not pressed down firmly or paint is too watery. Use painter’s tape, press the edge well, and apply thinner coats. If bleeding occurs, let the paint dry and clean the line with a small brush and the natural wood color, or simply embrace the handmade look.
Clothespins Sticking Shut
This usually happens when paint or sealer gets into the spring area. Paint only the outer surfaces and avoid flooding the hinge. Open and close each clothespin gently while it is drying to make sure the mechanism still moves.
Sticky Finish
A sticky finish often comes from thick sealer, not enough drying time, or humid conditions. Apply thin coats, allow proper drying and curing time, and avoid stacking the pins too soon. Craft patience is difficult, but so is peeling twenty clothespins apart like a sad wooden sandwich.
Uneven Color
Wood absorbs paint differently from pin to pin. Sanding helps, and a second thin coat usually solves the problem. For a softer stained effect, intentionally thin the paint with water and let the grain show through.
Kid-Friendly Tips
Paint-dipped clothespins can be a great family or classroom project, but adjust the process for age and skill level. Use washable, non-toxic paint for younger children. Skip spray sealers during kid sessions and let adults handle sealing later in a ventilated area. Choose larger clothespins for small hands, cover the workspace generously, and place each color in a shallow tray to reduce spills.
Children can use painted clothespins for color sorting, counting games, chore charts, kindness-note boards, and handmade gifts. The project also helps develop fine motor skills because kids practice pinching, clipping, painting, and arranging. They may also practice the important life skill of saying, “I did not get paint on the chair,” while standing in front of a very painted chair.
Experience Notes: What Making Paint-Dipped Clothespins Teaches You
The first time you make paint-dipped clothespins, you may assume the project will be almost too easy. After all, they are clothespins. They are tiny. They do not have complicated feelings. But once you begin, you learn that small crafts have their own rules. The biggest lesson is that preparation matters more than speed. The batch that looks best is usually the one where you took five extra minutes to sand rough edges, line up the tape carefully, and create a drying setup before opening the paint.
Another experience-based tip: do not dip too deeply on the first try. A half-painted clothespin can look great, but if the paint gets into the metal spring, it may dry stiff. Leaving the hinge area clean keeps the pin useful. I have found that painting the lower third of the clothespin creates the cleanest balance between color and natural wood. It looks intentional without making the pin feel heavy or overdecorated.
Color choice also changes the personality of the project. Pastels feel sweet and soft, perfect for baby showers, Easter baskets, and nursery displays. Matte black and white look modern and surprisingly expensive, especially on kraft gift tags. Metallic paint adds instant party energy, but it often needs a smoother base and sometimes a second coat. Neon colors are fun, but they can look streaky unless layered carefully. When in doubt, make a test pin before painting the whole batch. One test pin can save twenty clothespins from becoming “experimental.”
Drying is where many beginners get impatient. Clothespins may feel dry on the outside before the paint has fully settled. If you stack them too early, they can stick together or develop dents. The best drying trick is clipping them around the rim of a cardboard box. It keeps the painted ends suspended, separates each pin, and makes your workspace look like a tiny modern art installation. A shoebox works for small batches; a shipping box works for serious clothespin ambition.
Sealing depends on how the pins will be used. For decorative garlands, a simple brush-on sealer is usually enough. For magnets, pantry clips, or anything handled frequently, a stronger clear coat makes a noticeable difference. Thin coats are better than thick coats. A heavy sealer coat can stay tacky, blur the crisp paint line, or make the clothespin feel less pleasant in the hand. If using spray sealer, do it outdoors or in a very well-ventilated area, and protect surrounding surfaces from overspray.
The most satisfying part of this craft is how quickly the finished pins become useful. Clip them to a gift bag and the package looks more thoughtful. Add magnets and suddenly your grocery list has style. Use them for a photo wall and the room feels warmer. Paint-dipped clothespins are not just cute; they solve little visual problems. They turn ordinary paper, string, bags, labels, and notes into something that feels designed. That is the magic of the project: a few cents of wood, a little paint, and suddenly the everyday looks like it tried.
Conclusion
Paint-dipped clothespins are a small project with big creative range. They are easy enough for beginners, affordable enough for large batches, and stylish enough for home decor, parties, classrooms, and handmade gifts. With wooden clothespins, acrylic paint, careful taping, proper drying, and a protective sealer, you can create durable little clips that look polished without feeling fussy.
The best part is that there is no single correct style. You can make them rustic, bright, elegant, silly, seasonal, minimalist, or wildly colorful. Start with one batch, learn what paint consistency and drying method you like best, and then experiment. Before long, you may discover that the humble clothespin is not so humble after all. It was just waiting for its makeover.