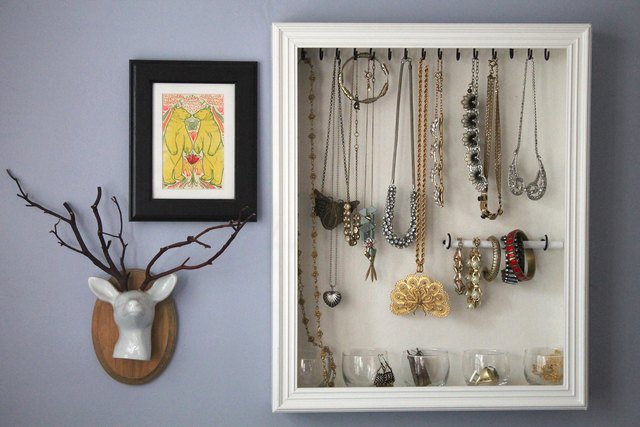

Jewelry has a funny way of turning from “tiny treasures” into “tiny chaos” when it does not have a proper home. One day your favorite necklace is resting peacefully on the dresser. The next day it has formed a mysterious knot with three bracelets, one earring, and a hair tie you have not seen since 2021. That is where a homemade jewelry holder saves the day.
Learning how to make a homemade jewelry holder is one of the easiest ways to organize necklaces, rings, earrings, bracelets, watches, and everyday accessories without spending a fortune. Even better, a DIY jewelry organizer can look like intentional home decor instead of a desperate rescue mission for tangled chains. With a few simple materialswood, hooks, dowels, fabric, cork, mesh, or even a picture frameyou can create a custom piece that fits your room, your style, and your actual jewelry collection.
This guide walks you through a practical, beginner-friendly project for making a wall-mounted homemade jewelry holder, plus several variations for different spaces and design tastes. Whether your style is farmhouse, modern, boho, minimalist, vintage, or “I found this frame in the closet and now it has a destiny,” this project can work beautifully.
Why Make a Homemade Jewelry Holder?
A homemade jewelry holder gives every piece a visible, easy-to-reach place. Necklaces can hang separately instead of twisting into one shiny spaghetti pile. Earrings can stay paired. Rings can sit in a small tray where they will not disappear into the carpet. Bracelets can slide onto a dowel or rest on hooks without taking over your nightstand.
Another benefit is customization. Store-bought jewelry organizers are convenient, but they are often too small, too plain, or designed for someone else’s collection. If you own mostly necklaces, you need hanging space. If earrings are your weakness, you need mesh, wire, cork, or small compartments. If rings keep multiplying like glamorous little rabbits, you need a tray or padded ring roll. A DIY jewelry holder lets you build around your real habits.
It is also budget-friendly. Many of the best homemade jewelry holder ideas use materials you may already have: an old picture frame, scrap wood, drawer pulls, cup hooks, leftover fabric, cork board, ribbon, chicken wire, or a thrifted tray. You get function, personality, and a little creative satisfactionthe holy trinity of home projects.
Best Homemade Jewelry Holder Design for Beginners
For most people, the best starter project is a wall-mounted jewelry holder with hooks, a dowel, and an earring panel. It is simple to make, does not require advanced tools, and can organize several jewelry types in one compact space.
This design includes hooks for necklaces, a dowel for bracelets or watches, mesh or cork for earrings, and a small shelf or tray area for rings. It uses vertical wall space, which is especially helpful if your dresser, vanity, or bathroom counter is already hosting lotion bottles, perfume, candles, and possibly one lonely sock.
Materials You Will Need
Basic Supplies
- One wood board, picture frame, or shallow wooden tray
- Small cup hooks, decorative hooks, or drawer pulls
- Wood dowel for bracelets and watches
- Metal mesh, chicken wire, cork board, or fabric-covered cardboard for earrings
- Small shelf, dish, or tray for rings and studs
- Sawtooth hanger, D-ring hangers, or wall-mounting hardware
- Paint, stain, or sealer
- Sandpaper
- Wood glue or strong craft glue
- Screws or nails
- Measuring tape and pencil
- Drill or screwdriver
Optional Decorative Supplies
- Peel-and-stick wallpaper
- Velvet, linen, burlap, or cotton fabric
- Decorative knobs
- Gold leaf paint or metallic wax
- Labels or small tags
- Ribbon or leather strips
- Clear acrylic hooks for a modern look
Step-by-Step: How to Make a Homemade Jewelry Holder
Step 1: Sort Your Jewelry First
Before you build anything, sort your jewelry into categories: necklaces, bracelets, rings, studs, hoop earrings, dangling earrings, watches, brooches, and special-occasion pieces. This step may feel boring, but it prevents you from building a beautiful organizer that holds everything except the items you actually wear.
Lay your jewelry on a table and remove broken pieces, single earrings with no partners, and items you never use. Clean dusty pieces gently. Set aside delicate or valuable jewelry that may need soft-lined storage rather than open display. The goal is not to judge your collection. The goal is to stop your dresser from looking like a pirate emptied his pockets on it.
Step 2: Choose the Base
Your base determines the style of the jewelry holder. A simple wood board creates a clean modern look. A vintage picture frame gives the project charm. A shallow wooden tray can become a framed organizer with built-in depth. A cork board is ideal for lightweight pieces and easy rearranging.
If you use wood, sand the surface and edges until smooth. Jewelry can snag on rough spots, and so can your fingers. If you use an old frame, remove the glass and backing. Keep the frame if it is sturdy, and replace the center with mesh, cork, or fabric-covered board.
Step 3: Plan the Layout
Place your hooks, dowel, mesh panel, and tray on the base before attaching anything. Keep long necklaces at the bottom or sides so they can hang freely. Place shorter necklaces or bracelets higher. Reserve the center for earrings if you are using mesh or cork. Add a small shelf near the bottom for rings, studs, perfume samples, or that one charm you swear you will put on a chain eventually.
Spacing matters. Hooks that are too close together will make necklaces overlap. A dowel that sits too near the board may not allow chunky bracelets to slide on easily. Earring panels should have enough open area so pairs do not crowd each other. Think of your jewelry holder like a tiny apartment building: everyone needs a little personal space.
Step 4: Paint or Stain the Base
Paint or stain the base before adding hardware. White paint creates a clean look. Black or charcoal makes metallic jewelry pop. Natural stain works well for rustic, farmhouse, or Scandinavian-inspired rooms. Soft sage, blush, navy, or cream can help the jewelry holder blend into bedroom decor.
Let paint dry completely before moving on. This is the part where impatience attacks. Resist it. Wet paint plus jewelry hardware equals fingerprints, smudges, and a project that says “homemade” in the wrong way.
Step 5: Add the Earring Panel
If you want to store earrings, add a panel made from metal mesh, chicken wire, perforated metal, lace, canvas, or cork. For a frame-based holder, staple mesh to the back of the frame. For a board-based holder, attach a smaller framed mesh section to the front.
Mesh works best for hook earrings and dangling earrings. Cork works well for studs if you use pushpins or small holes. Fabric-covered foam board can also hold studs, but choose fabric that is not too thick. Linen, cotton, and velvet are attractive options.
Step 6: Install Hooks for Necklaces
Mark the hook placement with a pencil. Use a ruler or measuring tape so the row looks intentional. Pre-drill tiny pilot holes if your wood is hard. Then twist in cup hooks or screw in decorative hooks.
For necklaces, choose hooks with enough curve to prevent chains from slipping off. Drawer pulls can also work beautifully, especially if you want a vintage or boutique display. Space hooks at least one to two inches apart, depending on necklace size. Longer statement necklaces need more room than delicate chains.
Step 7: Add a Dowel for Bracelets
A dowel is one of the simplest ways to organize bracelets, bangles, scrunchies, and watches. Cut the dowel to fit your holder, then rest it on two hooks or brackets. You can also glue wooden beads or caps to the ends so bracelets do not slide off.
If you want the dowel to be removable, place it on open hooks instead of permanently attaching it. That way, you can lift it off, slide bracelets on or off, and put it back. This small detail makes the holder much easier to use every day.
Step 8: Create a Ring and Stud Area
Rings and stud earrings need a safe landing zone. Add a small dish, shallow tray, or mini shelf to the bottom of the organizer. You can use a thrifted saucer, a ceramic pinch bowl, a wooden spice rack shelf, or a small drawer organizer.
For a more polished version, make ring rolls from felt or velvet. Roll strips of fabric around foam or cotton batting, then place them tightly in a small tray. Rings can slide between the rolls and stay upright, just like in a jewelry store display. Suddenly your dresser feels fancy, and nobody needs to know the foam came from leftover packaging.
Step 9: Attach Hanging Hardware
Turn the organizer over and attach sawtooth hangers, D-rings, or a sturdy picture-hanging system. If the holder will carry heavy jewelry, use wall anchors or screw into a stud. Lightweight holders can hang from standard picture hooks, but do not underestimate the weight of several chunky necklaces and bracelets.
Hang the jewelry holder where you get dressed: near a closet, vanity, mirror, or bedroom door. The easier it is to access, the more likely you are to use it. Organization should fit your routine, not demand a lifestyle transformation and a motivational podcast.
Creative Homemade Jewelry Holder Ideas
Picture Frame Jewelry Holder
Remove the glass from an old frame and replace it with mesh, lace, or cork. Add hooks along the bottom for necklaces. This is one of the easiest DIY jewelry holder ideas because the frame already provides structure and style.
Driftwood Jewelry Holder
A piece of driftwood or a natural branch can become a beautiful boho jewelry holder. Clean it, let it dry fully, seal it if needed, and add small hooks. Hang it with twine, leather cord, or picture wire. This style is perfect for necklaces and bracelets.
Pegboard Jewelry Organizer
A small pegboard gives you flexible storage. You can move hooks, shelves, cups, and dowels whenever your collection changes. Paint the pegboard to match your room, frame it for a finished look, and use it for necklaces, bracelets, sunglasses, and hair accessories.
Drawer Insert Jewelry Holder
If you prefer hidden storage, turn a shallow drawer into a jewelry station. Use small boxes, velvet trays, ice cube trays, or bamboo dividers to separate pieces. This option protects jewelry from dust and keeps the room visually calm.
Wall Hook Jewelry Display
For a fast project, mount decorative hooks directly onto a board or wall rail. This works especially well for necklaces and bracelets. Choose hooks that match your decorbrass for glam, matte black for modern, ceramic knobs for cottage style, or wood pegs for minimalist rooms.
Tips for Organizing Jewelry Like a Pro
Keep everyday jewelry in the easiest spot to reach. If you wear the same gold hoops, watch, and simple necklace most days, give them prime real estate. Special-occasion jewelry can go higher, lower, or inside a drawer.
Separate metals if possible. Silver, gold, rose gold, and costume jewelry can be grouped by finish so outfits are easier to plan. Keep delicate chains on individual hooks. Store pearls and soft gemstones away from rough surfaces. Avoid tossing fine jewelry into open bowls with heavy bangles, because scratches are not a design feature.
Use small dishes for “temporary parking.” This is where you place rings before washing your hands or earrings before bed. A tiny dish near the holder prevents pieces from migrating to random locations around the house.
Finally, leave room for growth. If your holder is completely full the day you make it, it will become cluttered quickly. Add a few extra hooks or leave open panel space. Future You will appreciate the optimism.
Common Mistakes to Avoid
One common mistake is making the organizer too small. Jewelry looks tiny until you try to store all of it in one place. Measure your longest necklaces, count your earrings, and consider how much you wear regularly.
Another mistake is using weak adhesive for heavy hardware. Glue can help with decorative elements, but hooks and hangers need screws when they will hold weight. Also avoid rough materials that can snag chains or scratch jewelry. Sand wood, trim wire ends, and cover sharp edges.
Do not hang valuable jewelry in direct sunlight, high humidity, or dusty areas. Bathrooms may seem convenient, but moisture can tarnish metals and damage some materials. A bedroom wall, closet area, or dressing nook is usually better.
How to Make Your Jewelry Holder Look Expensive
The secret to an expensive-looking homemade jewelry holder is consistency. Use matching hooks or knobs. Keep the color palette simple. Add one standout texture, such as velvet, cane webbing, linen, or brass hardware. Avoid over-decorating the base, because the jewelry itself will become part of the display.
For a boutique look, try a black frame with gold hooks, a white board with natural wood pegs, or a walnut-stained base with brass knobs. For a soft romantic style, use blush paint, velvet ring rolls, and pearl-headed pins. For a rustic design, use reclaimed wood, simple hooks, and a clear matte sealer.
Lighting also helps. Hang the holder near natural light or beside a mirror. When jewelry catches light, the whole display feels intentional and polished. It is the same necklace collection, just with better stage management.
Extra Experience: What I Learned From Making Homemade Jewelry Holders
The first lesson from making a homemade jewelry holder is simple: design for your real habits, not your fantasy habits. It is tempting to create a perfect display where every necklace hangs by length and every ring sits like it is waiting for a magazine photo shoot. But if you usually take jewelry off quickly at night, you need a catch-all dish. If you change earrings often, they need to be easy to remove. If the organizer is beautiful but annoying to use, clutter will return like a dramatic villain in a sequel.
Another useful experience is to test the layout before drilling. I once placed hooks in a neat little row, only to discover that my longest necklaces overlapped the bracelet dowel below. The organizer looked great empty and chaotic when used. Now I always lay the jewelry on the board, mark the longest pieces, and leave more vertical space than I think I need. Necklaces are surprisingly territorial.
Hardware choice also matters more than expected. Tiny cup hooks are affordable and easy to install, but they are not always best for thick chains or chunky beads. Decorative drawer pulls create more room and add personality. Pegs give a clean modern look. For bracelets, a removable dowel is much easier than fixed hooks, especially when storing bangles. You can slide everything off without playing a tiny game of bracelet gymnastics.
I have also learned that the best DIY jewelry organizer is not always the biggest one. A huge wall display can look impressive, but it may collect dust or make a bedroom feel busy. Sometimes a medium holder with a drawer tray nearby works better. Put the prettiest and most-used pieces on display, then store sentimental or delicate jewelry in soft compartments.
Repurposed materials can make the project feel special. An old frame from a thrift store, a leftover board from a shelf project, or a small ceramic dish from a flea market can turn a basic jewelry holder into something personal. The charm comes from the mix of function and story. Anyone can buy an organizer, but a homemade one feels like it belongs in your room because you made the decisions.
Finally, do not chase perfection. A homemade jewelry holder should be sturdy, useful, and attractive, but it does not need to look factory-made. Slight variations in wood grain, hand-painted edges, or mismatched vintage knobs can add character. The real win is opening your drawer or looking at your wall and actually seeing what you own. When jewelry is visible and organized, you wear it more often. That forgotten bracelet gets a comeback. Those earrings finally find their partner. Your necklaces stop auditioning for a knot-tying championship.
Making a homemade jewelry holder is more than a craft project. It is a small upgrade to your daily routine. It saves time, protects accessories, improves your space, and gives you a satisfying reason to use a drill, paintbrush, or glue gun. And honestly, any project that makes your dresser cleaner while letting your favorite jewelry sparkle deserves a standing ovationor at least a very organized round of applause.
Conclusion
A homemade jewelry holder is a smart, stylish, and affordable way to organize your accessories while adding personality to your room. With a simple base, a few hooks, an earring panel, and a ring tray, you can build a custom DIY jewelry organizer that fits your collection better than most store-bought options. The best design keeps necklaces untangled, earrings paired, bracelets easy to grab, and rings safely stored.
Start with what you own, choose materials that match your decor, and build around your daily routine. Whether you use a picture frame, pegboard, wood board, cork panel, thrifted tray, or driftwood branch, the result can be both practical and beautiful. Your jewelry deserves better than a tangled pile, and your morning routine deserves fewer tiny treasure hunts.


