
Creating a database in phpMyAdmin sounds like one of those tasks reserved for developers who drink black coffee, speak fluent SQL, and think “schema” is a casual lunch topic. Good news: it is much easier than it sounds. phpMyAdmin gives you a browser-based way to manage MySQL or MariaDB databases without typing every command into a terminal. If you can log in, click a tab, name a database, and press a button without panic-clicking the nearest “Cancel,” you are already halfway there.
Whether you are building a WordPress site, testing a PHP application, setting up a local development project, or preparing a clean database for an import, phpMyAdmin can help you create and manage your database quickly. The key is understanding what you are creating, which settings matter, and what to do if the famous “No Privileges” message pops up like an unwanted raccoon in your server room.
In this guide, you will learn how to create a database in phpMyAdmin in four simple steps. We will also cover naming rules, collation choices, user permissions, common errors, security tips, and practical experience-based advice from real-world database work. By the end, you will be able to create a MySQL database confidentlyand maybe even explain it to someone else without sounding like a robot reading a router manual.
What Is phpMyAdmin?
phpMyAdmin is a free, open-source web application used to manage MySQL and MariaDB databases. Instead of typing database commands only through a command-line interface, phpMyAdmin lets you perform common tasks through a visual dashboard. You can create databases, create tables, import SQL files, export backups, run queries, edit records, manage users, and adjust database settings such as character sets and collations.
Many web hosting companies include phpMyAdmin inside control panels such as cPanel, Plesk, or custom hosting dashboards. Local development tools like XAMPP, MAMP, WAMP, and LocalWP also commonly include phpMyAdmin. That makes it one of the most familiar database management tools for beginners, website owners, WordPress users, and developers who need a fast way to manage MySQL data.
Before You Start: What You Need
Before creating a database in phpMyAdmin, make sure you have access to the right environment. You will usually need:
- Access to phpMyAdmin through your hosting account, server, or local development stack
- A MySQL or MariaDB server running in the background
- A user account with permission to create databases
- A database name that matches your project
- A basic idea of what your database will store
If you are using shared hosting, your provider may not allow you to create databases directly from phpMyAdmin. In many cPanel environments, you create the database from the “MySQL Databases” or “MySQL Database Wizard” section first, then manage it in phpMyAdmin afterward. On a local server, however, phpMyAdmin often lets you create the database directly if your MySQL user has enough privileges.
How to Create a Database in phpMyAdmin: 4 Simple Steps
Step 1: Log In to phpMyAdmin
First, open phpMyAdmin. The exact path depends on your setup. If you are using cPanel, log in to your hosting account and look for the “Databases” section. Click “phpMyAdmin,” and it usually opens in a new browser tab. If you are working locally, you may access it through a URL such as http://localhost/phpmyadmin.
After phpMyAdmin loads, you should see a dashboard with a navigation panel on the left and a main work area on the right. The left sidebar usually lists existing databases. The top menu may include tabs such as “Databases,” “SQL,” “Status,” “User accounts,” “Export,” and “Import.” Your exact interface may look slightly different depending on your phpMyAdmin version, hosting provider, and permissions.
If phpMyAdmin asks for a username and password, enter the MySQL credentials provided by your host or created during local installation. For local development, common usernames include root, but production servers should use safer, limited-permission accounts whenever possible. Using the root account everywhere is a little like using a chainsaw to open an envelope: technically possible, but not exactly wise.
Step 2: Open the Databases Tab
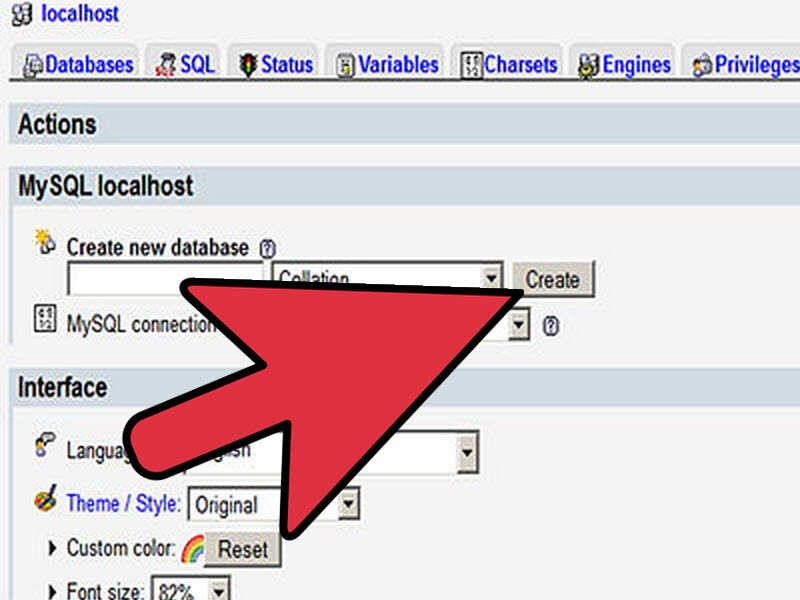
Once you are inside phpMyAdmin, click the “Databases” tab near the top of the interface. This page is where phpMyAdmin displays existing databases and, if your account has the correct permissions, a form for creating a new one.
You may see a field labeled “Create database” or “Database name.” Next to it, there may be a dropdown menu for collation. Collation controls how text is compared and sorted inside the database. For example, it affects how uppercase and lowercase letters are treated, how accented characters are sorted, and how multilingual content behaves.
For most modern web projects, a UTF-8 based option is the safest choice. In MySQL 8, utf8mb4 is commonly used because it supports a wide range of characters, including emojis and international alphabets. Older utf8 settings may not fully support every Unicode character. If your website will store names, comments, product descriptions, blog posts, or anything users might type, choosing a modern utf8mb4 collation helps prevent future “Why did my emoji turn into a square?” moments.
Step 3: Enter a Database Name and Choose a Collation
Now enter the name of your new database. Choose something clear, short, and related to the project. A good database name tells you what it belongs to without requiring detective work. For example:
wordpress_blogstore_inventoryclient_portallearning_app
Avoid spaces, special characters, and vague names like test, newdb, or final_final_real_database. Use lowercase letters, numbers, and underscores. This keeps your database name easy to read and less likely to cause problems in scripts, configuration files, or migrations.
If you are using shared hosting, your host may automatically add a prefix to your database name. For example, if your hosting username is bluefox and you create a database called blog, the final database name might become bluefox_blog. This is normal. Hosting providers use prefixes to avoid naming conflicts between accounts on the same server.
Next, choose a collation if phpMyAdmin gives you the option. A common modern choice is utf8mb4_unicode_ci or a newer MySQL 8 collation such as utf8mb4_0900_ai_ci, depending on what your server supports. If you are unsure, use your host’s default UTF-8 option or choose a widely compatible utf8mb4 collation. The important thing is to avoid outdated character settings unless you have a specific reason to use them.
Step 4: Click Create and Confirm the Database Exists
After entering the database name and selecting a collation, click the “Create” button. If everything is configured correctly, phpMyAdmin will create the new database and display it in the left sidebar. You may also see a success message in the main panel.
Click the database name in the left sidebar to open it. A brand-new database will usually be empty, which is exactly what you want. From here, you can create tables manually, import an SQL file, connect an application, or assign user privileges depending on your project.
If you are setting up WordPress, for example, WordPress will create the required tables during installation after you enter the database name, username, password, host, and table prefix. If you are building a custom PHP application, you may create tables yourself using phpMyAdmin’s visual table creator or by running SQL commands from the “SQL” tab.
What If You See “No Privileges”?
The “No Privileges” message means your current MySQL user does not have permission to create databases. This is common on shared hosting and some local installations. phpMyAdmin is only the interface; the actual permission rules come from MySQL or MariaDB. In other words, phpMyAdmin is not being rude. It is just the messenger wearing a very plain outfit.
If you are on shared hosting, go back to your hosting control panel and look for “MySQL Databases,” “Database Wizard,” or a similar tool. Many hosts require database creation there instead of inside phpMyAdmin. After creating the database, return to phpMyAdmin to manage tables, imports, exports, and records.
If you are managing your own server, you may need to log in with an administrative MySQL account and grant the required permissions. A typical workflow is to create a database, create a dedicated user, and grant that user privileges only on that specific database. This is better than giving every project global access to everything, which is how small mistakes become large weekends.
Should You Create a Database in phpMyAdmin or cPanel?
It depends on your hosting environment. On local development setups, creating a database directly in phpMyAdmin is usually fast and convenient. On shared hosting, cPanel or your host’s database wizard may be the correct place to create the database and database user.
Here is the practical difference: phpMyAdmin is mainly a database management tool, while cPanel is a hosting account management tool. cPanel may handle account-level restrictions, database prefixes, user creation, and user assignment. phpMyAdmin then gives you control over what happens inside the database.
If your hosting provider tells you to create databases through cPanel, follow that rule. Once the database exists, phpMyAdmin becomes your workbench for checking tables, importing data, exporting backups, changing collations, and running SQL queries.
How to Create Tables After Creating the Database
A database without tables is like a filing cabinet with no folders. It exists, it looks official, and it stores absolutely nothing useful yet. After creating your database, the next step is usually creating tables.
To create a table in phpMyAdmin, click your database name in the left sidebar. In the main panel, you should see an option to create a table. Enter a table name, choose the number of columns, and click “Go.” Then define each column’s name, data type, length, default value, and index settings.
For example, a simple customers table might include:
idas an integer with auto-increment and primary keyfirst_nameas a variable character fieldlast_nameas a variable character fieldemailas a variable character fieldcreated_atas a date/time field
For most applications, every table should have a primary key. The primary key uniquely identifies each record and makes it easier to update, delete, and connect data across tables. Auto-incrementing integer IDs are common, but some applications use UUIDs or other identifiers.
How to Import an Existing Database
If you are moving a website or restoring a backup, you may create a blank database first and then import an SQL file. In phpMyAdmin, click the database name, choose the “Import” tab, select your SQL file, and click “Go.” phpMyAdmin will run the SQL commands inside the file and create the tables and records.
Before importing, make sure the database is empty unless you intentionally want to merge data. Also check the file size limit. phpMyAdmin imports can fail if the SQL file is larger than the upload limit configured on the server. In that case, you may need to compress the file, increase server limits, split the SQL file, or use a command-line import method.
Best Practices for Naming a Database
Good database names make life easier later. Use names that are descriptive but not painfully long. A database called company_store_production is useful. A database called db1 is not. A database called this_is_the_database_for_the_new_store_please_do_not_delete is emotionally expressive but inconvenient.
Follow these simple rules:
- Use lowercase letters when possible.
- Separate words with underscores.
- Avoid spaces and special characters.
- Use project-specific names.
- Include environment labels such as
dev,staging, orprodwhen needed.
For example, if you run an online store, you might use store_dev for development, store_staging for testing, and store_prod for production. That naming pattern helps prevent a truly terrible mistake: editing the live database when you thought you were safely playing in the sandbox.
Security Tips After Creating a Database
Creating the database is only the first step. Securing it matters just as much. A database can hold user accounts, customer records, orders, comments, settings, and other sensitive information. Treat it like a locked cabinet, not a junk drawer.
Create a Dedicated Database User
Do not use one all-powerful MySQL user for every website or application. Instead, create a dedicated user for each project and grant access only to the database that project needs. This limits damage if credentials are exposed.
Use a Strong Password
Database passwords should be long, unique, and hard to guess. Avoid passwords like password123, admin, or your dog’s name followed by your birth year. Your dog deserves privacy, and your database deserves better security.
Back Up Before Major Changes
Before importing data, deleting tables, changing collations, or running large SQL queries, export a backup. phpMyAdmin makes this easy with the “Export” tab. A backup turns disaster into inconvenience. No backup turns inconvenience into a dramatic three-act tragedy.
Limit Remote Access
If remote MySQL access is not needed, keep it disabled. If it is needed, restrict access to trusted IP addresses whenever possible. Publicly exposed database services are attractive targets for attackers.
Common Mistakes to Avoid
Even a simple database setup can go sideways if you rush. Here are the most common mistakes beginners make when creating a database in phpMyAdmin.
Choosing the Wrong Character Set
If your database stores modern web content, use a Unicode-friendly setting such as utf8mb4. This helps support international characters and emojis. Choosing an outdated character set can create messy text problems later.
Forgetting to Assign a User
On many hosting platforms, creating a database is not enough. You must also create or choose a MySQL user and assign that user to the database. If your application cannot connect, missing user permissions may be the reason.
Confusing Database Name and Username
Applications often ask for a database name, database username, password, and host. These are not interchangeable. The database name identifies the database. The username identifies the account allowed to access it. Mixing them up is common, but your application will not politely guess what you meant.
Editing the Wrong Database
If your server has multiple databases, double-check the name before making changes. This is especially important when working with WordPress sites, staging copies, or client projects. One careless click can turn a quick fix into a long evening.
Example: Creating a Database for a WordPress Site
Suppose you want to install WordPress manually. You log in to phpMyAdmin and create a database named myblog_wp. You select a modern utf8mb4 collation and click “Create.” Then, in your hosting control panel, you create a MySQL user named myblog_user and assign it to myblog_wp with the required privileges.
During WordPress installation, you enter:
- Database name:
myblog_wp - Username:
myblog_user - Password: your secure database password
- Database host: usually
localhost, unless your host says otherwise - Table prefix: something like
wp_or a custom prefix
WordPress then creates its own tables inside the database. You do not need to manually create each WordPress table unless you are doing something advanced. phpMyAdmin remains useful afterward for backups, troubleshooting, database inspection, and repairs.
Troubleshooting: Why Database Creation Fails
If phpMyAdmin does not create the database, check the error message first. It often tells you exactly what went wrong, although sometimes in the charmingly cryptic language of server software.
Permission Error
If you see “No Privileges” or a permission-related message, your MySQL user cannot create databases. Use your hosting control panel or ask your server administrator to grant the right permission.
Database Already Exists
If the database name already exists, choose a different name or delete the old database only if you are absolutely sure it is no longer needed. When in doubt, export a backup first.
Invalid Database Name
Spaces, special characters, or reserved words can cause problems. Rename the database using simple lowercase letters, numbers, and underscores.
Server Connection Issue
If phpMyAdmin cannot connect to MySQL, the database server may be down, credentials may be wrong, or the server configuration may be incorrect. On local machines, make sure MySQL or MariaDB is running in your control panel.
Experience-Based Advice: What You Learn After Creating a Lot of Databases
After you create a few databases, the process feels almost too easy. Click, name, createdone. But after you manage dozens or hundreds of databases across websites, test environments, migrations, and backups, you learn that the real skill is not clicking the “Create” button. The real skill is creating databases in a way that your future self will understand at 2:00 a.m. when something breaks and coffee has become a personality trait.
The first practical lesson is to name databases clearly. In the beginning, names like demo, test2, and newsite seem harmless. Later, when you have three test sites, two staging copies, an old client backup, and a production database sitting in the same server list, those names become tiny traps. A descriptive name such as bakery_site_staging or shop_prod_2026 can save you from editing the wrong database. Clear naming is not glamorous, but neither is restoring a broken live website because you clicked too quickly.
The second lesson is to respect permissions. Beginners often want to give every user full privileges because it makes connection errors disappear. That works until it does not. A safer habit is to give each application only the access it needs. For most web apps, the database user needs to read, write, update, delete, and manage tables within one specific database. It usually does not need global privileges across the entire server. Limiting permissions is like installing interior doors in a building: if one room has a problem, the whole house does not have to burn down.
The third lesson is to choose character settings carefully from the start. Many older databases were created with settings that worked fine until someone added accented names, multilingual content, or emojis. Then strange symbols appeared, search behaved oddly, and everyone blamed the website theme even though the database was the real culprit. Using utf8mb4 for modern projects is a smart default because it handles a broad range of characters. It is easier to begin with the right setting than to fix encoding problems later.
The fourth lesson is to back up before experimenting. phpMyAdmin makes it very easy to run SQL queries, drop tables, empty data, and import files. That convenience is powerful, but it also means mistakes happen quickly. Before importing a large SQL file, changing table structure, or deleting anything, export the database first. Even a quick backup can be the difference between “Oops, let me restore that” and “I need to lie down and rethink my career.”
The fifth lesson is to document connection details securely. When you create a database for a project, record the database name, username, host, and purpose in a safe password manager or internal documentation system. Do not store passwords in plain text files on your desktop with names like database-passwords.txt. That is not documentation; that is a gift basket for trouble.
The sixth lesson is to separate development, staging, and production. A development database is where you test freely. A staging database is where you rehearse changes before launch. A production database is where real users and real business data live. Treating all three the same is how accidents happen. If possible, make their names visibly different and avoid using the same credentials across all environments.
Finally, remember that phpMyAdmin is a tool, not a magic shield. It helps you manage databases faster, but it cannot protect you from every bad decision. Slow down before destructive actions. Read confirmation messages. Check which database is selected. Export backups. Use strong passwords. Follow least-privilege access. These habits may feel boring, but boring is wonderful when databases are involved. In database management, “nothing exciting happened” is often the best possible outcome.
Conclusion
Creating a database in phpMyAdmin is straightforward once you understand the basic flow: log in, open the Databases tab, enter a clear database name, choose a suitable collation, and click Create. The process may vary slightly depending on your hosting provider, but the core idea stays the same. phpMyAdmin gives you a visual way to manage MySQL and MariaDB databases without requiring you to live inside a command-line window.
The most important details are permissions, naming, character settings, and security. If you cannot create a database directly in phpMyAdmin, your hosting account may require you to use cPanel or another control panel instead. If your application cannot connect, check the database name, username, password, host, and assigned privileges. And before making big changes, export a backup. Databases are wonderfully useful, but they have very little sense of humor when deleted by accident.
With the four steps in this guide, you can create a clean database for a website, application, WordPress installation, test project, or imported backup. Keep your names organized, use modern UTF-8 settings, assign users carefully, and your database setup will be neat, reliable, and much less likely to cause mysterious technical headaches.


