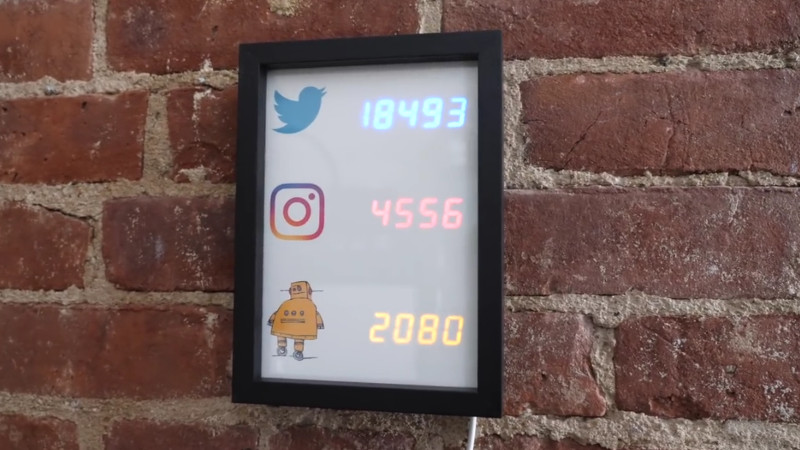

There are two types of people on the internet: those who say they do not care about follower counts, and those who definitely checked their follower count before saying that. A stylish ESP8266 display sits cheerfully in the middle. It does not shout, beg for likes, or vibrate in your pocket every six minutes. It simply glows on a shelf, showing your social media numbers like a tiny scoreboard for your online empire.
The idea behind a social media counter is wonderfully simple: connect a Wi-Fi-enabled microcontroller to the internet, fetch public stats from one or more platforms, and show those numbers on a physical display. The result feels more personal than a browser dashboard and more satisfying than refreshing an app. When built into a shadow box, picture frame, desk sign, or custom enclosure, an ESP8266 follower counter becomes part maker project, part decor, and part motivational gadget.
This article explores how a stylish ESP8266 display works, what parts make sense, which design decisions matter, and why this project remains a favorite for creators, streamers, makers, small businesses, and anyone who enjoys turning invisible internet data into something you can actually see across the room.
What Is an ESP8266 Social Media Display?
An ESP8266 social media display is a compact internet-connected counter that shows numbers such as YouTube subscribers, Instagram followers, project followers, page likes, GitHub stars, blog subscribers, or other public metrics. The ESP8266 acts as the brain. It connects to Wi-Fi, requests data from an online API or web service, parses the response, and sends the number to a display.
The most charming versions do not look like unfinished electronics. Instead, they hide the circuit behind paper, acrylic, tinted plastic, laser-cut panels, or a deep picture frame. Seven-segment LED modules glow through a printed template. OLED screens display icons and labels. LED matrix modules scroll names, milestones, or celebratory messages. The electronics do the work, but the enclosure gives the project personality.
A classic version of this build uses a NodeMCU or Wemos D1 mini board, several I2C seven-segment displays, and a shadow box frame. The display can track more than one platform at a time, giving each service its own number. That makes it more interesting than a single subscriber counter, especially for creators who publish across YouTube, Instagram, Instructables, GitHub, TikTok, newsletters, or personal websites.
Why the ESP8266 Is Perfect for a Fan Counter
The ESP8266 became popular because it put Wi-Fi into small projects without demanding a large budget or a giant board. For a social media counter, that is exactly what you need. The device does not have to run a complex operating system. It only needs to join a network, make occasional web requests, handle a small amount of text data, and update a display.
Boards such as the Wemos D1 mini and NodeMCU are especially convenient because they include USB programming, voltage regulation, and easy-to-use pins. Many versions are small enough to disappear behind a frame or inside a desk enclosure. They can be programmed with the Arduino IDE, which makes the project approachable for people who know a little Arduino but do not want to wrestle with low-level networking code at 2 a.m. while questioning their life choices.
Useful ESP8266 Features for This Project
The ESP8266 brings several helpful features to a follower counter. It has built-in Wi-Fi, enough processing power for simple API requests, support for I2C and SPI display modules, and a large community of libraries. It can run code written in the familiar Arduino style, and it works with libraries for HTTP requests, JSON parsing, OLED screens, seven-segment modules, and LED matrices.
For a display that checks stats every few minutes, the ESP8266 is more than capable. The main limitations are memory, secure web connection handling, and API rules. Those are manageable with thoughtful coding and realistic update intervals.
Choosing the Right Display Style
The display is where the project becomes art. A bare circuit on a breadboard may be technically impressive, but a clean, framed counter feels intentional. The best choice depends on how much information you want to show and what kind of visual personality fits your space.
Seven-Segment LED Displays
Seven-segment displays are the classic choice for numbers. They look bold, readable, and slightly retro. A four-digit module can show values up to 9,999. If your follower count has grown beyond that, congratulations, internet celebrity; you can chain multiple modules together. For five or six digits, two modules side by side work nicely.
I2C seven-segment modules are especially friendly because multiple displays can share the same two communication wires. That reduces the wiring mess and makes the inside of the frame less terrifying. They are also bright enough to shine through paper or diffusion material, which helps the display look polished rather than like a robot sneezed wires onto your desk.
OLED Displays
An SSD1306 OLED display is a good option when you want text, icons, labels, and small graphics. A 0.96-inch OLED screen can show a channel name, platform icon, subscriber count, Wi-Fi status, or update time. It looks crisp and modern, though it is smaller and less readable from across the room than large LED digits.
OLED displays are great for desk gadgets, wearable counters, compact badges, and minimalist builds. They also allow more flexible layouts than seven-segment modules. If you want a tiny dashboard that says “YouTube: 12.4K” and “Updated: 10:42,” OLED makes that easy.
LED Matrix Modules
LED matrix displays are fun when you want scrolling text, animations, and a more arcade-style feel. A MAX7219 LED matrix can display numbers, short labels, arrows, icons, and celebratory messages like “New fan!” or “10K!” The trade-off is that matrix displays require a bit more layout planning to keep numbers readable.
For a creator desk, streaming setup, workshop, or makerspace wall, an LED matrix counter has energy. It says, “Yes, I own a soldering iron, and yes, I will make it everyone’s problem.”
How the Counter Gets the Numbers
The basic software flow is simple. First, the ESP8266 connects to your Wi-Fi network. Next, it makes a request to a public API, a custom server endpoint, or a service that returns your current social stats. Then the ESP8266 reads the response, extracts the number, formats it, and updates the display.
For YouTube, the YouTube Data API can provide channel statistics, including subscriber count when it is publicly available. However, modern YouTube subscriber counts may be rounded, and hidden subscriber counts may not be returned. That means your display should be treated as a stylish public counter, not a laboratory instrument measuring fame down to the individual human.
For other platforms, the process depends on the service. Some APIs require authentication. Some limit requests. Some change their rules. Some make public follower counts harder to access than a snack hidden behind a sleeping cat. For long-term reliability, many builders use a small server script or automation platform between the ESP8266 and the social network. The server handles authentication and formatting, while the ESP8266 receives a simple number.
Why Update Intervals Matter
A follower counter does not need to refresh every second. In fact, it should not. Frequent requests can hit API limits, drain power, cause connection issues, and make your project less reliable. Updating every five, ten, fifteen, or thirty minutes is usually enough for a physical display.
A smart counter can show the last successful update time, keep the previous value if a request fails, and avoid flashing error messages every time the internet hiccups. The best user experience is calm. Your display should behave like a confident assistant, not like a toaster having an existential crisis.
Designing a Stylish Enclosure
The difference between a project and a product is often the enclosure. A beautiful ESP8266 display does not need to be expensive, but it does need intention. A shadow box frame is one of the easiest ways to make the project look finished. The electronics sit behind the backing board, while the display shines through a printed front panel.
Paper diffusion is surprisingly effective. Print platform names, icons, or labels on thick paper, cut windows where the digits appear, and place the LED modules behind it. The glow softens, the wires disappear, and the whole thing looks like a custom sign. Tinted acrylic, vellum, frosted plastic, and thin translucent film can also work well.
Layout Tips That Make the Display Look Better
Start with the viewing distance. If the counter will sit on your desk, a small OLED or compact LED display is fine. If it will hang on a wall, use larger digits. Keep labels short: “YouTube,” “Instagram,” “GitHub,” “Views,” or “Fans.” Avoid cramming too much information into one area. White space is not wasted space; it is where your design takes a breath.
Match digit length to the metric. A beginner channel might need four digits today but five later. If growth is the goal, leave room for expansion. Using two four-digit displays for one platform gives you space up to eight digits, which is probably enough unless you are secretly a global pop star reading maker blogs between stadium shows.
Parts You Might Use
A typical ESP8266 fan counter can be built with a short and affordable parts list. You need an ESP8266 development board, a display, a USB cable or 5V power supply, jumper wires, a small prototyping board, and an enclosure. Depending on the display, you may also need headers, resistors, solder, heat shrink, or mounting tape.
For the brain, the Wemos D1 mini is compact and convenient. NodeMCU boards are larger but beginner-friendly because they expose many pins and plug easily into a breadboard. For displays, I2C seven-segment modules are excellent for clean numeric counters. OLED displays are better for mixed text and icons. LED matrix modules are best for scrolling or animated layouts.
Recommended Beginner Combination
For a first build, choose a Wemos D1 mini, one SSD1306 OLED display, and a USB power cable. This version keeps wiring simple and lets you focus on Wi-Fi, data fetching, and layout. Once that works, upgrade to larger seven-segment modules or multiple displays inside a frame.
Recommended Display-First Combination
For a more decorative project, choose a NodeMCU or D1 mini with two to six I2C seven-segment modules inside a shadow box. This creates a bold, visible counter that looks good on camera, in a studio, or on a workshop wall. It is also easier for visitors to understand at a glance.
Software Planning Without the Headache
The software has four main jobs: connect, request, parse, and display. Keep each job separate. One function can handle Wi-Fi. Another can make the web request. Another can extract the number. Another can update the screen. This makes debugging much easier, especially when the number does not appear and you are trying to decide whether the problem is Wi-Fi, JSON, API permissions, wiring, or the ancient curse of “it worked yesterday.”
For modern web services, HTTPS is common. On the ESP8266, secure connections can require careful handling of certificates, memory, and client settings. Many hobby projects simplify this by using an intermediate endpoint that returns plain, compact JSON. For example, instead of asking the ESP8266 to deal with a large API response, your server can return something simple like {“fans”:12345}. Smaller responses are easier to parse and more reliable on limited hardware.
JSON libraries make the parsing step cleaner. Rather than searching raw text manually, the ESP8266 can deserialize the response and read the exact field it needs. This is especially useful when tracking multiple platforms, because you can return all stats in one tidy response.
Common Problems and Simple Fixes
The Display Shows Nothing
Check power, ground, and communication pins first. Many I2C OLED and LED modules use addresses such as 0x3C or 0x70, but address conflicts can happen. An I2C scanner sketch can help confirm that the ESP8266 can see the display. Also check whether your display library expects a reset pin, a specific screen size, or a particular address.
The Numbers Are Wrong or Rounded
Some social platforms round public counts, cache results, or hide exact numbers. Your display can only show what the data source provides. If a subscriber count jumps in rounded steps, the project is probably working correctly. The platform is simply protecting or simplifying public statistics.
The ESP8266 Randomly Resets
Resets often come from weak power, memory pressure, or unstable wiring. Use a reliable USB power supply, keep wires short, and avoid overly large API responses. If the display is bright and draws more current, consider powering it properly rather than expecting the ESP8266 board to perform miracles while sipping electricity through a questionable cable found in a drawer.
The API Stops Working
APIs change. Authentication rules change. Rate limits change. Social media platforms especially enjoy moving the furniture around. To make your counter easier to maintain, isolate platform-specific code on a server or in a small cloud function. Then the ESP8266 only needs to read your own stable endpoint.
Creative Ways to Use the Display
A fan counter is not limited to vanity metrics. You can use the same ESP8266 display idea for many kinds of public or personal data. Show newsletter subscribers, store orders, GitHub stars, website visits, Twitch followers, weather alerts, classroom points, donation milestones, or event registrations. The format is the same: fetch a number, format the number, and display it beautifully.
Small businesses can use a counter as a motivational desk display. A coffee shop could show loyalty members. A podcast host could track downloads. A teacher could display class challenge points. A maker could show project views. A YouTuber could mount it near the camera as a quiet reminder that real people are watching, subscribing, and waiting for the next upload.
Privacy, Security, and Good Manners
Any connected device should be designed with care. Do not hard-code sensitive API keys into public code repositories. Do not share screenshots that expose tokens. Keep Wi-Fi credentials private. If you publish the project, use placeholder values and explain where users should insert their own details.
Also, respect API terms and rate limits. A display that refreshes politely every few minutes is useful. A display that hammers a service every second is just a tiny denial-of-service machine wearing a cute frame. Be the good kind of maker.
Is This Still Worth Building Today?
Absolutely. Newer boards such as the ESP32 offer more memory and processing power, but the ESP8266 remains a practical choice for simple Wi-Fi displays. It is inexpensive, well documented, widely supported, and small enough for elegant enclosures. For a project that mostly fetches a number and lights up a display, it still does the job nicely.
The bigger challenge today is not the hardware. It is the data source. Social media APIs are more restrictive than they once were. That does not kill the project; it simply changes the architecture. A small server-side helper can keep the ESP8266 code simple and make the whole system easier to update when platforms change.
Experience Notes: What Building One Teaches You
Building a stylish ESP8266 fan counter teaches a lot more than how to display a number. The first lesson is that “simple” IoT projects are usually three projects wearing one jacket. There is the electronics project, where you wire the board and display. There is the software project, where you connect to Wi-Fi and parse data. Then there is the design project, where you hide the evidence that the first two projects involved a suspicious amount of tape.
The most satisfying moment comes when the display updates for the first time. You upload the sketch, open the serial monitor, watch the ESP8266 connect to Wi-Fi, and suddenly the digits change from zeros to a real count. It feels like the internet has been poured into a tiny glowing window. Even if the number is modest, it feels official. Your followers are no longer trapped inside an app; they have escaped into hardware.
One practical experience is learning to respect power. A single OLED is forgiving, but several bright LED modules can expose every weakness in your cable, breadboard, or power supply. If the board resets when the digits light up, the code may be innocent. The power source is often the real troublemaker. A stable supply and clean wiring make the project behave like a finished object instead of a nervous prototype.
Another lesson is that physical layout should be planned before soldering. It is tempting to build the circuit first and think about the enclosure later. That usually leads to awkward wire bends, blocked USB ports, and displays mounted slightly crooked, which will bother you forever. Print a paper template first. Mark where the digits will appear. Place the boards behind the template. Make sure the USB cable can exit cleanly. Only then start committing things with solder.
The software side teaches patience with APIs. A number that loads perfectly in a browser may not be easy for a microcontroller to fetch. HTTPS, certificates, redirects, authentication, and large JSON responses can all complicate the job. A useful trick is to make the ESP8266’s job boring. Let a server or script do the complicated platform work, then give the microcontroller a tiny response that contains only the numbers it needs.
The final experience is surprisingly emotional. A follower counter can be silly, yes, but it can also be encouraging. It turns slow progress into something visible. A creator who posts every week may not notice growth day to day, but a desk display quietly reminds them that the audience is real. Every new milestone becomes a small celebration. It is not about worshiping the number. It is about making progress tangible, and doing it with a little glow, a little code, and a lot of maker charm.
Conclusion
A stylish ESP8266 display is one of those rare DIY electronics projects that is useful, decorative, and genuinely fun. It combines Wi-Fi programming, display control, API data, enclosure design, and a bit of internet theater. Whether you build a tiny OLED dashboard or a framed wall display with glowing seven-segment digits, the result is a custom fan counter that feels personal.
The best version is not necessarily the most complicated. A clean layout, reliable update schedule, readable digits, and thoughtful enclosure will beat a messy feature monster every time. Start small, make the number appear, then refine the design. Before long, your follower count will have a stylish home outside your phoneand your desk will look at least 37 percent more like a maker studio.


