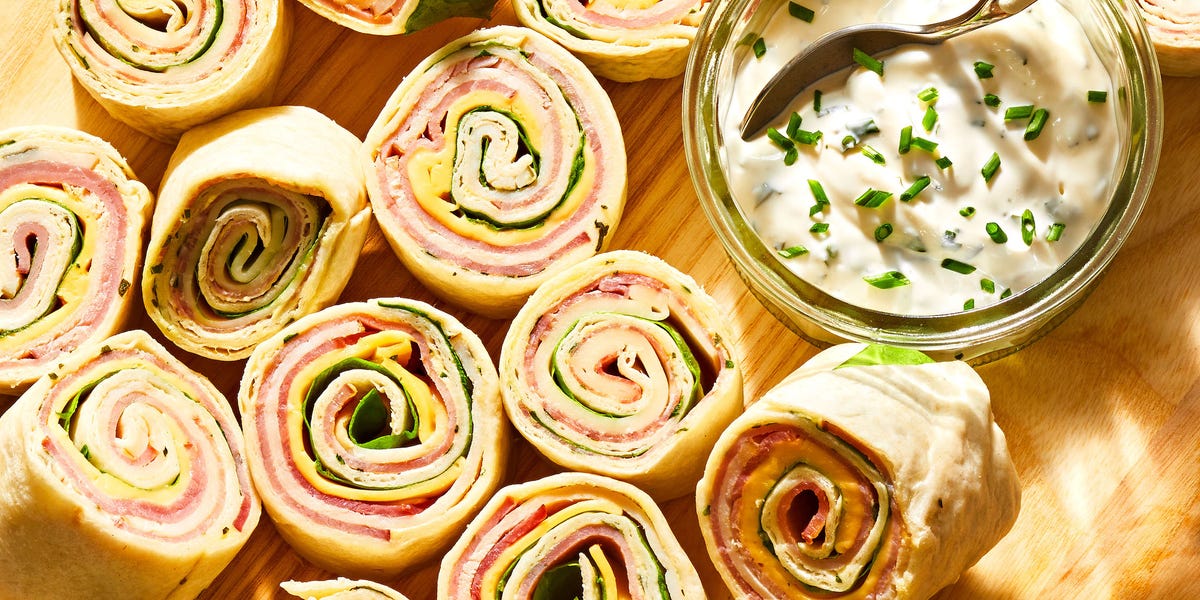

Picnic food has one important job: it must survive thk, or an emergency wardrobe change. These colorful picnic sandwich pinwheels understand the assignment. Each bite delivers tender deli meat, sliced cheese, crisp vegetables, and a creamy herb spread wrapped inside a soft flour tortilla.
Unlike traditional sandwiches, pinwheels are compact, easy to share, and resistant to the unfortunate picnic phenomenon known as “all the filling escaped into the cooler.” They can be prepared ahead, customized for different eaters, and arranged on a platter that looks far more impressive than the effort involved.
This picnic sandwich pinwheels recipe makes approximately 32 bite-size pieces. It is ideal for park lunches, road trips, potlucks, school events, backyard parties, and those afternoons when eating lunch on a blanket somehow makes everything taste 37 percent better.
Why These Are the Best Picnic Sandwich Pinwheels
A successful pinwheel needs more than attractive spirals. It must hold together, taste balanced, and remain pleasant after chilling. This recipe handles all three requirements with a few simple choices.
The cream cheese spread acts as both a flavorful condiment and an edible adhesive. Thin layers of turkey, ham, cheese, spinach, roasted pepper, and carrot create contrast without making the tortilla too bulky. Rolling the tortillas tightly and refrigerating them before slicing helps the cylinders firm up and retain their round shape, a technique also used by major American test kitchens and recipe publications.
What Makes a Good Pinwheel Filling?
The best filling combines four basic elements:
- A creamy spread: This adds flavor, moisture, and structure.
- A savory protein: Turkey and ham provide substance without requiring cooking.
- A sliced cheese: Cheddar and provolone create a smooth, satisfying layer.
- Dry, crisp vegetables: Spinach, carrot, and well-drained roasted pepper add freshness without turning the tortilla soggy.
The filling should be flavorful but relatively flat. Large chunks, wet tomatoes, overloaded salad greens, and ambitious mountains of meat may taste good, but they can transform a neat spiral into a tortilla landslide.
Picnic Sandwich Pinwheels Recipe
Prep time: 25 minutes
Chilling time: 1 hour
Total time: 1 hour 25 minutes
Yield: About 32 pinwheels
Serving size: 4 pinwheels
Ingredients
For the Creamy Herb Spread
- 8 ounces cream cheese, softened
- 1/4 cup mayonnaise
- 1 tablespoon Dijon mustard
- 1 teaspoon fresh lemon juice
- 1/2 teaspoon garlic powder
- 1/4 teaspoon onion powder
- 2 tablespoons finely chopped fresh chives
- 1 tablespoon finely chopped fresh parsley
- 1/4 teaspoon ground black pepper
For the Pinwheels
- 4 large burrito-size flour tortillas, about 10 inches each
- 8 ounces thinly sliced deli turkey
- 6 ounces thinly sliced deli ham
- 4 thin slices cheddar cheese
- 4 thin slices provolone cheese
- 1 packed cup baby spinach, washed and thoroughly dried
- 1/2 cup jarred roasted red pepper strips, drained and patted dry
- 1/2 cup finely shredded carrot
- Optional cocktail picks for serving
Recommended Equipment
- Medium mixing bowl
- Flexible spatula or butter knife
- Large cutting board
- Plastic wrap, parchment paper, or reusable food wrap
- Sharp serrated knife
- Paper towels for drying vegetables
How to Make Picnic Sandwich Pinwheels
Step 1: Prepare the Creamy Herb Spread
Place the softened cream cheese in a medium bowl. Add the mayonnaise, Dijon mustard, lemon juice, garlic powder, onion powder, chives, parsley, and black pepper.
Stir until the mixture is smooth and evenly blended. The spread should be soft enough to glide across a tortilla without tearing it. When the cream cheese is still cold and stubborn, let it stand at room temperature for another 10 to 15 minutes. Wrestling frozen-feeling cream cheese with a tortilla is not a respected culinary technique.
Step 2: Dry the Vegetables
Moisture is the natural enemy of make-ahead tortilla pinwheels. Pat the spinach and roasted red pepper strips thoroughly dry with paper towels. If the shredded carrot feels wet, blot it as well.
This small step makes a noticeable difference. The vegetables remain crisp, the spread stays creamy, and the tortilla is less likely to become damp during refrigeration.
Step 3: Soften the Tortillas if Necessary
Fresh, room-temperature flour tortillas should roll without cracking. If yours feel stiff, place them between two barely damp paper towels and microwave them for approximately 10 seconds. Warm them only until flexible, not hot.
Allow warmed tortillas to cool before adding the filling. Heat can soften the cream cheese too much and encourage the layers to slide while rolling.
Step 4: Spread the Base Layer
Place one tortilla flat on the cutting board. Spread approximately one-quarter of the cream cheese mixture evenly over its entire surface. Reach almost to the edges, especially along the far edge that will seal the roll.
An edge-to-edge cheese mixture helps hold the finished pinwheel together. Several established pinwheel recipes use the spread as the structural layer rather than merely placing it in the center.
Step 5: Add the Fillings
Arrange a thin layer of turkey and ham over the tortilla, leaving approximately 1/2 inch uncovered along the far edge. Add one slice each of cheddar and provolone, tearing the cheese when needed to distribute it evenly.
Top with a small amount of spinach, roasted red pepper, and shredded carrot. Keep the layers thin and relatively even. Avoid placing a large ridge of vegetables in the center because it will create a hollow or oddly shaped roll.
Step 6: Roll the Tortilla Tightly
Beginning with the edge closest to you, roll the tortilla forward into a tight cylinder. Use your fingertips to keep the filling tucked in while maintaining gentle, even pressure.
Do not squeeze so hard that the spread escapes from both ends like toothpaste. The goal is a firm roll, not an interrogation.
Finish with the seam underneath the cylinder. Repeat the filling and rolling process with the remaining tortillas.
Step 7: Wrap and Chill
Wrap each tortilla roll tightly in plastic wrap, parchment, or reusable food wrap. Refrigerate for at least 1 hour. Chilling firms the spread and makes clean slicing significantly easier.
The uncut rolls can be assembled the night before and refrigerated for up to 24 hours. Keeping them whole until shortly before serving generally protects the cut edges from drying out. Similar make-ahead methods are recommended by Betty Crocker and Pillsbury recipes for tortilla pinwheels and wraps.
Step 8: Slice the Pinwheels
Unwrap one chilled roll and place it seam-side down. Trim approximately 1/2 inch from each uneven end. The trimmed pieces are the cook’s snack, a long-standing benefit of being near the cutting board.
Using a sharp serrated knife and a gentle sawing motion, cut the roll into eight slices, each approximately 1 inch thick. Wipe the knife between cuts if the spread begins to collect on the blade.
Repeat with the remaining rolls. Arrange the picnic sandwich pinwheels cut-side up in a shallow airtight container or on a serving platter.
How to Keep Pinwheel Sandwiches from Getting Soggy
Sogginess is usually caused by excess moisture rather than the amount of spread. Cream cheese actually helps create a barrier between the tortilla and wetter fillings. The following habits keep the texture fresh:
- Dry washed greens completely before assembling.
- Drain jarred vegetables and blot them with paper towels.
- Avoid juicy tomatoes unless the pinwheels will be eaten immediately.
- Use whole lettuce or spinach leaves rather than heavily dressed salad.
- Do not add watery salsa directly to the tortilla.
- Store the rolls whole and slice them closer to serving time.
- Keep the container sealed so the tortilla does not dry out.
If tomato flavor is essential, use finely chopped sun-dried tomatoes or a thin layer of thick tomato pesto. These alternatives provide concentrated flavor with less free moisture.
Easy Pinwheel Sandwich Variations
One reason tortilla pinwheels appear so often on party and lunch menus is their flexibility. Cream cheese, deli meat, leafy vegetables, hummus, roasted peppers, olives, and herbs can be rearranged into dozens of combinations.
Turkey Ranch Pinwheels
Replace the herbs, mustard, and lemon juice with 1 tablespoon dry ranch seasoning. Use turkey, cheddar, spinach, and finely diced bell pepper.
Italian Picnic Pinwheels
Mix the cream cheese with 2 tablespoons pesto. Layer it with salami, turkey, provolone, spinach, and well-drained roasted peppers. Add chopped pepperoncini only after blotting them dry.
Vegetarian Hummus Pinwheels
Replace the meat and cream cheese mixture with thick hummus. Add spinach, roasted pepper, cucumber matchsticks, grated carrot, and crumbled feta. Remove the watery seed center from the cucumber before slicing it.
Chicken Salad Pinwheels
Use a thick chicken salad made with finely chopped chicken, mayonnaise, celery, and herbs. Spread a thin cream cheese layer on the tortilla first, then add the chicken salad and spinach.
Kid-Friendly Ham and Cheese Pinwheels
Skip the herbs and Dijon. Combine cream cheese with a small spoonful of honey mustard, then add ham and mild cheddar. Leave out visible vegetables when serving young diners who treat green ingredients as a personal betrayal.
Smoked Salmon Pinwheels
Flavor the cream cheese with dill, lemon zest, and black pepper. Add smoked salmon, cucumber matchsticks, and spinach. Keep this variation especially cold during transport.
How to Pack Pinwheels for a Picnic
Place the sliced pinwheels in a single layer inside a shallow airtight container. When stacking is necessary, separate the layers with parchment paper. Pack the container in a cooler with ice or frozen gel packs rather than carrying it in an uninsulated picnic basket.
Cold foods should be maintained at 40°F or below. The FDA advises that perishable picnic foods should not remain between 40°F and 140°F for more than two hours, or more than one hour when the outdoor temperature exceeds 90°F. The USDA also recommends using plenty of ice or frozen gel packs and keeping the cooler in the shade whenever possible.
Practical Picnic Packing Tips
- Chill the pinwheels completely before packing them.
- Use a hard-sided container to prevent crushing.
- Position the food container between cold packs rather than only placing ice underneath it.
- Keep the cooler closed until the food is needed.
- Place drinks in a separate cooler when possible, since beverage coolers are opened frequently.
- Serve small batches and return the remaining pinwheels to the cooler.
- Discard perishable pieces that have remained warm beyond the recommended limit.
What to Serve with Picnic Sandwich Pinwheels
Pinwheels work best beside foods that are easy to pack and eat. Their creamy, savory flavor pairs particularly well with something crunchy, juicy, or lightly acidic.
- Kettle-cooked potato chips or pretzel sticks
- Grapes, berries, apple slices, or melon
- Pickles, olives, or marinated vegetables
- Carrot sticks, celery, and snap peas
- Pasta salad or coleslaw kept properly chilled
- Individual fruit cups
- Brownies, cookies, or cereal treats
- Lemonade, iced tea, or sparkling water
For a larger gathering, prepare two or three pinwheel variations and arrange them in separate rows. Different tortilla colors can help guests identify the fillings, but labeling the platter remains the safer strategy. A spinach tortilla does not always mean vegetarian, and hungry guests are poor detectives.
Common Pinwheel Mistakes and How to Fix Them
The Tortilla Cracks While Rolling
The tortilla may be cold, dry, or past its prime. Warm it briefly between damp paper towels until flexible. Do not soak it, or you will trade cracking for gumminess.
The Filling Slides Out
Too much spread or too many slippery layers can cause movement. Use a thin, even coating and avoid stacking several cheese slices directly on top of one another.
The Rolls Flatten During Slicing
Chill them longer and use a sharper knife. Pressing straight down with a dull chef’s knife compresses the tortilla. A gentle sawing motion preserves the round spiral.
The Pinwheels Unroll on the Platter
Spread the cream cheese mixture fully to the finishing edge, place the rolls seam-side down during chilling, and use cocktail picks when necessary.
The Center Is Hollow
The first turn was probably too loose. Start the roll firmly and tuck the filling inward as you complete the first rotation.
The Pinwheels Taste Bland
Season the spread before assembling. Cream cheese, tortillas, turkey, and mild cheese all benefit from acid, herbs, mustard, pepper, or a modest amount of seasoning.
Frequently Asked Questions
Can Picnic Sandwich Pinwheels Be Made the Night Before?
Yes. Assemble and wrap the tortilla rolls, then refrigerate them overnight. For the best-looking slices, wait until the day of serving to cut them.
How Long Do Pinwheel Sandwiches Last in the Refrigerator?
For the best texture, eat them within 24 hours. Properly refrigerated leftovers may remain usable longer depending on the ingredients, but the tortillas and vegetables gradually soften. When in doubt, prioritize safe storage and ingredient-specific guidance.
Can You Freeze Tortilla Pinwheels?
Freezing is not recommended for this fresh version. Cream cheese can become grainy after thawing, while spinach and roasted peppers may release water. Baked pinwheels freeze more successfully than cold sandwich pinwheels.
What Is the Best Tortilla for Pinwheels?
Large, soft flour tortillas are the easiest to roll and provide enough surface area for an attractive spiral. Burrito-size tortillas produce more uniform slices than small taco-size tortillas. Whole-wheat and flavored flour tortillas also work when they are fresh and flexible.
How Many Pinwheels Should I Make Per Person?
Plan on three to four pieces per person when serving pinwheels with several other picnic foods. Allow six to eight pieces per person when they are the main lunch item.
Can I Make These Without Cream Cheese?
Yes. Thick hummus, whipped feta, pimento cheese, mashed avocado, bean spread, or a dense chicken salad can replace cream cheese. Choose a spread that is thick enough to hold the layers together.
Practical Experiences and Lessons from Making Picnic Pinwheels
The first lesson experienced home cooks learn is that pinwheels reward restraint. A tortilla resting on the counter looks enormous and practically begs to be covered with every ingredient in the refrigerator. Then the rolling begins, and that generous pile of fillings turns into a structural engineering problem.
Thin layers consistently produce better results. A single layer of overlapping deli meat rolls more neatly than a thick stack. Cheese works best when distributed across the tortilla instead of concentrated in the middle. Even vegetables should be treated as accents rather than the entire salad bar.
The second lesson is that drying the ingredients matters more than expected. Spinach that appears dry can still hold water around its stems and folds. Roasted peppers pulled directly from a jar bring enough liquid to soften a tortilla during an afternoon in the refrigerator. A quick blot with paper towels prevents most of these problems and takes less time than apologizing for damp sandwiches.
Temperature also changes the assembly experience. Cold tortillas crack, while overheated tortillas become overly soft. Cold cream cheese tears the tortilla; very warm cream cheese squishes out during rolling. The easiest setup uses room-temperature tortillas and softenedbut not meltingcream cheese.
Rolling technique improves quickly after the first tortilla. The initial turn should be snug because it forms the center of the spiral. After that, steady pressure matters more than force. Pulling backward slightly while rolling forward can help keep the cylinder compact, much like rolling sushi without the bamboo mat or the intimidating confidence of a sushi chef.
Chilling is the point where untidy rolls become presentable pinwheels. Before refrigeration, a filled tortilla may feel soft and unstable. After an hour, the cream cheese firms up, the seam adheres, and the fillings settle into place. Skipping this step often leads to crushed slices and loose spirals.
A serrated knife is another small upgrade with an obvious payoff. A smooth knife may drag the filling or flatten the roll, especially when it is not exceptionally sharp. A serrated blade cuts through the tortilla with less pressure. Cleaning the blade every few cuts keeps the spiral pattern visible.
Picnic transport introduces a different challenge: compression. A beautiful platter can become a box of abstract tortilla shapes when packed beneath cans, fruit, or a container of potato salad. A shallow, rigid container protects the slices far better than a zip-top bag. Parchment between layers keeps the pinwheels from sticking together.
It is also wise to bring only part of the batch out at once. A small plate can be replenished from the cooler, keeping the remaining pieces cold and fresh. This strategy reduces food waste and stops one adventurous insect from claiming the entire lunch.
Finally, the best pinwheel combination is not necessarily the most complicated one. Turkey, cheese, spinach, and seasoned cream cheese remain popular because every ingredient has a clear purpose. Successful picnic food should be tasty, sturdy, recognizable, and easy to eat while sitting on uneven ground. These sandwich pinwheels deliver all four without requiring anyone to balance a dinner plate on their knees.
Final Thoughts
The best picnic sandwich pinwheels are simple enough for a weekday lunch but polished enough for a party platter. A flavorful cream cheese spread holds the layers together, dry vegetables preserve the texture, and a proper chilling period creates clean, attractive spirals.
Prepare the rolls ahead, slice them with a serrated knife, and transport them in a well-chilled container. From classic turkey and cheese to Italian, vegetarian, and smoked salmon variations, the basic method can be adapted to nearly any picnic menu.
Most importantly, these pinwheels allow you to enjoy lunch without chasing loose tomato slices across a picnic blanket. That alone deserves a place in the recipe box.
SEO Information
Note: Keep meat-and-cheese pinwheels refrigerated or packed in a properly iced cooler until serving, and follow current FDA and USDA time-and-temperature guidance for outdoor meals.


