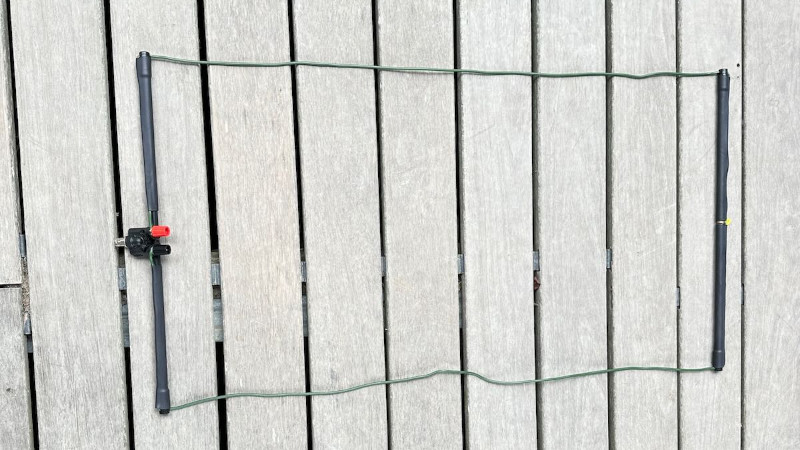

The 2 meter band (144–148 MHz) is the ham world’s “easy button” until you leave the house.
In your shack, a decent antenna and some elevation make repeaters sound like your next-door neighbor.
On a ridge, in a park, or during Field Day, 2 meters becomes a physics lesson delivered by trees, terrain, and your HT’s tiny “rubber duck.”
The good news: you don’t need a trunk full of aluminum to sound big.
You just need an antenna that packs small, deploys fast, and doesn’t waste your watts.
This guide walks through what makes a small-packing 2 meter portable antenna genuinely useful (not just cute),
then focuses on one of the best all-around solutions: a roll-up Slim Jim / ladder-line J-pole style antenna
that stuffs into a pocket but performs like you brought “real antenna energy” to the trail.
Along the way, you’ll also learn when a tiny counterpoise wire beats buying a longer whip, and when a packable Yagi is worth the extra pieces.
What “portable success” on 2 meters actually means
Before picking an antenna, decide what kind of “portable” you’re doing. Two meters is used in a few very different ways, and your antenna choice
should match the mission:
-
FM repeaters / local nets: You want vertical polarization, quick setup, and solid coverage.
Height matters more than heroic gain claims. - Simplex (FM) event comms: You want reliable line-of-sight, decent range, and something you can deploy anywhere.
-
SSB/CW weak-signal: You usually want horizontal polarization and a directional antenna (Yagi/loop).
Using the wrong polarization can turn your signal into a faint whisper. - Satellites / fox hunts: Directional antennas shine, but packability and fast assembly still matter.
Translation: the “best” antenna isn’t a single unicorn. It’s the one that fits your operating style and the way you’ll actually carry it.
If it’s annoying to deploy, you won’t deploy it. And then your “best antenna” becomes your backpack’s most expensive decoration.
The small-packing shortlist for 2 meter portable work
If you want maximum performance per cubic inch, these options dominate real-world portable setups:
1) A better HT whip + a simple counterpoise (“tiger tail”)
Most handheld antennas are a compromise: they’re short, flexible, and convenient. They’re also only half the story.
A typical HT uses your body and the radio chassis as a sloppy “other half” of the antenna system.
Add a short wire counterpoise (often called a tiger tail), and you can noticeably improve transmit efficiency and stability.
For 2 meters, a quarter-wave counterpoise is roughly 19 inches around 146 MHz (close enough for field use).
The practical takeaway: if you’re using an HT in awkward positions (holding it away from your body, using it on a table, running it with a headset),
a counterpoise often helps more than simply buying a longer whip.
Best for: Ultra-light setups, quick wins, and anyone who wants better performance without changing their whole carry system.
2) The roll-up ladder-line “Slim Jim” (our main build)
If you want a portable antenna that packs absurdly small but behaves like a “real antenna” once deployed,
the ladder-line Slim Jim/J-pole family is hard to beat. It’s lightweight, durable, and easy to hang from a branch, a mast, or a fishing pole.
Get it in the air, keep it away from metal, and it will make your HT sound like it leveled up.
Best for: Go-kits, hiking, parks-on-the-air style operating, emergency comms, repeaters, and portable FM work.
3) A packable directional antenna (compact Yagi)
When you need gain and direction satellites, weak-signal, long simplex paths, or just punching through clutter a small Yagi is the move.
The key is choosing one that breaks down quickly and fits your bag.
Some commercial “starter” Yagis break down into pieces under about a yard long, and many handheld Yagis assemble in minutes.
Best for: Satellites, fox hunting, SSB/CW work, and situations where “turn the antenna” is your best knob.
4) The “from a pile of parts” emergency vertical (ground plane / sleeve dipole)
If you’re building a go-kit and want something you can improvise, a simple vertical dipole/ground-plane concept is extremely practical.
It won’t pack as tiny as ladder line, but it’s straightforward, predictable, and teaches you a lot about what 2 meters wants:
a resonant radiator and something that behaves like the missing half.
Pick one: the best all-around small-packing choice
If you forced most experienced portable operators to choose one antenna to throw in a bag for 2 meters,
the smart pick is usually the roll-up Slim Jim / ladder-line J-pole style.
Here’s why:
- It packs tiny: coiled ladder line and a bit of coax fit in a sandwich bag.
- It deploys anywhere: hang it from a tree, tape it to a pole, or clip it inside a window in a pinch.
- It gives real height: and height is king on VHF.
- It plays well with HTs: especially when you can’t keep the radio body acting like a consistent counterpoise.
How to build a small-packing 2 meter roll-up Slim Jim
What you’re building (in plain English)
The Slim Jim is an end-fed folded dipole that uses a J-pole-style matching section.
In ladder-line versions, the layout is typically described as a top radiating section and a bottom matching section,
with the feedpoint near the bottom where the impedance is around 50 ohms.
The exact physical dimensions depend on the ladder line’s spacing and velocity factor, so the best strategy is:
build to a known plan or calculator, then trim/tune if needed.
Materials (keep it simple)
- 450-ohm ladder line (the “window line” type is common and tough)
- Coax feed line (use decent coax; thinner cable is fine if the run is short)
- Connector that matches your radio (BNC is common for portable)
- Heat shrink or electrical tape for strain relief
- Zip ties / small cord for hanging
- Optional: a small choke/balun (ferrite beads or a coil of coax) to tame feedline common-mode currents
Cutting and layout: a safe, accurate approach
Rather than pretending there’s one “magic” dimension that fits every spool of ladder line ever made,
use a proven Slim Jim/J-pole ladder-line plan or calculator as your starting point.
Here’s the reliable method:
-
Choose your target frequency. If you live on repeaters around 146.940, use that neighborhood.
If you travel, aim near the center of the band (around 146 MHz) for a broader match. - Build slightly long. It’s much easier to trim down than to “trim up.”
-
Set up a realistic test environment. Hang the antenna in the clear (not against metal, not on a metal fence),
with the feedline dropping away naturally. - Adjust the feedpoint first. On many ladder-line J-pole/Slim Jim builds, moving the feedpoint slightly can improve match.
- Trim only if you must. Small changes can move resonance.
Don’t overthink it: for most portable FM work, a “good enough” match is fine as long as the antenna is resonant-ish and up in the air.
Your biggest performance gains will come from height, placement, and feedline management.
Deployment tricks that make it work like magic
A roll-up antenna’s superpower is that it lets you create height without lugging metal tubing.
Try these practical setups:
-
Throw line + tree branch: Toss a lightweight line over a branch, clip the antenna on, and hoist it up.
Keep it away from the trunk if possible. -
Fiberglass fishing pole: Tape the ladder-line antenna to a collapsible pole.
This is a go-to setup for parks and emergency kits because it’s fast and repeatable. - Indoor “good enough” hang: Hang it in a window when you’re stuck inside not ideal, but often better than the stock HT antenna.
One rule that saves a lot of frustration: keep the antenna away from metal.
Metal railings, metal awnings, chain-link fences, and even some foil-backed insulation can detune it and warp the pattern.
Feedline: the unglamorous hero
On VHF, coax losses matter more than most people expect especially if you’re using skinny cable and long runs.
For portable work, the winning move is usually:
short coax run + antenna as high as you can reasonably get it.
If you’re running an HT at 5 watts, losing a chunk of that in feedline is like paying for a pizza and receiving only the crust.
(Still edible… but emotionally damaging.)
When you should carry a small Yagi instead
A roll-up Slim Jim is fantastic for all-around portable FM and general coverage.
But if you’re doing any of these, a compact Yagi can be worth the extra parts:
- Satellites: Directionality helps a lot, and handheld Yagis are popular for a reason.
- Weak-signal / SSB/CW: You often want horizontal polarization and gain in a specific direction.
- Long simplex paths: Pointing a beam can beat adding power.
- Noise and clutter: A beam can reject interference from behind and sides.
Handheld Yagi safety + power sanity
If you’re using a handheld Yagi close to your body, follow common-sense RF exposure practices and keep power conservative.
Many handheld Yagi makers explicitly recommend keeping power low when hand-held, and using higher power only when the antenna is mounted.
In practice, portable 5–10 watts with a directional antenna can go a long way.
DIY “tape measure” Yagi: the classic backpack beam
A tape-measure Yagi is popular because it’s lightweight, cheap, and surprisingly tough.
The steel tape elements roll up or flex without permanently bending, and the whole thing can break down fast.
It’s a great “upgrade path” once you’ve mastered roll-up antennas and want directional performance without buying a full-size beam.
The most accurate way to build one is to follow a proven plan for your target frequency and then verify with an antenna analyzer.
Build long, trim carefully, and keep your element mounting consistent so the antenna stays repeatable.
Portable performance hacks that matter more than buying stuff
Height beats hype
On 2 meters, a few extra meters of antenna height can be the difference between “full quieting” and “did you say your call sign was…?”
If you only change one variable in the field, change height.
Match your polarization to your target
FM repeaters and most local FM work use vertical polarization.
Much VHF weak-signal activity uses horizontal polarization.
If you aim at the wrong audience with the wrong polarization, you can lose a shocking amount of effective signal.
Decide what you’re doing first, then orient the antenna accordingly.
Carry a “micro-kit” so deployment doesn’t turn into a scavenger hunt
- Two spare adapters (because the universe loves connector drama)
- 10–20 feet of light line (for throwing/hanging)
- Two velcro straps (for cable management and quick mounting)
- A tiny carabiner (for clipping the antenna to a loop or cord)
- Electrical tape (fixes everything except bad life choices)
A quick decision guide
If you’re still unsure, here’s a practical “choose your own adventure”:
- I only carry an HT and want better range: upgrade whip + add a 2m tiger tail counterpoise.
- I want a go-kit antenna that actually works: roll-up ladder-line Slim Jim.
- I do satellites / fox hunts / weak-signal: add a compact Yagi (handheld or packable boom).
- I’m doing Field Day VHF seriously: height + good coax + the right polarization + a small beam if possible.
Conclusion: the “small-packing” sweet spot
For 2 meter portable work, the best antenna is the one you’ll actually deploy quickly, correctly, and at a decent height.
A roll-up ladder-line Slim Jim is a nearly perfect match for that reality: tiny in the bag, big on the air.
Pair it with sane feedline choices, smart placement, and a simple counterpoise trick when you’re stuck with an HT whip,
and you’ll get the kind of portable performance that feels like cheating (but is really just good RF hygiene).
Field Notes: 500+ Words of Real-World Portable “Lessons Learned”
Portable 2 meter work teaches the same lesson over and over: antennas don’t fail in theory they fail in logistics.
Operators will tell you the first time they brought a “great” antenna into the field, they learned it wasn’t great at all… because it took
20 minutes to deploy, required three hands, and mysteriously needed a tool they did not pack. The antenna worked fine. The plan didn’t.
That’s why roll-up antennas are beloved. People who use them regularly tend to describe the same workflow:
arrive, find a hang point, clip and hoist, plug in, done. The “win” isn’t just signal strength it’s the fact that you’re on the air
while everyone else is still assembling gear like an IKEA bookshelf in a windstorm.
Another common lesson: the best antenna site is rarely the most comfortable one. Portable operators learn to negotiate between
shade, safety, and elevation. You’ll hear stories about setting up near a picnic table (easy), then realizing the metal railing is detuning
the antenna (not easy), then moving twenty feet to a clear spot and suddenly hearing stations that were previously buried in noise.
The same antenna, same radio, same power different surroundings. Two meters is polite like that: it punishes you quietly.
Then there’s the “feedline comedy.” People routinely pack an excellent antenna and then connect it with a questionable coax patch
that’s been stepped on, kinked, and emotionally scarred. In the field, you’ll also discover that loose adapters become loose at the exact moment
you’re trying to check in to a net. The cure is boring but effective: one small pouch with known-good adapters, a short known-good coax,
and strain relief so the connector isn’t carrying the weight of your entire setup.
Portable operators also learn that directionality is a superpower when you need it and a distraction when you don’t.
A small Yagi feels amazing when you’re trying to reach a distant station on simplex or work a satellite pass, because you can literally “aim”
your success. But for casual repeater work, constantly pointing a beam can feel like trying to drink coffee while doing archery.
That’s why many people treat a beam as a specialty tool and a roll-up vertical as their default.
Finally, there’s the quiet truth nobody puts on a product page: the portable antenna you love is the one that fits your routine.
Some folks thrive on a minimal setup: HT, better whip, and a tiger tail. Others love the “tiny antenna, big height” trick of ladder line.
And some build a full portable VHF station with a packable Yagi because chasing distant grids is their idea of fun.
The best setup is the one that makes you want to get outside, get on the air, and do it again because repetition is what turns “portable”
from a one-time experiment into a skill.


