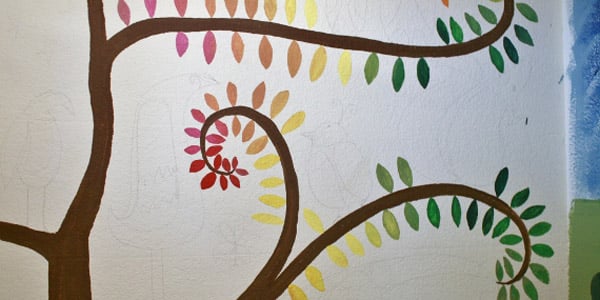

A blank wall is practical, polite, and about as exciting as a bowl of unsalted oatmeal. A leafy treetop mural, on the other hand, can turn that same wall into the edge of an imaginary forest. The original Little Leafy Tree Tops! project appeared as a playful work in progress for a children’s playhouse: tree forms went up first, clusters of leaves followed, and even a shoebox lid earned a supporting role as a paint tray.
That humble setup is part of the charm. The project proves that memorable rooms do not always begin with custom millwork, a designer invoice, or a dramatic television reveal. Sometimes they begin with a brush, a few paint samples, and the cheerful decision to let a tree grow across the wall.
A tree mural works because it is both decoration and storytelling. Children can treat it as a forest canopy, adults can appreciate it as botanical artwork, and the room gains a focal point without becoming cluttered. Whether you paint the design by hand or install a printed wall mural, the central idea is the same: use branches, leafy shapes, and layered color to create an immersive view that feels larger than the wall itself.
Research basis for the original project concept:
Why a Leafy Treetop Mural Works So Well
The best wall murals do more than fill square footage. They change how a room feels. A treetop scene draws the eye upward, which can make a low ceiling appear taller. Branches create natural movement, while overlapping leaves soften hard architectural lines. Unlike a small framed print, a mural behaves more like part of the room’s architecture.
Nature-inspired interiors are often discussed under the broader idea of biophilic design: intentionally bringing natural forms, patterns, materials, and views into built spaces. A painted canopy is not a replacement for sunlight, fresh air, or an actual tree, obviously. No squirrel will approve your paint sample. Still, botanical imagery can provide a visual connection to nature and help a playroom, nursery, bedroom, or reading corner feel calmer and more imaginative.
The subject is also unusually flexible. Rounded leaves in mint, sage, and cream create a gentle nursery look. Rich olive, moss, and charcoal produce a more sophisticated woodland wall. Coral, mustard, teal, and sky blue can turn the same concept into cheerful folk art. The design can grow with the room when the palette is thoughtful and the shapes are not overly babyish.
Research basis for nature-connected and botanical design:
Plan the Mural Before Opening the Paint
Choose the Right Wall
Start with the wall that naturally attracts attention. In a child’s room, that may be behind a reading nook, playhouse, daybed, or low storage unit. In a living room, it may be the wall behind a sofa. A mural can also rescue a neglected hallway or stair landing where ordinary framed art feels undersized.
Avoid placing the most important part of the image where a tall bookcase, headboard, or television will hide it. Sketch the furniture directly onto a scaled drawing of the wall. This five-minute exercise can prevent the tragic discovery that your most beautiful branch now grows directly behind a wardrobe.
Measure and Establish the Scale
Measure the full width and height of the wall, including baseboards, doors, windows, switches, and outlets. Decide where the canopy will begin. A high canopy creates the impression of standing beneath mature trees, while a lower canopy feels more graphic and playful.
For a hand-painted mural, tape paper cutouts to the wall to test leaf size. Small leaves create texture but require patience. Large leaves read clearly from across the room and are much faster to paint. A balanced mural often uses three sizes: large foundation clusters, medium connecting shapes, and small accent leaves.
When ordering a printed mural, measure the wall in more than one place. Walls and ceilings are not always perfectly square, despite looking extremely confident about it. Follow the mural manufacturer’s allowance recommendations and include enough extra material for trimming and minor irregularities.
Build a Controlled Color Palette
Choose three to five related colors rather than using every green available at the paint counter. One dark shade creates depth, one middle shade carries most of the design, and one or two lighter tones add highlights. A small accent color can introduce energy without turning the canopy into a botanical carnival.
Test the colors on poster board and view them during the day and at night. Wall color changes under warm bulbs, cool LEDs, and natural light. The perfect sage in the store can become “institutional pea soup” after sunset, which is not usually the woodland fantasy anyone requested.
Research basis for mural scale, accent-wall placement, and botanical styling:
Painted Mural or Wallpaper Mural?
A hand-painted mural offers complete control. You can adapt branches around windows, change the density of the leaves, incorporate a child’s initials, or match leftover room paint. It also has a handmade character that slight imperfections often improve.
A printed wallpaper mural is faster when the artwork is complex, highly detailed, or photographic. Peel-and-stick products arrive with adhesive already applied, while traditional and nonwoven murals may use paste. Whichever format you choose, read the manufacturer’s instructions and confirm that the product is compatible with the wall.
Smooth, clean, dry walls generally provide the best surface. Heavy texture can remain visible through thin wallpaper, weaken adhesion, or make panel seams harder to align. Newly painted walls may also need time to cure before a self-adhesive mural is installed.
For renters, removable wallpaper can be appealing, but test a sample in an inconspicuous area first. Paint type, curing time, wall condition, surface sheen, and adhesive strength can all affect removal. “Removable” is a useful product description, not a legally binding promise to your security deposit.
Research basis for mural formats and installation surfaces:
Materials and Tools
For a painted leafy treetop wall mural, gather the following supplies:
- Interior wall paint in three to five coordinated colors
- Primer, if the wall is patched, stained, porous, or uneven
- Painter’s tape and protective drop cloths
- Chalk or a soft pencil for sketching
- A tape measure and level
- A two-inch angled brush for trunks and branches
- Small flat or round brushes for leaves
- A damp cloth for immediate cleanup
- A paint tray, paper plate, cardboard scrap, or shoebox lid
For a wallpaper mural, typical tools include a tape measure, level, pencil, sharp utility knife, straightedge, smoothing tool, clean sponge, ladder, and the recommended adhesive if the mural is not self-stick. Lay numbered panels out in order before installation. Future you will be grateful that present you did not create a giant botanical jigsaw puzzle.
Think About Indoor Air Quality
Pay attention to product selection and ventilation, especially in nurseries, playrooms, and children’s bedrooms. Read paint and adhesive labels, choose lower-emission materials when practical, and ventilate the space during painting or wallpaper installation.
A low-VOC or zero-VOC label does not necessarily describe every substance emitted by a household product. Certifications, ingredient information, manufacturer guidance, and correct ventilation practices can provide a more complete picture. Keep paint, paste, blades, ladders, cords, and tools away from children, and allow the room to air out before normal use.
Research basis for wall preparation, ventilation, and child-room material considerations:
How to Paint a Little Leafy Tree Tops Wall Mural
1. Prepare the Surface
Remove dust, grease, cobwebs, and loose paint. Patch holes and cracks, sand rough areas, and let the surface dry completely. Primer may be useful on patched, porous, stained, or uneven walls. Good preparation is not glamorous, but neither is watching a leaf-shaped patch of paint slide down the wall.
Protect baseboards, floors, outlets, and nearby furniture. Remove outlet covers rather than painting around them whenever it is safe to do so.
2. Sketch the Main Tree Structure
Use chalk or a light pencil to draw trunks and major branches. Begin with broad lines and refine them after checking the composition from across the room. Trees rarely grow as perfect mirrored diagrams, so vary the branch angles, spacing, and thicknesses.
Let some branches disappear behind the canopy. The viewer’s brain will complete the tree, and you will avoid painting enough detailed lumber to open a small hardware store.
3. Paint the Trunks and Branches
Apply the darkest trunk color first. Add a second, lighter brown, gray, taupe, or muted green along one side to suggest light. Keep the edges organic. A slightly dry brush can create bark-like texture without requiring hours of tiny detail.
Allow the branches to dry before adding leaves. If the design is intentionally loose, small overlaps are fine. In fact, overlaps help the mural look integrated rather than assembled from separate pieces.
4. Create the Main Leaf Masses
Block in large clusters with the middle green or dominant color. Think in cloud-like shapes rather than individual leaves. Leave irregular gaps so the background wall color peeks through. These openings keep the canopy airy and prevent it from becoming one enormous green blob.
Step back every few minutes. Close-up painting encourages overworking, while distance reveals the real composition. Taking a phone photo in grayscale can also help you see whether the dark and light areas feel balanced.
5. Layer Individual Leaves
Add darker leaves beneath branches and in the lower portions of the clusters. Place lighter leaves near upper edges and wherever your imagined light source would strike. Rotate the brush marks so every leaf does not point in precisely the same direction.
For quick leaves, load a small flat brush, press it onto the wall, and lift with a slight twist. Two overlapping strokes can form a simple almond-shaped leaf. Practice on cardboard first. The goal is rhythm, not botanical certification.
6. Add Depth, Whimsy, and Personal Details
Once the canopy is established, decide whether the mural needs birds, blossoms, fruit, stars, clouds, or a hidden creature. Restraint helps. One tiny painted owl can be delightful; seventeen owls may suggest that the room has been taken over by a highly organized committee.
You can also paint a miniature door at the base of a trunk, add a swing, or include subtle initials in the bark. These details turn a decorative wall into a story children can revisit.
7. Clean Up and Let the Finish Cure
Remove painter’s tape carefully, touch up the edges, and clean tools according to the paint manufacturer’s directions. Allow the mural to dry and cure fully before wiping it, placing furniture tightly against it, or letting small hands investigate every leaf.
How to Install a Printed Treetop Mural
Begin by confirming the order of the mural panels. Lay them flat and compare the image across every seam before attaching anything to the wall. Establish a straight vertical guideline with a level rather than trusting the nearest corner.
For peel-and-stick panels, expose only a small portion of the backing at first. Align the top edge, then slowly remove the backing while smoothing from the center toward the sides. Work in manageable sections so bubbles and wrinkles do not become permanent roommates.
For paste-the-wall products, apply only enough adhesive for the next panel. Position each panel edge to edge, match the image carefully, and smooth it according to the product instructions. Use a sharp blade and straightedge to trim excess material at the ceiling, baseboard, and corners.
Do not assume that all murals use the same seam method. Some products are installed edge to edge, while others may require an overlap-and-trim technique. The instructions supplied with the mural should always take priority over general online advice.
Research basis for wallpaper panel alignment and application:
Styling the Room Around the Mural
Let the mural remain the star. Choose bedding, rugs, curtains, and storage in colors pulled from the artwork, but avoid matching every object to every leaf. A successful room needs visual breathing space.
Natural wood, woven baskets, linen-like textures, and simple white furniture complement a leafy wall without competing with it. Warm lighting makes olive and moss tones feel cozy, while cooler daylight keeps mint and blue-green palettes fresh.
In a playroom, use the mural to define a zone. A rug beneath the canopy can become the “forest floor.” Floor cushions create a reading camp. Low shelves can hold animal figures, nature books, blocks, and art supplies.
In an adult bedroom, dining room, or home office, pair the mural with restrained furniture and one or two sculptural lamps. This prevents the space from feeling like a theme park gift shop and allows the botanical artwork to look intentional.
Common Mural Mistakes to Avoid
Skipping Surface Preparation
Dirt, grease, loose paint, and heavy texture can undermine both paint and wallpaper. A beautiful design cannot compensate for a surface that was never ready to receive it.
Using the Corner as a Level
Walls, ceilings, and corners are frequently imperfect. Use a real level to establish the first line of a wallpaper mural. Otherwise, each additional panel can drift farther out of alignment.
Making Every Leaf Identical
Leaves that share one size, color, shape, and direction can look stamped. Use a limited palette, but vary the scale, spacing, orientation, and density of the marks.
Filling Every Empty Space
Negative space is part of the composition. Small areas of visible wall make the canopy look lighter and more natural. When every inch is filled, the mural can feel heavy.
Choosing From a Tiny Screen Image
Order a wallpaper sample or paint a large test board. Check the scale, color, texture, sheen, and visibility beside the room’s existing flooring, trim, furniture, and fabrics.
A 500-Word Practical Experience: What the Project Feels Like in Real Life
A typical leafy treetop mural begins with great confidence and a suspiciously clean floor. The first hour is mostly preparation: moving furniture, wiping the wall, taping trim, arranging paint, and wondering whether the ambitious sketch was a brilliant plan or evidence of poor impulse control. This stage can feel slow, yet it determines whether the rest of the project is enjoyable.
The branches usually create the first moment of doubt. A line that looked graceful on paper may look alarmingly crooked at full scale. The useful response is not panic; it is distance. Walking to the other side of the room reveals whether the curve truly needs correction. Because leaves will cover portions of the branch structure, the initial drawing does not need to be perfect. That realization is wonderfully freeing.
Painting the first leaf cluster changes the mood. The wall stops looking like a construction diagram and begins looking like a scene. A homemade palette, such as a shoebox lid or scrap of cardboard, keeps small amounts of color nearby and makes blending easy. The project becomes rhythmic: load the brush, press, twist, step back, repeat. Music helps. So does coffee, provided it stays far away from the pale paint.
The biggest practical lesson is that depth comes from layering, not from drawing hundreds of detailed leaves. Large middle-tone shapes establish the canopy. Darker strokes create shadow. Light accents bring selected edges forward. When every layer is equally bright, the wall looks flat. When every inch is equally detailed, the eye has nowhere to rest.
Mistakes happen, and most are fixable. A leaf that lands in the wrong place can be reshaped, covered with the background color, or absorbed into a larger cluster. A branch that feels too heavy can disappear behind foliage. A drip is easiest to address immediately with a damp cloth when the paint system permits it. The mural gradually teaches a useful decorating truth: perfection matters less than visual balance.
Children often respond before the project is finished. They may identify imaginary animals in the branches, assign names to trees, or request additions that were never included in the plan. Some requests are charming. Others involve dragons, six rainbows, and a purple dump truck. The mural benefits from participation, but the adult holding the brush is allowed to maintain editorial control.
There is also a predictable point when the artist becomes tired and begins adding leaves simply because an open patch feels suspicious. This is the ideal moment to stop, leave the room, and return later. Fresh eyes usually reveal that the mural needs fewer additions than expected.
At the end, the room feels different even before the furniture returns. The wall creates a sense of enclosure without necessarily making the space feel smaller. Once cushions, books, toys, or a playhouse are placed beneath the canopy, the mural becomes a setting rather than a surface.
That is the most rewarding part of the experience. The project is not merely paint arranged to resemble leaves. It becomes a small piece of architecture for imaginationa forest edge for stories, reading, play, rest, and the occasional purple dump truck.
Conclusion
The Little Leafy Tree Tops! Wall Mural idea endures because it is accessible, adaptable, and full of personality. It can begin with leftover paint and a cardboard palette, or it can arrive as a carefully printed wallpaper mural. Either way, success depends on thoughtful preparation, suitable materials, balanced scale, a controlled color palette, and the willingness to step back frequently.
Keep the branches loose, layer the leaves, preserve some open wall, and let the room tell part of the story. A good tree mural does not need to imitate a forest perfectly. It only needs to make someone look up and imagine one.
Note: Always follow the specific safety, preparation, curing, installation, and ventilation instructions provided by the paint, adhesive, or mural manufacturer.
Research synthesis also informed by these reputable design, installation, safety, and home-improvement resources:


