
Budget note: In this version of the project, the “$25” covers the visual upgrade of an existing door, not a brand-new premium rail kit. If you already have sliding hardware, score it secondhand, or are refreshing a door that is already hung on a track, this makeover budget is completely believable. If you need to buy the hardware too, that is usually a separate line item. Honesty is still cheaper than regret.
There are home upgrades that whisper, and then there are barn doors, which confidently slide into view and say, “Yes, I do have personality, thanks for noticing.” The good news is that you do not need to buy a fancy new slab door to get the look. If you have an old interior door sitting in a garage, leaning in a closet, or quietly underperforming in your hallway, you may already own the star of the project.
A smart barn door upgrade from an existing door is one of those rare DIY ideas that can feel high-end without demanding a luxury budget. You reuse what you have, add some strategic cosmetic changes, and end up with a feature that looks custom. Better yet, it is practical. Barn doors can be a terrific solution where a swinging door eats up too much floor space, such as a pantry, laundry room, small office, flex room, or tight hallway.
The trick is knowing where the bargain lives. It lives in the makeover: filling dents, cleaning, sanding, painting or staining, adding trim for a more substantial look, and swapping in a better pull. That is how an ordinary door starts looking like a curated design choice instead of something rescued from the “maybe I’ll use this someday” pile.
Why This Cheap Barn Door Makeover Works So Well
The biggest reason this project works is simple: doors are mostly surface area. Change the surface, and you change the whole mood. A tired flat door can become modern with a smooth matte finish. A plain hollow-core slab can look more expensive with a few narrow trim boards arranged in a clean Shaker or farmhouse pattern. Even a scratched old panel door can become the charming “character piece” people assume you found at a boutique salvage shop instead of next to your vacuum cleaner.
Reusing an existing door also makes the project more sustainable and less wasteful. You are not tossing a perfectly usable piece of material just because it lacks drama. You are giving it a second act, which is basically the home-improvement version of a comeback tour.
And from a design standpoint, barn doors pull double duty. They solve space problems and add visual interest. A standard hinged door disappears into daily life. A barn door becomes part of the room’s style. That can be a blessing in spaces that need a focal point, especially if the surrounding finishes are simple.
What a Barn Door Can Doand What It Cannot
Before anyone grabs paint samples and starts naming stain colors, let us talk about expectations. A barn door is great at saving swing space and adding style. It is not great at pretending to be a bank vault. Because it slides along the wall instead of sealing tightly inside a jamb, it usually offers less sound control and less privacy than a traditional hinged door. That does not make it a bad choice. It just makes it the wrong choice for certain rooms if silence is the goal.
If you are using this upgrade for a pantry, laundry nook, closet, mudroom, home office, or bonus room, it can be fantastic. For a primary bathroom or bedroom, it can still work, but choose carefully. A heavier door will generally feel more substantial than a flimsy one, and if you have the option between hollow-core and solid-core, the solid-core door is the grown-up in the room.
You also need enough wall space for the door to slide open fully. That means the wall beside the opening cannot be crowded with trim details, switches, artwork you are unwilling to relocate, or a row of hooks that would greet the door with violence. Measure first. Admire later.
How to Keep the Makeover Near $25
The most realistic way to stay near a $25 barn door upgrade budget is to work with supplies you may already own or buy only a few essentials:
- Wood filler for dents and old hardware holes
- Sandpaper or sanding sponges
- Primer, if the finish needs it
- A quart or sample-sized paint, stain, or clear finish
- One inexpensive pull, or a reused handle from another project
- Thin trim strips if you want to fake a custom door style
If you already have leftover paint, the budget gets even friendlier. If you need every single item from scratch, $25 becomes more of a tightrope walk. But for many homeowners, this project works because the door is free, the tools are already on hand, and the makeover materials are minimal.
Step-by-Step: Turning an Existing Door Into a Budget Barn Door
1. Pick the right door
Start by choosing a door that is straight, structurally sound, and appropriately sized for the opening. The door should be wider than the opening so it overlaps the sides when closed, and a little taller than the opening as well. In plain English, you want enough extra coverage that the finished result looks intentional instead of like it missed the doorway by a technicality.
Flat slab doors are easiest to modernize. Traditional panel doors can look beautiful too, especially if you are leaning cottage, farmhouse, or vintage. Hollow-core doors are lighter and easier to move, but they can feel less substantial. Solid-core doors look and feel better in many situations, though they are heavier and may need more careful handling. If the door is extremely damaged, warped, or crumbling at the edges, let it retire with dignity.
2. Measure the opening and the wall beside it
This is the step that prevents sadness. Measure the width and height of the opening, then measure the clear wall area where the door will slide. You want enough room for the door to move fully open without crashing into a thermostat, switch plate, or your decorating decisions. Also check baseboards, casing, and nearby furniture. Barn doors are stylish, but they do not become flexible just because you love them.
If you are buying or using a hardware kit, read its measurements before refinishing the door. Different systems call for slightly different clearances. Some need a groove in the bottom of the door for a floor guide, while others allow a wall-mounted guide instead. That detail matters before the final finish goes on.
3. Remove old hardware and patch the evidence
Take off hinges, knob sets, strike plates, and anything else from the door’s former life. Fill old holes, dents, and scratches with wood filler. Let it dry thoroughly, then sand smooth. This is where the transformation starts. A freshly patched and sanded door already looks more intentional, even before color enters the chat.
If the door has old paint and you suspect it could be very old, handle prep carefully and safely before sanding. For newer finishes, a good scuff-sand is usually enough to help primer or paint bond better. Clean off dust when you are done. Dust is the clingy ex of DIY projects. It always tries to show up in the finish.
4. Add trim if you want a custom look
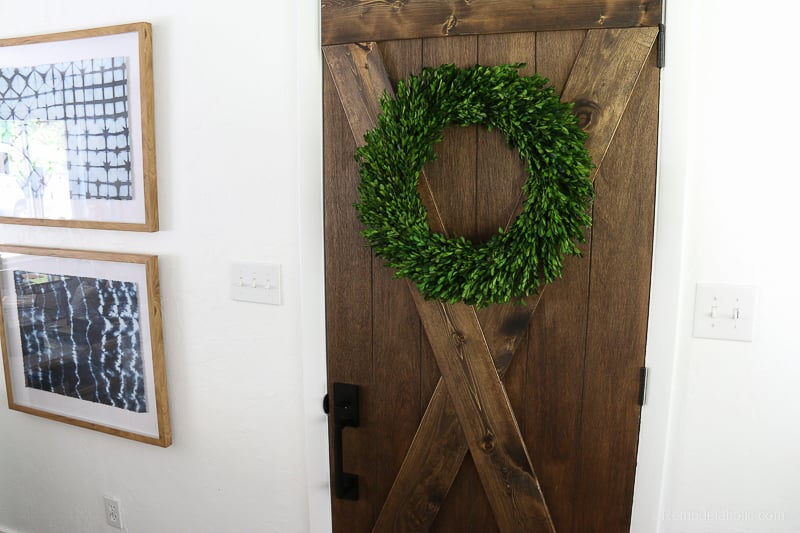
This is the secret sauce for making a cheap door look expensive. Thin wood strips can mimic a modern grid, a classic Shaker layout, or even a simple faux crossbuck pattern. Keep the design clean. Too many diagonal pieces can move the door from “stylish feature” to “the wall is cosplaying as a chicken coop.”
For a modern farmhouse version, try a simple frame around the perimeter with one vertical board down the center. For a cleaner contemporary door, add just a few slim horizontal strips. Dry-fit the layout before attaching anything, and make sure added trim will not interfere with your hardware placement.
5. Prime, paint, or stain the door
Once the surface is smooth and dust-free, choose your finish. Paint is usually the easiest path for a low-cost makeover because it hides patchwork well and instantly unifies the surface. White creates a crisp built-in feel. Black makes the door feel architectural and a little dramatic, in the best way. Deep green, warm greige, navy, and soft clay tones can all look designer-worthy without screaming for attention.
If the wood grain is attractive, stain can also look beautiful, especially in rooms that need warmth. Just be realistic: stain highlights character, but it also highlights flaws. If the door has lots of patched holes or mismatched materials, paint is the kinder option.
Lay the door flat if possible while finishing it. This helps avoid drips and gives you more control. Let each coat dry fully, lightly sand between coats if needed, and do not rush the cure time. Impatience is one of the most expensive free mistakes in DIY.
6. Plan the hardware attachment before you admire your masterpiece too long
The rail needs to be level, secure, and properly anchored. That usually means fastening it into studs or into a properly installed mounting board or header, not just into drywall. If your kit uses straps, hangers, anti-jump blocks, stops, and a floor guide, dry-fit everything before final assembly. Confirm the handle location too, especially if the door will pass close to a wall.
Some kits require the track center to sit above the door by a specific amount, and many use a small gap at the bottom so the door can glide cleanly. Translation: follow your specific hardware instructions, not your inner improvisational artist.
7. Hang the door and test the slide
Once the rail is installed, hang the door with help. This is not the time to prove you are secretly a forklift. Check that the door moves smoothly, clears the floor, and stops where it should. Install the floor guide in the correct position so the door does not swing away from the wall or wobble like it has stage fright.
Then step back and enjoy the moment. The same door that looked forgettable two days ago now has presence, purpose, and a suspiciously expensive vibe.
Design Ideas That Make an Old Door Look High-End
Go monochrome
Paint the door, the trim, and the mounting board the same color for a built-in look. This works especially well in small spaces because the barn door feels integrated instead of tacked on.
Use a matte or satin finish
A soft sheen tends to look richer than high gloss on interior doors. It also hides minor imperfections better, which is useful when your star material has lived a whole previous life.
Add a simple black pull
Even a modest handle can dramatically improve the finished look. Black hardware pairs well with both rustic and modern doors, which is why it keeps showing up in rooms that mysteriously end up on Pinterest.
Let the trim do the talking
One or two well-placed trim boards can completely change the style of the door. Minimal trim works for modern spaces. Framed trim suits transitional rooms. The door does not need to be busy to be beautiful.
Mistakes That Can Ruin a Budget Barn Door Project
Choosing a door that is too narrow: If it barely covers the opening, it will always look wrong. Barn doors need overlap to look finished.
Ignoring privacy expectations: A barn door is usually better for visual separation than full acoustic privacy. That matters more than people think.
Mounting into drywall alone: The door and hardware need real support. This is not the place for wishful thinking.
Forgetting the floor guide: Without one, the door can swing and feel sloppy. Stylish should still mean functional.
Overdecorating the door: When every trim board idea makes it onto one surface, the result can feel chaotic. The nicest budget makeovers usually show restraint.
Final Thoughts
A $25 barn door upgrade from an existing door is not really about gaming the laws of physics or pretending premium hardware costs pocket change. It is about understanding where value actually lives. Reuse the door. Spend a little on finish materials. Add trim only where it improves the design. Respect the measurements. Follow the hardware instructions. And let the makeover do what makeovers do best: create a dramatic before-and-after without draining the renovation fund.
If you have an old interior door and a spot in your home where a sliding solution makes sense, this is one of the most satisfying upgrades you can make. It is practical, stylish, and just humble enough to be charming. Basically, it is the home-improvement equivalent of showing up in thrifted clothes and somehow looking better than everyone who paid full price.
Experiences and Lessons From Real Barn Door Makeovers
One of the most common experiences people have with this kind of project is realizing that the makeover matters more than the door itself. A door that looked dull, yellowed, and slightly depressing while hinged in a hallway suddenly looks intentional the minute it is cleaned up, painted, and mounted to slide. That is a surprisingly encouraging moment for DIY beginners. It teaches you that “old” and “ugly” are not the same thing. Often, old just means unfinished. Once the scratches are filled, the old knob hole is patched, and the surface gets a fresh coat of paint, the door starts acting like it knew it had potential all along.
Another real-world lesson is that measurement is not the boring part of the project. It is the project. Plenty of people start with a romantic vision of a dramatic black barn door, only to discover the wall has a light switch in the wrong place, a return vent that will get blocked, or not enough room for the panel to slide fully open. The homeowners who walk away happiest are usually the ones who spend extra time with a tape measure before buying or refinishing anything. They measure the opening, the trim, the baseboard, the nearby wall, and the hardware height. Then they measure again because confidence is great, but math is better.
There is also the experience of discovering that door weight changes the whole feel of the room. A lightweight hollow-core door can absolutely be upgraded and made pretty, especially for closets, pantries, or decorative dividers. But when people use a heavier existing door, the finished result often feels more substantial and “built in.” It slides with a little authority. It closes with more confidence. It looks less like a prop and more like architecture. That does not mean every project needs a heavy solid-core slab, but it does explain why some finished barn doors look more luxurious than others even when the paint color is similar.
Many DIYers also learn that the best-looking details are usually the simplest ones. A single matte color, a clean handle, and one restrained trim pattern often beat complicated faux-rustic designs. It is easy to get excited and start adding diagonal boards, fake distressing, dark wax, decorative corner brackets, and three kinds of stain because the internet can make everything look like a craft challenge. In real homes, though, a simpler finish tends to age better. It works with more styles, photographs well, and does not make the room feel like it is trying too hard to audition for farmhouse theater.
And then there is the emotional payoff, which is very real. A successful barn door makeover changes how a small area feels. A laundry room becomes less of a utility closet and more of a deliberate part of the home. A pantry gets personality. A home office feels separate without requiring a full remodel. That is why this project keeps showing up in real houses: it solves a problem and creates a mood at the same time. When a project can do both while reusing something you already own, it tends to earn a permanent place on the list of smart upgrades.


