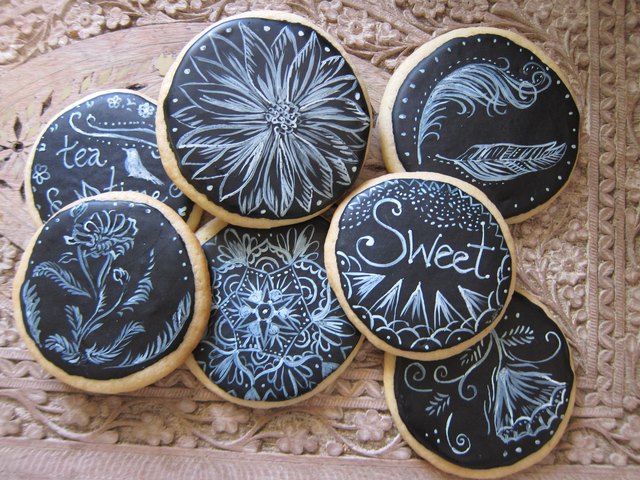

If regular sugar cookies are the straight-A students of the dessert world, chalkboard cookies are the artsy overachievers who also bring their own fancy pens. They look clever, nostalgic, and almost too cute to eatalmost. With a dark “chalkboard” surface, dusty chalk-like lettering, and a neat frame around the edges, these cookies are perfect for back-to-school gifts, teacher appreciation boxes, birthday dessert tables, baby showers, and anyone who thinks dessert should come with a little drama.
The good news? You do not need a culinary degree, a television crew, or a suspicious amount of confidence to make them. What you do need is a sturdy sugar cookie, properly mixed royal icing, a little patience, and the emotional strength to let things dry before poking them “just to check.” That last part is harder than it sounds.
In this guide, you’ll learn how to make chalkboard cookies from start to finish, including the best cookie base, how to create the matte black board, how to get that soft chalk effect, and how to write on cookies without making them look like a kindergarten whiteboard after recess. Whether you’re a beginner or a seasoned cookie decorator looking for a polished chalkboard cookie tutorial, this step-by-step method keeps things approachable, clean, and fun.
What Are Chalkboard Cookies, Exactly?
Chalkboard cookies are decorated sugar cookies designed to look like mini classroom chalkboards. Most styles use a plaque-shaped or rectangular cookie, a black royal icing base, a brown or wood-toned frame, and white lettering or doodles that mimic chalk. Some decorators go ultra-clean and elegant; others lean into a more rustic, dusty finish that looks like someone erased algebra homework five minutes ago.
The effect usually comes from one of two methods:
- A smooth black royal icing base topped with white piping or edible marker details.
- A black base softened with a faint white haze to imitate real chalk dust.
That second option is what makes these cookies especially charming. They do not just look black and whitethey look like a tiny edible chalkboard that wandered out of a classroom and into your cookie box.
Why Chalkboard Cookies Work So Well
From an SEO perspective, people searching for how to make chalkboard cookies usually want more than a basic recipe. They want a finish that looks intentional, not accidental. Chalkboard cookies are popular because they check all the boxes: they are visually striking, easy to customize, and surprisingly versatile. You can write names, short messages, subject-themed doodles, menu labels, wedding table numbers, or “welcome back” notes that are way sweeter than any actual homework assignment.
They also hold up well for gifting because royal icing dries firm. That means once your design is fully set, the cookies are easier to package, stack, and transport than soft-frosted cookies. In other words, these are not just pretty. They are practical pretty, which is the gold medal category of baking.
The Best Cookie Base for Chalkboard Cookies
If you want neat edges and a clean surface, start with a roll-out sugar cookie dough that holds its shape. This is not the moment for a puffy drop cookie that spreads like it is trying to escape the pan. Chalkboard cookies look best when the lines are crisp and the surface is flat enough to decorate easily.
What the ideal dough should do
- Roll evenly without becoming sticky and dramatic.
- Keep sharp cutter edges during baking.
- Bake relatively flat.
- Have a texture sturdy enough to support royal icing without crumbling.
Classic vanilla sugar cookie dough is the safest bet. Almond or orange-vanilla versions can also work beautifully if you want extra flavor. Just avoid recipes that puff aggressively or bake into domes, because writing on a hill is difficult unless you are a mountain goat or a very determined cookie artist.
Best shapes for chalkboard cookies
Rectangles, plaques, and rounded rectangles are the easiest options. A plaque cutter gives that old-fashioned classroom look, while a simple rectangle feels modern and clean. If you want to get extra cute, pair your chalkboard cookies with pencil cookies, apple cookies, or notebook-paper cookies in the same box.
What You Need to Make Chalkboard Cookies
- Rolled sugar cookies, fully baked and completely cooled
- Royal icing made with meringue powder or pasteurized egg product
- Black gel food coloring
- White royal icing for lettering and chalk effect
- Brown royal icing for the frame
- Piping bags or tipless bags
- Small round piping tips, if you like using them
- Scribe tool, toothpick, or skewer for smoothing icing
- Food-safe fine brush for softening details
- Optional: edible marker for extra accents on fully dried icing
- Optional: a tiny amount of cornstarch for a dusty chalkboard finish
One important note: if you plan to use edible markers, the icing surface needs to be fully dry. Not “probably dry.” Not “dry-ish.” Fully dry. Otherwise the pen can drag, skip, or leave you with a streaky design that looks less “bakery chic” and more “printer malfunction.”
How to Make Royal Icing for Chalkboard Cookies
Royal icing is the backbone of this entire project. For decorated sugar cookies, it is popular because it dries hard, holds detail well, and can be mixed to different consistencies for outlining, flooding, and fine piping. For beginners, a meringue powder-based royal icing is especially handy because it is stable, easy to work with, and avoids the fuss of raw egg whites.
The two consistencies you need
You do not need six bowls of icing and a chemistry degree. For chalkboard cookies, you mainly need:
- Flood consistency: thin enough to settle into a smooth surface for the black board and brown frame.
- Piping consistency: thicker icing for lettering, outlines, and details.
A helpful rule of thumb is that flood icing should smooth out after a few seconds, while piping icing should hold its shape without spreading everywhere like gossip. If your icing traps lots of air bubbles, let it sit for a bit and gently stir before bagging it.
Step-by-Step: How to Make Chalkboard Cookies
Step 1: Bake and cool your cookies
Roll your dough evenly, cut your shapes, and bake until the edges are set. Then let the cookies cool completely before decorating. This matters. Warm cookies melt icing, create uneven surfaces, and break hearts.
Step 2: Flood the chalkboard center in black icing
Pipe and flood the center section of each cookie with black royal icing, leaving room around the edge for the frame if you want the traditional chalkboard look. Use a scribe tool or toothpick to guide the icing into corners and pop any bubbles.
Let this layer settle and begin to dry. If you want a smooth modern chalkboard, let it dry as is. If you want the softer, dusty classroom effect, keep reading.
Step 3: Create the chalky finish
This is the magic. For a realistic chalkboard effect, lightly add a touch of white to the black surface. There are two easy ways to do it:
- Soft-smear method: add a tiny amount of white icing over the black and gently spread it thinly so the black still shows through.
- Dust method: once the black icing is fully dry, lightly dust with a whisper of cornstarch to mute the shine and create a chalkboard haze.
Use restraint here. You are aiming for “soft erased chalkboard,” not “cookie survived a blizzard.” A little haze goes a long way.
Step 4: Add the frame
Pipe a border around the cookie with brown icing to mimic a wood frame. Flood that border neatly and let it level. If you want a more polished finish, let it dry completely and then add woodgrain lines with an edible marker. This detail is optional, but it adds a surprisingly convincing faux-wood look.
Step 5: Let everything dry properly
This is where many decorators sabotage their own success. The base needs enough time to dry before you add lettering or extra details. Depending on the humidity, thickness of icing, and how much detail you added, that can mean several hours or overnight. Overnight is the safest choice if you want crisp writing and minimal smudging.
Step 6: Write like it’s edible chalk
Now for the fun part. Use piping-consistency white royal icing in a very small bag opening to write names, short phrases, or doodles. For a realistic chalk look, pipe one small section at a time and gently soften it with a fine food-safe brush before it dries fully. This removes the too-perfect glossy edge and makes the design look more hand-drawn.
Think simple: names, “Back to School,” “A+ Teacher,” hearts, apples, stars, arrows, or tiny math equations if you enjoy edible irony.
How to Make Your Chalkboard Cookies Look Better Instantly
Use gel coloring, not watery coloring
Gel food coloring gives richer color without thinning your icing too much. That matters when you are trying to get a deep black base. Thin, washed-out gray icing is not wrong, exactlyit is just less “chalkboard” and more “mildly gloomy raincloud.”
Keep your lettering short
These cookies are tiny billboards, not full-length essays. A name, a phrase, or a few doodles always look cleaner than trying to squeeze an inspirational quote onto a three-inch cookie.
Practice on parchment first
If your handwriting gets nervous under pressure, practice a few words on parchment paper before touching the cookie. It is much less upsetting to mess up on parchment than on a cookie that has already used half your afternoon.
Work in layers
Professional-looking decorated sugar cookies often rely on layered drying time. That means base first, details second, extra accents third. It may feel slower, but the final result looks much sharper.
Common Mistakes to Avoid
- Using cookies that are still warm: icing will melt or separate.
- Skipping the outline on flood areas: icing can run off the sides.
- Making icing too thin: letters blur and details lose shape.
- Overmixing icing: too much air means more bubbles.
- Writing before the base is dry: hello, smears.
- Adding too much white haze: the cookie stops looking like a chalkboard and starts looking confused.
Creative Ways to Use Chalkboard Cookies
Once you know the basic technique, these cookies become wildly adaptable. Here are a few smart ways to use them:
- Back-to-school cookies: write student names, grades, or teacher messages.
- Wedding favors: use them as edible place cards or mini table numbers.
- Birthday cookies: add age, names, or tiny doodles that match the party theme.
- Baby shower desserts: write “hello baby” or use sweet nursery-style sketches.
- Holiday cookie boxes: make mini menu-board cookies with festive phrases.
They are also fantastic for small businesses, bake sales, and custom cookie orders because the design feels personalized without requiring sculpted fondant or advanced painting skills.
How to Store Chalkboard Cookies
Once fully dry, store the cookies in an airtight container at room temperature. If you are stacking them, place parchment between layers. If they are for gifting, wait until the icing is completely set before bagging or boxing them. Rushing the packaging step is like putting wet nail polish into mittens. Nothing good happens after that.
Royal icing-decorated cookies also travel well once dry, which makes chalkboard cookies a strong choice for party favors and shipped treats. Just make sure they are thoroughly set first, especially if you used layered details or brushed-on chalk effects.
Final Thoughts on How to Make Chalkboard Cookies
If you have been wondering how to make chalkboard cookies that actually look polished, the secret is not a mystery ingredient or a magician’s wand. It is a combination of sturdy sugar cookies, well-mixed royal icing, clean layering, and patience between steps. The black base gives drama, the white lettering adds contrast, and the soft chalky finish turns a basic decorated cookie into something memorable.
Best of all, chalkboard cookies strike that rare sweet spot between charming and practical. They are impressive enough for gifting, flexible enough for custom themes, and easy enough for home bakers to master with a little repetition. Your first batch may not look like it came straight from a boutique bakeryand that is fine. The second batch will be better. The third batch will make you feel suspiciously powerful.
So roll out the dough, mix the icing, and embrace your inner cookie calligrapher. The chalkboard is edible now, and frankly, that is a major upgrade over actual school supplies.
Experience: What I Learned Making Chalkboard Cookies Again and Again
The first time I made chalkboard cookies, I thought the black icing was the hard part. It was not. The hard part was waiting. I wanted instant results, bakery-level elegance, and perfect lettering on the very first try, which is an adorable mindset right up until you smear wet royal icing with your thumb and say words that do not belong in a baking tutorial.
What surprised me most was how much the tiny details changed the final look. A plain black cookie with white writing can look nice, but once I added a faint chalk haze and softened the lettering with a brush, the design suddenly looked intentional and polished. That was the moment the cookies stopped looking like “black cookies with writing” and started looking like actual chalkboards. It felt like flipping on a light switch.
I also learned that a flatter cookie makes everything easier. When the cookie surface is even, the icing settles more smoothly, the writing flows better, and the whole design feels calmer. On puffier cookies, the icing can pool oddly, and lettering starts to look like it is climbing a hill. So now I pay attention to dough thickness more than I used to, and I chill shapes before baking if they start getting too soft.
Another lesson: short messages always win. I once tried to fit a long phrase onto a medium cookie because I was feeling ambitious. The result looked like a tiny chalkboard written by someone in a moving car. Since then, I keep the wording briefnames, initials, simple phrases, maybe a doodle or two. The cookies look cleaner, and I stay much more emotionally stable.
Color also matters more than people think. A true black base gives the strongest contrast, but it can take patience to achieve. Rushing that step can leave you with a muddy gray, which is still edible, still lovable, and still a cookie, but it does not have the same bold classroom effect. I found that using concentrated gel color and letting the icing rest briefly helped the color deepen and the air bubbles settle down.
The biggest confidence boost came when I stopped chasing perfect symmetry. Real chalkboards are not perfect. Chalk lines skip a little. Erased areas look slightly dusty. Letters have personality. Once I embraced that softer handmade look, the cookies became more fun to decorate and, honestly, more beautiful. They felt warm instead of stiff. Charming instead of overly controlled.
Now when I make chalkboard cookies, I treat them like tiny edible art projects. I turn on music, line up the piping bags, and work in stages instead of trying to finish everything at once. The process is slower, but the results are better, and there is something deeply satisfying about watching a tray of plain sugar cookies transform into a set of miniature chalkboards with names, notes, and playful little doodles. It feels crafty, nostalgic, and slightly ridiculous in the best possible way.
If you are making them for the first time, expect a learning curve and enjoy it. Chalkboard cookies are not about machine-made perfection. They are about contrast, texture, personality, and a little edible nostalgia. And if one or two cookies come out weird? Congratulations. Those are the ones you eat first.


