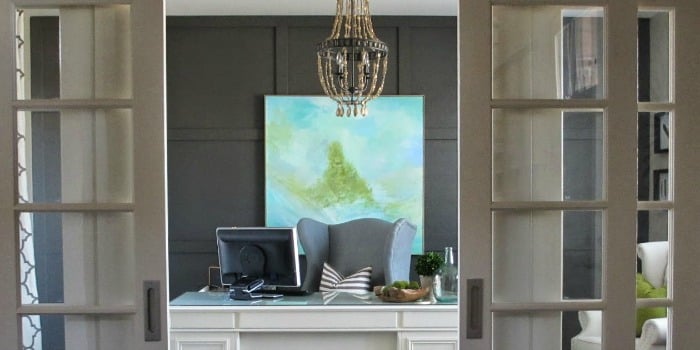

A home office should do more than hold a laptop, a mug, and the heroic pile of papers you keep promising to “sort this weekend.” It should help you focus, feel calm, look good on video calls, and make Monday morning slightly less rude. One of the easiest ways to give a plain workspace personality is with lighting, and few pieces add warmth, texture, and handmade charm quite like a DIY wood bead chandelier.
This home office makeover idea blends practical design with a little weekend creativity. The wood bead chandelier becomes the focal point, but the real magic happens when it works together with smart desk placement, layered lighting, cozy storage, neutral colors, and comfortable furniture. Think of it as giving your office a promotion from “spare room with Wi-Fi” to “stylish productivity headquarters.”
Why a DIY Wood Bead Chandelier Works So Well in a Home Office
A chandelier in an office may sound fancy, but a wood bead chandelier keeps the mood approachable. It has a relaxed, handcrafted look that fits beautifully with farmhouse, coastal, bohemian, transitional, and modern organic interiors. The natural beads soften the harder edges of desks, shelves, screens, and office equipment. In other words, it brings balance to a room where technology usually wins the decorating argument.
Wood beads also add texture without overwhelming the space. A crystal chandelier can feel too formal for a casual home office, while a plain flush-mount fixture can disappear completely. A beaded chandelier sits comfortably in the middle: decorative enough to be noticed, simple enough to live with every day.
Start the Makeover with a Clear Office Plan
Before choosing beads, paint, or a new desk chair, study how the room actually works. A good home office makeover starts with three questions: Where does natural light come from? Where should the desk go? What currently makes the room annoying?
If glare hits your screen every afternoon, placing the desk directly in front of the window may not be the best move. If the room doubles as a guest room, craft zone, or storage closet for mystery cables, you need flexible furniture and hidden organization. If the ceiling fixture is dull, harsh, or off-center, the DIY wood bead chandelier can help pull the whole layout together visually.
Choose a Desk Position That Supports Focus
Place the desk where you can work comfortably without screen glare. A position perpendicular to the window often works better than facing the window directly. It gives you natural light without turning your monitor into a tiny mirror that shows your own tired face at 3 p.m.
If possible, keep the doorway visible from your chair. Many people feel more comfortable when they are not sitting with their back fully exposed to the room. This is not about being dramatic; it is about reducing tiny distractions so your brain can stop acting like a security camera.
Design the Lighting in Layers
The DIY wood bead chandelier should be the star, but it should not be the only light source. A productive home office needs layered lighting: ambient light for the whole room, task lighting for focused work, and accent lighting for warmth and mood.
Ambient Lighting: The Chandelier
The chandelier provides general light and style. For a smaller office, a single-tier wood bead chandelier may be enough. For a larger room with tall ceilings, a two-tier design can create more presence. If your chandelier hangs in the center of the room rather than over the desk, choose a shape that looks good from every angle.
Task Lighting: The Desk Lamp
Even with a beautiful chandelier, add a desk lamp. Task lighting helps reduce eye strain when reading, writing, sketching, or pretending to review spreadsheets while secretly rearranging your desktop icons. A lamp with an adjustable arm gives you more control and keeps light where you need it.
Accent Lighting: The Cozy Finishing Touch
Accent lighting can be as simple as a small lamp on a bookshelf, a picture light above framed art, or LED strip lighting under floating shelves. These details make the room feel finished and help the office shift from daytime work mode to evening calm mode.
How to Size a Wood Bead Chandelier for a Home Office
Scale matters. A chandelier that is too small looks like an afterthought. One that is too large can make the office feel like it is wearing a hat that belongs to a much bigger room.
A useful design rule is to add the room’s length and width in feet, then use that number in inches as a starting point for chandelier diameter. For example, a 10-by-12-foot office can usually handle a fixture around 22 inches wide. This is not a law carved into stone tablets, but it is a practical place to begin.
Also consider ceiling height. In a standard room, the bottom of the chandelier should allow comfortable clearance. If the fixture hangs over a desk or small meeting table, it can be lower because people will not walk beneath it. If it hangs in an open walking path, keep it high enough that nobody has to duck like they are entering a secret clubhouse.
DIY Wood Bead Chandelier Materials
The exact supply list depends on whether you are building a decorative bead cover for an existing fixture or creating a full pendant-style chandelier around a lighting kit. For most approachable DIY projects, the semi-DIY route is safer and easier: start with an existing chandelier frame or basic light fixture, then add wood bead strands for a custom look.
Common Materials
- Unfinished wood beads in mixed sizes
- Strong cotton cord, jewelry wire, or thin craft wire
- An existing chandelier frame, metal hoop, or embroidery hoop
- Small eye hooks, jump rings, or wire loops
- Wood stain, paint, or matte sealer
- Measuring tape
- Scissors or wire cutters
- Painter’s tape
- LED bulbs suitable for the fixture
For a high-end look, mix bead sizes instead of using only one diameter. Smaller beads create flexibility, while larger beads add drama. Natural wood gives a soft organic feel, whitewashed beads lean coastal, black beads look modern and bold, and stained beads can warm up a neutral office beautifully.
Step-by-Step DIY Wood Bead Chandelier Idea
Step 1: Choose or Prepare the Frame
Start with a chandelier frame, pendant frame, or circular hoop that matches the scale of your office. If the frame is shiny or outdated, spray-paint it matte black, antique brass, white, or warm bronze. Let the paint cure fully before adding beads. Rushing this step is how fingerprints become part of the design, and not in a charming artisanal way.
Step 2: Plan the Bead Strands
Measure the distance from the upper ring to the lower ring, or from one attachment point to another. Cut cord or wire slightly longer than needed so you have room to knot or twist the ends. Create one test strand first. Hold it against the frame to check the drape. If it looks too tight, add more beads. If it sags like a hammock after a family reunion, remove a few.
Step 3: String the Beads
Thread the beads in a repeating pattern. A simple pattern might be small-medium-large-medium-small. A more relaxed design can use random bead sizes, which looks casual and handmade. Keep the rhythm consistent enough that the finished chandelier feels intentional rather than “I dropped beads and accepted fate.”
Step 4: Attach the Strands
Secure each strand to the frame using knots, wire loops, or jump rings. Space the strands evenly around the chandelier. Turn the fixture as you work so you can check the balance from all sides. If one section looks sparse, add another strand. If it looks crowded, remove one before the chandelier starts resembling a wooden bead waterfall.
Step 5: Finish the Beads
You can leave the beads unfinished for a pale natural look, or apply a light stain to bring out the grain. A matte clear sealer helps protect the beads from dust and handling. Avoid glossy finishes unless you specifically want a polished look; most wood bead chandeliers look best with a soft, natural surface.
Step 6: Install Safely
If the fixture requires electrical work, safety comes first. Turn off power at the electrical panel, test that power is off, and follow the fixture instructions carefully. If you are not experienced with wiring, hire a licensed electrician. A beautiful chandelier is wonderful; a surprise electrical adventure is not part of the design plan.
Choose Bulbs That Make the Office Feel Good
LED bulbs are usually the best choice for a home office chandelier because they are energy-efficient, long-lasting, and available in many color temperatures. For a warm and cozy office, choose bulbs around 2700K to 3000K. For a brighter task-oriented space, 3500K to 4000K may feel cleaner and more alert. Avoid lighting that is too cool and harsh unless your goal is “airport restroom chic.”
Dimmable bulbs are especially useful. During work hours, you can keep the light bright and clear. In the evening, dim the chandelier and let the room feel calm. Just make sure the bulbs, fixture, and dimmer switch are compatible.
Build the Room Around the Chandelier
Once the DIY wood bead chandelier is installed, repeat its texture and tone elsewhere in the room. This makes the fixture look like part of a design plan instead of a random craft project that escaped from a weekend workshop.
Use Natural Materials
Add a wood desk, woven baskets, rattan boxes, linen curtains, or a jute rug. These materials echo the beads and create a warm, grounded atmosphere. The goal is not to turn the office into a basket factory; two or three natural touches are enough.
Keep the Color Palette Calm
Soft whites, warm grays, muted greens, sandy beige, and gentle taupe all pair well with wood beads. If you want contrast, add black hardware, a charcoal chair, or dark picture frames. For a cheerful office, bring in dusty blue, terracotta, olive, or mustard accents.
Add One Accent Wall
A board-and-batten wall, painted bookcase, peel-and-stick wallpaper, or framed gallery wall can create a strong backdrop. The chandelier adds texture overhead, while the wall treatment gives the eye somewhere else to land. Together, they make the office feel designed from top to bottom.
Storage Makes the Makeover Work
A pretty office that cannot store anything is just a stage set with a printer problem. Include practical storage so the room stays functional after the makeover photos are taken.
Use closed cabinets for supplies you do not want to see, open shelves for attractive books and boxes, and drawer organizers for pens, chargers, sticky notes, and other tiny objects that multiply when you are not looking. Label baskets if you share the office with family members, because “the gray basket” is somehow never specific enough.
Small Office? No Problem
A DIY wood bead chandelier can work in a small home office if you keep the design airy. Choose a lighter bead color, a compact frame, and a simple silhouette. Pair it with a floating desk or slim writing table to keep the room from feeling heavy.
Mirrors, pale walls, and lightweight curtains can help bounce natural light around the room. Vertical shelves draw the eye upward and make the ceiling feel higher, which also gives the chandelier more breathing room.
Budget-Friendly Makeover Tips
You do not need a luxury budget to create a home office makeover with a DIY wood bead chandelier. Start by repainting the existing light frame instead of buying a new one. Shop unfinished wood beads in bulk. Reuse a desk you already own and upgrade it with new hardware. Add peel-and-stick wallpaper behind shelves. Replace mismatched office supplies with matching boxes or baskets.
Sometimes the most affordable improvement is editing. Remove anything that does not belong in the office. Old cords, dried markers, broken frames, abandoned notebooks, and that one mystery remote can all leave the room. Your chandelier will look better when it is not supervising clutter.
Common Mistakes to Avoid
Using Only Overhead Light
A chandelier alone can create shadows on your work surface. Always pair it with a desk lamp or task light.
Choosing a Fixture That Is Too Heavy
Wood beads are lighter than crystal, but the full fixture can still have weight. Make sure the ceiling box is rated for the fixture you install.
Ignoring Glare
Beautiful lighting should not bounce directly into your monitor. Test bulb brightness and desk placement before calling the makeover finished.
Overdecorating the Desk
A plant, lamp, notebook, and small tray can look polished. Twelve candles, three sculptures, and a decorative bowl of beads may make your keyboard feel like it is living in a gift shop.
Final Styling Ideas
Finish the office with details that make work feel more enjoyable. Add framed art you actually like, not just something that says “Hustle” in a font that looks tired. Use a comfortable chair with proper support. Bring in one healthy plant. Keep a soft throw nearby if the room gets cool. Add a pinboard or linen memo board for notes, ideas, and reminders.
The best home office makeover is not only attractive; it helps you do your work with fewer distractions and more comfort. The DIY wood bead chandelier gives the room a memorable focal point, but the supporting choices make the makeover last.
Experience: What It Feels Like to Make Over a Home Office with a DIY Wood Bead Chandelier
The first thing you notice during this kind of makeover is how quickly lighting changes your opinion of a room. Before the chandelier, a home office can feel flat and temporary, like a place where furniture went because no one knew where else to put it. After the wood bead chandelier goes up, the room suddenly has a center. It feels intentional. Even if the desk is still covered in receipts and one suspiciously old coffee cup, the ceiling is now saying, “We have a plan.”
The DIY process itself is surprisingly satisfying. Stringing beads is simple, repetitive, and almost meditative. It is the rare project that lets you listen to a podcast, drink iced coffee, and still feel productive. The trick is patience. The first few strands may look odd, and you may wonder if you are building a chandelier or an oversized necklace for a very glamorous giraffe. But once the strands multiply and the shape fills in, the design begins to make sense.
One useful lesson is to test everything before committing. Hold bead strands against the frame. Check the drape. Step back often. Take a photo from the doorway, because a camera catches awkward gaps your eyes may politely ignore. If the beads look too pale, try a light stain on a sample strand before staining the entire batch. If the fixture feels too busy, simplify the pattern. DIY projects reward flexibility more than perfection.
Another experience many people have is realizing the chandelier makes the rest of the office look slightly underdressed. That is not a problem; it is an invitation. Suddenly, the plastic file bins look less charming, the wall color seems a little tired, and the desk chair starts begging for an upgrade. Instead of replacing everything, repeat the chandelier’s natural texture in small ways. A woven basket under the desk, a wood picture frame, a linen curtain, or a warm-toned rug can connect the room without draining the budget.
The final result is more than decorative. A good office makeover changes behavior. When the room feels calm, you are more likely to clear the desk at the end of the day. When lighting is layered, you are less likely to work under harsh glare. When storage has a place, papers are less likely to form a small mountain range near the printer. And when the chandelier catches your eye during a long workday, it reminds you that your workspace can be practical and personal at the same time.
That is the real charm of a home office makeover with a DIY wood bead chandelier. It is not about creating a showroom. It is about making a room that supports real life: emails, deadlines, creative ideas, video calls, snack breaks, and the occasional dramatic sigh. The chandelier adds beauty, but the makeover adds ease. Together, they turn an ordinary office into a place you actually want to use.
Conclusion
A home office makeover with a DIY wood bead chandelier is one of those rare projects that delivers style, function, and personality without requiring a full renovation. The chandelier creates a warm focal point, while layered lighting, smart storage, comfortable furniture, and natural textures make the room work better every day. Whether your office is a full room, a corner, or a converted closet, this project can help transform it from forgettable to focused, cozy, and camera-ready.
Note: For any hardwired chandelier installation, turn off power at the electrical panel, test before touching wires, follow local building codes, and hire a licensed electrician if you are unsure.


