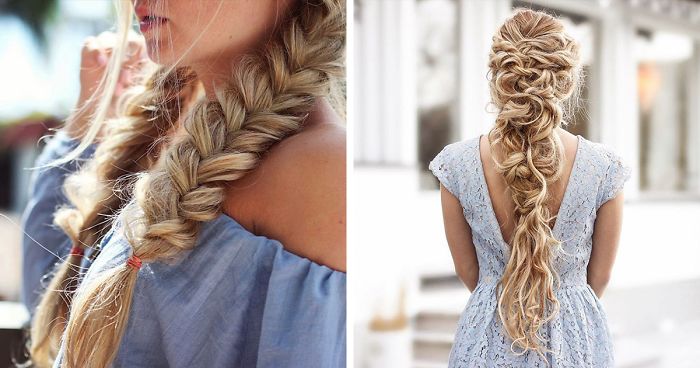
This Swedish Woman Creates Stunning Braided Hairstyles And Teaches You How To Do It Yourself

Some people wake up, drink coffee, and answer emails. Elvira Jonsson, the Swedish braid artist behind @inspobyelvirall, appears to wake up and casually turn hair into something that looks like it should be guarded by palace security. Her braided hairstyles are romantic, sculptural, delicate, and practical enough to make you think, “Maybe I can do that,” right before your arms turn into noodles halfway through a Dutch braid.
When Bored Panda profiled Jonsson, she was introduced as a 26-year-old Swedish woman with a serious passion for hair braiding and an Instagram feed filled with designs that looked part fairy tale, part wedding inspiration board, and part “how are human fingers capable of this?” Her work proves that braided hairstyles are not just quick fixes for second-day hair. They can be wearable art, a personal ritual, and a surprisingly relaxing DIY skill once you understand the basics.
The best part? You do not need a royal stylist, a magic comb, or a Scandinavian forest cottage to begin. You need clean sections, patient fingers, a few small elastics, and the willingness to practice without judging your first attempt too harshly. A braid that starts out looking like a confused pretzel can still become a beautiful hairstyle with a little tugging, pinning, and confidence.
Why Elvira Jonsson’s Braids Captured So Much Attention
Elvira Jonsson’s braided hairstyles stand out because they combine precision with softness. Many of her looks are intricate, but they rarely feel stiff or costume-like. Instead, they have that dreamy, effortless finish people love in wedding hair, festival hairstyles, prom updos, and everyday romantic braids. Think crown braids, stacked braids, fishtail details, flower-like braided buns, soft pull-through sections, and half-up styles that make long hair look like it has its own plotline.
Her style also taps into something timeless. Braiding has existed across cultures for thousands of years as a practical, decorative, and social art. It keeps hair controlled, protects strands from tangling, and can carry personal or cultural meaning. Today, braids still do all of that, but they also live happily on Instagram, Pinterest, wedding boards, and “I have five minutes but want to look intentional” mornings.
What makes Jonsson especially interesting is not only the finished result. It is the teaching angle. Her work inspires people to try braided hairstyles themselves instead of simply saving photos and whispering, “Someday.” That educational spirit matters because braiding is one of those beauty skills that looks mysterious until someone breaks it down. Then suddenly, you realize most styles are built from a handful of repeatable moves.
The Foundation: Every Stunning Braid Starts With Simple Technique
Before you attempt a dramatic braided crown or a princess-level flower braid, start with the core techniques. Almost every complex braided hairstyle is a remix of a few basic patterns. Once your hands understand those patterns, your brain can stop panicking and start designing.
1. The Classic Three-Strand Braid
The classic three-strand braid is the alphabet of braiding. Divide the hair into three equal sections. Cross the right section over the middle, then the left section over the middle. Repeat until you reach the ends and secure with an elastic. That is it. No secret handshake required.
For a cleaner result, brush or detangle first, keep even tension, and avoid pulling so tightly that the scalp feels uncomfortable. If you want a fuller look, gently pull the outer edges of the braid after securing it. This technique is often called “pancaking,” which is delightful because beauty vocabulary clearly gets hungry sometimes.
2. The French Braid
A French braid begins near the crown or hairline and gathers new hair as it travels. Start with three sections, cross the side pieces over the center, and add a small amount of loose hair each time before crossing. The finished braid lies flatter against the head and looks polished without needing much decoration.
French braids are excellent for school, work, workouts, casual weekends, and heatless waves. If your braid looks uneven the first few times, that is normal. The trick is to add similar-sized pieces as you move and keep your hands close to the scalp. The farther your hands drift away, the looser and bumpier the braid becomes.
3. The Dutch Braid
The Dutch braid is basically the French braid’s bolder cousin. Instead of crossing sections over the middle, you cross them under. This creates a raised, 3D braid that pops from the head. Many dramatic braided hairstyles use Dutch braiding because it gives structure and visibility, especially in photos.
If you are new to braiding, Dutch braids may actually be easier to see while you work because the braid forms on top of the hair. Start with a center part for double Dutch braids, or create a deep side part for a soft accent braid. Keep sections neat, add hair gradually, and secure the ends with a small elastic.
4. The Fishtail Braid
A fishtail braid looks complicated but uses only two main sections. Divide the hair in half. Take a small piece from the outside of the left section and cross it into the right section. Then take a small piece from the outside of the right section and cross it into the left section. Repeat until finished.
The smaller the pieces, the more detailed the fishtail looks. The larger the pieces, the faster it goes. For a soft boho finish, secure the end and gently loosen the braid from the bottom upward. This is a great style for long hair, half-up hairstyles, side braids, and textured updos.
How To Recreate A Swedish-Inspired Braided Look At Home
Want a hairstyle inspired by Elvira Jonsson’s romantic braided aesthetic? Try a soft Dutch fishtail crown. It looks impressive, photographs beautifully, and can be simplified for beginners.
Step 1: Prep The Hair
Start with dry, detangled hair. Freshly washed hair can be slippery, so if your strands are very smooth, add a small amount of lightweight mousse, texture spray, or styling cream. The goal is grip, not crunch. Your braid should feel like hair, not a decorative breadstick.
Step 2: Create A Side Part
Part your hair to the side that feels most natural. A side part makes the crown shape easier to start and gives the finished look a romantic curve. Brush through any tangles, especially near the nape of the neck, because hidden knots love to appear exactly when your hands are already busy.
Step 3: Begin A Dutch Braid Near The Hairline
Take a one-inch section near the front hairline and divide it into three pieces. Cross each side section under the middle section, adding a little new hair each time. Continue braiding along the side of the head, curving toward the back. Keep the tension secure but comfortable.
Step 4: Curve Around The Nape
As you reach the nape of the neck, guide the braid around the back of the head. This is where beginners often lose direction, so go slowly. Use a mirror if needed, or simply feel where the braid is traveling. Braiding is partly technique and partly learning the geography of your own head.
Step 5: Finish With A Regular Braid
When there is no more loose hair to add, finish the remaining length with a regular three-strand braid or switch into a fishtail braid for extra detail. Secure the end with a clear elastic.
Step 6: Pin And Shape
Wrap the loose braid around the head to complete the crown shape. Tuck the ends under another section of braid and secure with bobby pins. Use pins that match your hair color if you want them hidden, or decorative pins if you want the accessory moment to have its own spotlight.
Step 7: Pancake For Volume
Gently pull the outer edges of the braid to make it appear fuller and softer. Do this slowly, especially if you have layers. Pancaking is the difference between “I braided my hair in a hurry” and “I may or may not be attending a garden wedding in a castle.”
Best Braided Hairstyles To Try If You Love Elvira’s Style
Romantic Crown Braid
The crown braid wraps around the head and creates a halo effect. It is perfect for weddings, outdoor events, graduation photos, and days when you want your hair off your neck but still want to look like you made an effort. For short hair, try a braided headband instead of a full wraparound crown.
Half-Up Fishtail Braid
This style is beginner-friendly and flattering on many hair lengths. Take two sections from the front, bring them toward the back, and create a fishtail braid with the joined hair. Leave the rest loose. Add soft waves if desired, or keep it natural for an easy daytime look.
Double Dutch Braids
Double Dutch braids are practical, sporty, and surprisingly versatile. Wear them tight enough to stay secure, but not so tight that your scalp complains. You can leave the braids down, pin them into buns, or loosen them for a fuller weekend look.
Flower Braid Bun
A flower braid bun is made by braiding a section of hair, pancaking one side more than the other, and coiling it into a rose-like shape. Pin it flat against the head. This small detail can turn a simple half-up hairstyle into something special without requiring a full updo.
Stacked Braid
A stacked braid places a smaller braid on top of a larger braid, creating depth and contrast. It is more advanced, but the effect is gorgeous. Start with a Dutch braid as the base, then add a thin three-strand or fishtail braid over it. Secure both together at the end.
Tools That Make DIY Braiding Easier
You do not need a salon drawer full of equipment, but a few tools make a big difference. A rat-tail comb helps create clean parts. Small clear elastics secure ends without stealing attention. Bobby pins hold crowns, buns, and tucked sections in place. A detangling brush reduces snagging. A light styling cream or mousse adds grip. A flexible hairspray can help control flyaways without making the style stiff.
For curly, coily, or textured hair, moisture and gentle detangling are especially important. Use a leave-in conditioner or styling product that suits your hair type, and work in sections. For fine hair, dry shampoo or texture spray can add volume before braiding. For thick hair, clips are your best friends because they keep the “not yet” sections out of the way.
Hair Safety: Beautiful Braids Should Not Hurt
A beautiful braided hairstyle should feel secure, not painful. If your scalp stings, your hairline feels pulled, or you see small bumps from tension, loosen the style. Dermatologists warn that repeated tight hairstyles can contribute to traction alopecia, a type of hair loss caused by constant pulling.
That does not mean you should avoid braids. It means you should braid wisely. Rotate styles, avoid constant tension at the hairline, choose looser versions when possible, and remove a style if it causes discomfort. Thicker braids generally place less concentrated tension on small sections than extremely tight, tiny braids. Also, give your hair breaks between demanding styles, especially if you use extensions.
The golden rule is simple: if a braid feels like it is negotiating with your scalp using threats, it is too tight. Beauty should not require a headache.
Common Braiding Mistakes And How To Fix Them
Mistake: Uneven Sections
Uneven sections create lopsided braids. Use a comb, divide carefully, and check section thickness before you begin. For relaxed boho styles, perfect symmetry is not required, but the foundation still matters.
Mistake: Letting Go Too Often
Braids become messy when the hands release tension repeatedly. Keep your fingers close to the braid and transfer sections smoothly from hand to hand. It feels awkward at first, then suddenly becomes muscle memory.
Mistake: Starting Too Big
Do not begin with the most complicated style on your saved board. Start with a side braid, then a French braid, then a Dutch braid, then a crown braid. Skill stacking works better than beauty panic.
Mistake: Skipping Texture
Silky hair often slips out of braids. Add a bit of texture spray, mousse, or dry shampoo before styling. You want the strands to cooperate, not slide away like they have other plans.
Real-Life Experience: What DIY Braiding Teaches You
Trying to recreate a stunning Swedish-inspired braid at home is a humbling experience in the best possible way. The first lesson is that your hands have opinions. You may tell them to cross the right section under the middle, and they may respond by inventing a new move not recognized by any known hairstyling tradition. That is normal. Braiding your own hair requires coordination, patience, and the ability to laugh when one side looks royal and the other side looks like it survived a wind tunnel.
The second lesson is that mirrors help, but they can also confuse you. When you braid in a mirror, left and right become philosophical questions. Many beginners improve faster when they practice by feel. Try braiding while watching a show, using low-pressure practice time instead of attempting a masterpiece ten minutes before leaving the house. Your arms will get tired, but they will build stamina. Consider it beauty cardio, minus the gym membership.
The third lesson is that products matter less than preparation. A simple braid on detangled, slightly textured hair often looks better than an ambitious updo on slippery, rushed hair. Before braiding, brush gently, part cleanly, and clip away sections you are not using. Those tiny steps make the final hairstyle look intentional instead of improvised by a raccoon with a bobby pin.
The fourth lesson is that imperfection can be beautiful. Many of Elvira Jonsson’s most inspiring braided hairstyles have softness, movement, and romantic looseness. That means every flyaway is not an emergency. A few face-framing pieces can make the style look relaxed. A slightly uneven braid can become charming once it is pancaked and pinned. The goal is not to turn your head into a helmet. The goal is to create shape, texture, and personality.
The fifth lesson is that braiding becomes easier when you understand structure. A crown braid is not magic; it is a Dutch braid traveling around the head. A flower bun is not sorcery; it is a loosened braid coiled into a circle. A stacked braid is not impossible; it is one braid layered over another. Once you see braided hairstyles as combinations of small techniques, the whole world opens up. You stop asking, “Can I do that?” and start asking, “Which part should I learn first?”
Finally, DIY braiding teaches patience in a very practical way. You learn to slow down, section carefully, and fix small problems before they become big ones. You learn that taking a braid out and starting over is not failure; it is part of the process. And when you finally finish a style that looks even close to the photo you admired, the feeling is fantastic. You did not just style your hair. You built something with your own hands, one section at a time.
Conclusion
Elvira Jonsson’s braided hairstyles are stunning because they make hair feel imaginative again. Her work reminds us that braids can be classic, modern, practical, romantic, and artistic all at once. Whether you are learning a simple three-strand braid or practicing a crown braid for a special occasion, the secret is to begin with the basics and build slowly.
You do not need perfect hands on day one. You need a comb, a few elastics, gentle tension, and enough patience to survive the first few attempts. Start small, protect your scalp, loosen the braid for volume, and let the finished look have a little personality. After all, the best braided hairstyles are not just pretty; they feel handmade, human, and a tiny bit magical.


