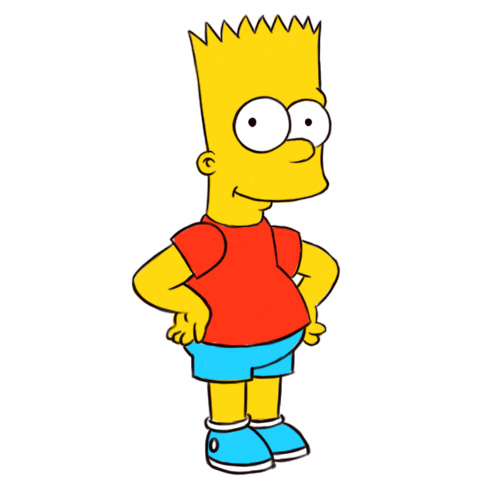

Bart Simpson looks deceptively simple. His head resembles a yellow sunburst, his eyes are two circles, and his daily wardrobe suggests he has never spent more than twelve seconds choosing an outfit. Yet the moment you try to draw him, something strange happens. The spikes become uneven, the eyes drift apart, and Bart suddenly looks like a nervous pineapple waiting at the DMV.
The secret is not advanced anatomy or expensive equipment. It is learning to see Bart as a collection of recognizable shapes, proportions, and expressive lines. His spiky silhouette, rounded eyes, projecting upper lip, red shirt, blue shorts, and oversized shoes do most of the character-recognition work.
In this guide, you will learn three practical ways to draw Bart Simpson: a beginner-friendly front view, a more energetic three-quarter pose, and a clean digital illustration. Each method teaches a different skill, so grab a pencil, loosen your wrist, and prepare to create a little Springfield trouble.
Before You Draw Bart Simpson: Understand His Basic Design
Professional character artists frequently begin with primitive shapes instead of finished outlines. Circles, cylinders, boxes, and tapered forms help establish proportion before small details are added. Animation artists also rely on clear silhouettes and repeatable construction because a character may need to be drawn consistently across many poses.
Bart is an excellent subject for practicing these fundamentals because his design is highly simplified. You do not need to draw realistic muscles, carefully shaded cheekbones, or seventeen individual hair strands. His visual identity depends on a few bold features.
Bart Simpson’s Most Recognizable Features
- A tall, slightly rectangular head topped with nine pointed spikes
- Two large circular eyes that touch or nearly overlap
- A small curved nose extending from the eye area
- A rounded muzzle and upper lip that project beyond the face
- A compact body with thin arms and legs
- A short-sleeved red shirt, blue shorts, white socks, and blue shoes
- Four-fingered cartoon hands
Recommended Drawing Supplies
For traditional drawing, use plain paper, an HB or 2H pencil for construction lines, a softer 2B pencil or black fineliner for the final outline, an eraser, and colored pencils or markers. A lighter pencil is useful because early guidelines should be easy to remove.
For digital drawing, use any program that supports layers. Separate layers allow you to sketch, ink, color, and correct mistakes without damaging the rest of the artwork. A drawing tablet is convenient, but a phone, mouse, or trackpad can work if you have patience and the emotional resilience of a saint.
Method 1: Draw Bart Simpson in a Simple Front View
The front view is the best starting point for beginners. It removes perspective problems and lets you concentrate on Bart’s facial proportions, head shape, clothing, and overall symmetry.
Step 1: Sketch the Head Shape
Lightly draw a vertical rectangle with softly curved sides. Make it taller than it is wide. Do not create a perfectly geometric box; Bart’s head should feel slightly organic rather than manufactured by a refrigerator company.
Leave extra room above the rectangle for the spikes. Draw a faint vertical guideline down the center of the face and a horizontal guideline across the upper half. These guides help align the eyes and nose.
Step 2: Add the Spiky Hair
Across the top of the head, draw a row of approximately nine triangular spikes. Keep their height reasonably consistent, but avoid making every spike mathematically identical. Slight variation makes the silhouette feel hand-drawn and lively.
The first and last spikes should connect naturally to the sides of the skull. A common beginner mistake is attaching the spikes like a removable crown. Instead, treat the hair and head as one continuous outline.
Step 3: Construct the Eyes and Nose
Draw two large circles along the horizontal guideline. Bart’s eyes sit close together, with the inner edges touching or slightly overlapping. Place a small black pupil near the center of each eye.
From the lower-right area of the left eye, extend a short curved line outward to form the nose. The nose should be small and rounded. If it becomes too long, Bart may begin resembling a yellow woodpecker, which is probably not the artistic direction you intended.
Step 4: Draw the Muzzle, Mouth, and Ear
Below the nose, sketch a rounded muzzle that pushes slightly beyond the front edge of the face. Add a curved mouth line inside this area. For a neutral expression, keep the mouth almost horizontal. For a mischievous grin, raise one corner and expose a small row of uneven cartoon teeth.
Add a simple C-shaped ear on each side of the head. Place the ears roughly level with the nose and lower eye area. A small curved mark inside each ear is enough to suggest structure.
Step 5: Build the Torso and Clothing
Draw two short lines descending from the head to form the neck. Below them, sketch a narrow torso shaped like a slightly tapered rectangle. Add short sleeves on both sides and draw Bart’s arms hanging downward.
Use simple mitten-like forms for the hands, then divide each one into four fingers. Keep the fingers rounded and flexible. Cartoon hands communicate more clearly through gesture than through realistic anatomy.
Add loose shorts below the shirt. Draw two thin legs, small sock cuffs, and rounded shoes that point slightly outward.
Step 6: Ink and Color the Drawing
Once the proportions look correct, trace the final lines with a darker pencil or fineliner. Use confident strokes instead of repeatedly scratching over the same area. A clean line is usually more appealing than a hairy outline made from thirty anxious marks.
Erase the construction guides after the ink is dry. Color the skin bright yellow, the shirt red-orange, the shorts and shoes blue, and the socks white. Add a light gray shadow beneath the shoes to keep Bart from appearing to float through Springfield.
Method 2: Draw Bart Simpson in a Three-Quarter Action Pose
After mastering the front view, try a three-quarter pose. This angle shows part of the front and side of the character at the same time. It is more challenging, but it also produces a more energetic and story-driven drawing.
Step 1: Begin With a Line of Action
Draw one loose curved line representing the direction of Bart’s body. For a running pose, tilt the line forward. For a skateboard pose, create a long curve that travels from the head through the torso and into the supporting leg.
This line is not part of the finished drawing. It acts as the pose’s backbone, preventing the character from becoming stiff. Gesture should come before details, especially when drawing animated figures.
Step 2: Place the Head and Body Masses
Draw a tilted box for the head and a smaller bean or tapered block for the torso. Connect them with a short neck. Add circles for the shoulder and hip joints, then use simple cylinders to indicate the arms and legs.
Keep everything loose. At this stage, Bart may look like a collection of yellow construction equipment. That is normal. The goal is to establish balance and movement before worrying about his facial expression.
Step 3: Turn the Facial Features
Draw a curved vertical guideline around the head to show which direction Bart is facing. Move the nose toward the outer edge of the face. The far eye should appear slightly narrower than the near eye because it is turning away from the viewer.
The muzzle should also follow the turn of the head. Do not paste a front-facing mouth onto a rotated skull. Imagine the features wrapping around a three-dimensional form rather than sitting flat on the paper.
Step 4: Adjust the Hair Silhouette
In a three-quarter view, the spikes should follow the top plane of the skull. Spikes on the far side may overlap or appear narrower, while those closest to the viewer can look wider.
Check the silhouette by temporarily ignoring the interior details. Even as a solid black shape, the head should still read as Bart. A clear silhouette is one of the strongest tools in cartoon character design.
Step 5: Create an Expressive Pose
Bend the elbows and knees to exaggerate motion. If Bart is running, swing one arm forward and the opposite arm backward. If he is skateboarding, lower his center of gravity, bend the supporting knee, and extend the free arm for balance.
Push the pose slightly beyond realism. Animation drawings often benefit from exaggeration because subtle movement can look stiff when translated into simplified shapes.
Step 6: Add a Prop and Simple Background
A skateboard, slingshot, school backpack, or piece of chalk can immediately clarify the scene. Props also help the hands feel purposeful. Instead of drawing a random fist, show Bart gripping the edge of his skateboard or pointing toward the next terrible decision.
Keep the background simple. A sidewalk line, school wall, ramp, or speed streak can create context without competing with the character. Use diagonal lines to reinforce movement and horizontal lines to create stability.
Step 7: Clean Up the Final Drawing
Reduce the opacity of your rough sketch or erase it lightly. Draw the final outline using longer, controlled strokes. Make the outer contour slightly heavier than interior lines so the character separates clearly from the background.
Add small motion lines near moving hands, feet, or wheels. Use them sparingly. Too many speed lines can make it look as though Bart is being attacked by invisible spaghetti.
Method 3: Draw Bart Simpson Digitally With Layers
Digital drawing is ideal when you want smooth line art, easy corrections, reusable colors, or an image suitable for online sharing. The basic drawing principles remain the same, but layers and selection tools make experimentation faster.
Step 1: Create the Canvas and Reference Area
Open a square or vertical canvas at a reasonably high resolution. A canvas around 2,000 pixels on its longest side provides enough detail for clean lines without becoming difficult to manage.
Keep a legitimate visual reference nearby so you can study Bart’s proportions and clothing. Use the reference for observation rather than tracing. Studying how recognizable features are constructed will teach you more than mechanically following an existing outline.
Step 2: Make a Rough Sketch Layer
Create a new layer labeled “Sketch.” Choose a textured pencil brush and draw the head, torso, limbs, and pose with simple forms. Use a different layer for major props or background elements.
Lower the sketch layer’s opacity when you are ready to ink. This makes the rough drawing visible without allowing it to dominate the final lines.
Step 3: Ink on a Separate Layer
Add a layer above the sketch and label it “Line Art.” Use a pressure-sensitive brush when available. Slight changes in thickness can make the outline feel more natural: thicker along the outer silhouette and thinner around the eyes, mouth, and clothing folds.
Rotate the canvas when drawing difficult curves. Digital artists are not required to keep the canvas perfectly upright as though it is undergoing a military inspection.
Step 4: Fill the Base Colors
Create a color layer beneath the line art. Close any gaps in the outline before using a fill tool, or Bart’s yellow skin may escape and colonize the entire canvas.
Use separate layers or grouped areas for skin, clothing, shoes, and background. This organization makes color adjustments much easier. You can change the shirt without repainting the arms or test different background colors without touching the character.
Step 5: Add Minimal Shadows and Highlights
The classic television design is primarily flat-colored, so heavy realistic rendering is unnecessary. For a more dimensional fan-art style, add a soft shadow beneath the chin, sleeves, shorts, and shoes. Place the shadows consistently according to one imaginary light source.
Add a subtle highlight along one edge of the head and arms. Keep these effects simple so Bart remains recognizable. Too much glossy rendering may make him look like a collectible plastic lamp.
Step 6: Export the Finished Artwork
Save an editable version with all layers intact. Then export a PNG for online use or a high-quality JPEG when a smaller file is needed. A transparent PNG is useful for stickers, thumbnails, and personal design projects.
Inspect the image at thumbnail size before exporting. If the pose, expression, and spikes remain readable when the artwork is small, the design is working.
Common Mistakes When Drawing Bart Simpson
Making the Eyes Too Small
Bart’s large eyes are central to his expression. Small or widely separated eyes can make him resemble a completely different character. Compare their size with the total width of the face before finalizing the outline.
Drawing a Perfectly Round Head
Bart’s skull is tall and block-like, not circular. A round head removes much of his signature silhouette. Begin with a tall rectangular mass and soften it only after the proportions are established.
Ignoring the Muzzle
The rounded area around Bart’s mouth projects from the face. Drawing the mouth directly on the flat head shape makes the lower face appear compressed. Build the muzzle as a separate overlapping form.
Making Every Line Equally Thick
Uniform line weight can make a drawing feel mechanical. Use heavier contours around the body and lighter lines for facial features and small details. Even a modest difference improves clarity.
Adding Details Before Fixing the Pose
Perfect pupils cannot rescue a character whose body is leaning in an impossible direction. Establish the gesture, head angle, torso, and limbs before drawing shoelaces, teeth, or clothing folds.
Practice Exercises That Improve Your Bart Simpson Drawing
Draw the head ten times using only boxes, circles, and curves. Do not add color. Repetition helps you recognize which proportions matter most.
Next, create a page of expressions: happy, suspicious, angry, surprised, bored, and guilty. Change the pupils, eyelids, mouth angle, and eyebrows while keeping the head construction consistent.
Finally, draw three small silhouettes of Bart performing different actions. Try running, sitting, and riding a skateboard. If each pose is readable without facial features, your gesture and shape design are becoming stronger.
Drawing Experience: What I Learned From Repeating Bart’s Design
My first attempt at drawing Bart Simpson seemed promising for approximately forty seconds. I began confidently with the spikes, added two circles for the eyes, and assumed the rest would assemble itself through the mysterious power of childhood television memories. It did not. The finished head looked less like Bart and more like a startled cactus that had just received an unexpected electricity bill.
The biggest lesson was that familiarity is not the same as visual understanding. I knew what Bart looked like, but I had never carefully studied where his eyes sat, how far the muzzle extended, or how the hair connected to the skull. Once I stopped drawing from vague memory and began measuring relationships between features, the likeness improved quickly.
Breaking the character into simple shapes made the greatest difference. Instead of starting with a polished contour, I used a tall box for the head, circles for the eyes, a rounded wedge for the muzzle, and narrow cylinders for the arms and legs. The rough construction initially looked messy, but it gave me something reliable to correct. When the eye line was too low, I could move it before spending time on the final outline.
I also discovered that the spikes require rhythm rather than perfect symmetry. On early attempts, I counted each spike and tried to make every triangle identical. The result looked like a factory-produced fence. When I allowed small differences in width and angle, the silhouette became much more natural while remaining recognizable.
The three-quarter pose introduced a different challenge. I initially kept both eyes the same size, even though the head was turning. This flattened the face and made the nose appear glued to the wrong location. Drawing a curved centerline around the head helped me place the near and far features more convincingly. The far eye became slightly narrower, the muzzle wrapped around the face, and the spikes followed the skull’s direction.
Digital drawing made corrections easier but introduced the temptation to zoom in too far. At 800 percent magnification, I spent several minutes repairing a tiny wobble that nobody would ever notice. When I zoomed back out, I realized the pose itself was too stiff. That experience taught me to check the full drawing frequently instead of polishing isolated details.
Layers were especially helpful. Keeping the sketch, ink, colors, shadows, and background separate meant I could experiment without destroying earlier work. I could move an eye, resize the head, or change the shirt color while preserving the rest of the illustration. Naming the layers also prevented the classic digital-art mystery known as “Which of these seventeen layers contains the left shoe?”
Repeated practice eventually made the process faster. The first drawing required constant corrections, while later versions felt more intuitive. More importantly, each attempt taught a transferable skill: shape construction, proportion checking, gesture, silhouette design, line control, and simplified color. The goal was no longer merely to copy Bart. It was to understand why a few carefully arranged lines could communicate such a recognizable personality.
The most useful habit was comparing each finished attempt with the previous one rather than demanding perfection immediately. Small improvements became visible: cleaner eye placement, stronger poses, smoother outlines, and more expressive hands. Drawing progress often arrives quietly. One day your Bart resembles a confused pineapple; several pages later, he finally looks ready to write something regrettable on a classroom chalkboard.
Conclusion
Learning how to draw Bart Simpson is an entertaining way to practice essential cartooning skills. The simple front view teaches proportion and facial construction. The three-quarter action pose develops gesture, perspective, and storytelling. The digital method introduces layers, clean line art, flexible coloring, and efficient editing.
Start with basic shapes, keep your early lines light, and judge the overall silhouette before adding details. Do not worry when the first few attempts look unusual. Cartoon drawing improves through repetition, observation, and a willingness to let several experimental Barts live quietly at the bottom of the sketchbook.
Once you can draw the standard design confidently, experiment with new expressions, poses, props, and personal stylistic choices. Keep the iconic features recognizable, but allow your own line quality and sense of humor to show. That is where a drawing exercise begins to become genuine fan art.


