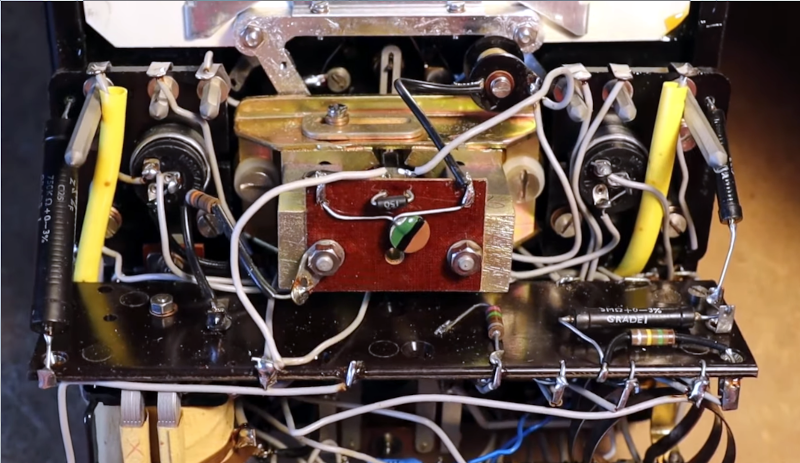

There are tools you buy, tools you borrow, and tools you inherit with a faint smell of old workshops, dust, Bakelite, and heroic overengineering. The AVO 8 belongs firmly in the third category. Known properly as the AVO Model 8 or AVOMETER Model 8, this classic analog multimeter is not just a piece of test equipment. It is a small museum of electrical measurement packed into a case that looks ready to survive a disagreement with gravity.
An AVO 8 teardown is more than unscrewing a vintage meter and pointing at parts. It is a look inside the design philosophy of an era when precision instruments were built to be serviced, calibrated, and trusted for decades. This meter measured volts, amps, ohms, and patience. It also taught generations of technicians that a needle can sometimes tell a richer story than a digital display blinking “OL” with the emotional range of a toaster.
In this in-depth teardown, we will explore what makes the AVO 8 multimeter special, what you can expect to find inside, how its key systems work, and why this analog legend still has fans in an age of pocket-sized digital multimeters. We will also cover practical restoration observations, common faults, safety reminders, and real bench experiences with the AVO 8.
What Is the AVO 8?
The AVO 8 is a portable analog multimeter designed for measuring voltage, current, and resistance. The name AVO comes from amps, volts, and ohms, which is delightfully direct. No marketing fog machine required.
The Model 8 became one of the most famous instruments in the AVOMETER family because it offered high sensitivity for its time, especially on DC voltage ranges. Its 20,000 ohms-per-volt DC sensitivity helped reduce circuit loading compared with many older analog meters. In plain English, it could measure many electronic circuits without disturbing them quite as dramatically as a lower-resistance meter would.
The AVO 8 appeared in several marks over its long production life. Earlier models used a more traditional internal construction, while later versions introduced design changes, different materials, improved fusing, and revised safety features. Yet the face remained familiar: two large rotary switches, a large mirrored scale, a resettable cut-out button, and a confidence-inspiring case that seems to say, “I was measuring voltage before your phone learned to take selfies.”
Before the Teardown: Safety First
A vintage multimeter teardown should begin with caution, not enthusiasm plus a screwdriver. An AVO 8 may look charming, but it was built to measure serious voltages and currents. Before opening one, remove all test leads, confirm it is disconnected from any circuit, and remove the batteries if possible. Never work inside the meter while it is connected to live equipment.
If the meter has been used on high-voltage ranges, treat it respectfully. Old insulation, aged components, corrosion, and unknown prior repairs can create risks. If you plan to use an AVO 8 on mains circuits or high-energy systems, use proper rated leads and follow modern electrical safety practices. A collectible meter is not worth a shocking plot twist.
First Impressions: Built Like a Scientific Brick
The AVO 8 has a physical presence that modern digital multimeters rarely match. It is large, heavy, and unapologetically mechanical. The front panel is dominated by a wide analog scale with multiple markings for voltage, current, resistance, and sometimes decibels depending on the version. A mirror strip helps reduce parallax error, allowing the user to line up the pointer and its reflection for a more accurate reading.
The two rotary selectors are central to the AVO experience. Instead of a single range dial, the AVO 8 uses a dual-switch system. One switch selects groups of DC ranges, and the other handles AC and resistance ranges. The arrangement can feel unusual to newcomers, but it is logical once you understand the instrument. It also gives the meter its unmistakable “serious lab gear” face.
There is also the cut-out reset button, a feature that gives the AVO 8 part of its personality. If the movement is overloaded and the pointer swings too aggressively, the cut-out can trip and disconnect the meter movement. It is a mechanical safety guard for a delicate analog heart.
Opening the Case
Once the meter is safely disconnected and batteries are removed, the rear case can usually be opened by undoing the retaining screws. Inside, you are greeted by a layout that feels more like a carefully arranged electromechanical machine than a modern circuit board.
Depending on the mark, you may find a mixture of wire-wound resistors, precision multiplier resistors, shunts, solder tag assemblies, switching contacts, battery compartments, fuses, rectifier components, and the protected moving-coil meter movement. Later models may use more conventional resistors and printed-circuit construction, while earlier units often show more hand-wired craftsmanship.
This is one reason an AVO 8 teardown is so satisfying. You are not staring at a tiny black epoxy blob and a mysterious microcontroller. You can see the measurement system. Current has paths. Voltage has dividers. Resistance ranges have batteries and zero-adjust controls. The instrument explains itself if you are patient enough to follow the wiring.
The Meter Movement: The Heart of the AVO 8
The most delicate and important part inside the AVO 8 is the moving-coil meter movement. This is the component that turns electrical current into pointer movement. In many later Model 8 versions, the movement itself is extremely sensitive, with the meter circuit arranged so the instrument consumes only a small current at full-scale deflection on DC ranges.
The pointer, jeweled bearings, springs, magnet assembly, and damping system must all work together. A bent pointer, dirty bearing, weak magnet, or mechanical shock can affect accuracy. That is why teardown work around the movement should be slow, calm, and free of “let’s just poke this” energy.
The knife-edge pointer and mirrored scale are not decorative flourishes. They are part of the instrument’s accuracy system. A digital meter gives you numbers, but an analog pointer gives you motion. When checking a drifting voltage, peaking a circuit, or watching a capacitor charge, the pointer can be wonderfully informative.
The Cut-Out Mechanism: A Tiny Mechanical Bodyguard
One of the most interesting features in an AVO 8 teardown is the automatic cut-out. The cut-out is designed to protect the meter movement when a severe overload occurs. If the pointer is driven beyond the normal scale too violently, the mechanism can trip and open the circuit to the movement.
This is not a license to abuse the meter. The cut-out is impressive, but it cannot defeat every possible mistake. Connecting a current range directly across a high-energy supply can still damage components and create danger. Think of the cut-out as a seat belt, not a force field.
During restoration, the cut-out should move freely and reset properly. Dirt, oxidation, mechanical wear, or previous “creative repairs” can make it unreliable. If the reset button feels sticky or the meter remains unresponsive after a known-safe test, the cut-out and its contacts are worth inspecting.
Range Switches and Contacts
The two range switches are the traffic controllers of the AVO 8. They route signals through the correct shunts, multipliers, rectifiers, and resistance circuits. These switch assemblies are beautifully purposeful, but age is not always kind to contacts.
Common issues include oxidized switch contacts, intermittent resistance ranges, noisy readings, and ranges that only work when the switch is gently wiggled. That last symptom is the meter equivalent of clearing its throat before admitting it needs cleaning.
Contact cleaning should be done carefully. Avoid flooding the mechanism with aggressive chemicals. Use appropriate contact cleaner sparingly, protect the scale and movement, and do not bend switch fingers unless you know exactly what you are doing. The AVO 8 is robust, but its accuracy depends on many small mechanical relationships staying exactly where the factory intended.
Resistors, Shunts, and the Measurement Network
Inside the AVO 8, precision resistors and shunts create the measurement ranges. On voltage ranges, multiplier resistors allow the meter movement to measure higher voltages by limiting current. On current ranges, shunts carry most of the current while only a controlled portion passes through the movement circuit.
High-current ranges may use substantial shunt material, sometimes visibly heavier than the surrounding wiring. This is where the AVO 8 reminds you that it was designed by people who expected instruments to handle real workshop conditions.
Resistor drift is a common concern in old meters. Wire-wound resistors tend to be stable, but age, heat, moisture, corrosion, and past overloads can alter values. Later AVO 8 versions used more conventional resistor networks in some areas. A careful teardown should include visual inspection for cracked resistors, overheated parts, broken solder joints, and suspicious modifications.
AC Measurement: Rectifiers and Transformers
Analog DC movements cannot directly respond to alternating current in the way a user needs for AC measurement. The AVO 8 solves this by using AC measurement circuitry, including rectifier arrangements and, in some versions or ranges, transformer-related components.
Earlier instruments may include older rectifier technology, while later versions used different diode arrangements. In practical restoration, AC ranges can be more challenging to verify than DC ranges because frequency response, waveform shape, rectifier condition, and calibration all matter.
For ordinary sine-wave AC checks, the AVO 8 can be very useful. For modern non-sinusoidal waveforms, switching supplies, variable-frequency drives, and noisy electronic loads, a true-RMS digital meter is usually the better tool. The AVO 8 is a classic, not a wizard.
Resistance Ranges and Batteries
The ohms ranges require internal batteries. This makes the battery compartment one of the most important areas to inspect during a teardown. Unfortunately, many vintage meters have suffered from battery leakage. Corroded terminals, green crust, broken contacts, and damaged wiring are common surprises.
The resistance ranges also require zero adjustment. Before measuring resistance, the leads are shorted together and the appropriate zero control is adjusted so the pointer reaches the correct end of the ohms scale. If the meter cannot zero, the problem may be weak batteries, dirty contacts, blown fuses, corroded battery clips, or faults in the resistance network.
Old batteries should never be left in an AVO 8. A fresh cell costs little. A corroded battery compartment costs patience, tiny brushes, and several words not approved for family publications.
Common Faults Found During an AVO 8 Teardown
1. Corroded Battery Contacts
Battery leakage is one of the most frequent problems. Clean corrosion carefully, neutralize residue where appropriate, and verify continuity through the battery holders and fuse clips.
2. Dirty Switch Contacts
Intermittent readings often come from oxidized range-switch contacts. Gentle cleaning can restore ranges that appear dead at first glance.
3. Sticking Pointer
A pointer that catches, hesitates, or does not return to zero may indicate mechanical issues with the movement, debris, static, or bearing trouble. This is delicate work and not a place for brute force.
4. Open Resistors or Damaged Shunts
A past overload may leave a range inaccurate or dead. Inspect for heat marks, broken resistor windings, and failed solder joints.
5. Blown Fuses
Later versions include protective fusing. A blown fuse may be the simplest explanation for failed current or resistance ranges.
Cleaning and Restoration Tips
Start with documentation. Photograph every stage before removing parts. Vintage instruments often contain hand wiring that is easy to misroute during reassembly. Label screws and small parts. Keep the movement protected from metal filings, dust, and magnetic tools.
Clean the case with mild methods first. Avoid harsh solvents on Bakelite, plastic, scale markings, or labels. The goal is preservation, not making the meter look like it just came out of a 3D printer.
When testing ranges after reassembly, begin with known low-energy sources. Use current-limited supplies and reference resistors where possible. Do not jump straight to high voltage. The AVO 8 may be brave, but bravery is not a calibration method.
Why the AVO 8 Still Matters
The AVO 8 is not the most convenient multimeter today. A modern digital meter is smaller, lighter, safer for many modern electrical environments, and easier to read in low light. But convenience is not the whole story.
The AVO 8 matters because it represents a different kind of engineering. It is understandable. It is repairable. Its design reveals the relationship between current, voltage, resistance, magnetism, mechanics, and human reading skill. It rewards the user who understands what the meter is doing.
For vintage radio, valve equipment, classic service manuals, and educational bench work, the AVO 8 remains especially interesting. Many older service procedures specified analog meters with particular sensitivities. Using a modern 10-megohm digital meter can sometimes produce readings that differ from original service data because the circuit is loaded differently. In those cases, an analog meter is not outdated; it is historically appropriate.
AVO 8 Teardown Experience: Lessons From the Bench
The first time you open an AVO 8, the experience is oddly cinematic. The rear cover lifts away, and instead of modern surface-mount anonymity, you find a carefully composed landscape of metal, fiberboard, resistors, springs, screws, and switchwork. It feels like opening a pocket watch designed by an electrical engineer with a fondness for battleships.
One of the strongest impressions is how much of the instrument can be understood visually. The high-current shunts look like they mean business. The resistor networks are not hidden. The switches show their logic. The movement sits protected, almost ceremonial, behind the scale. You quickly understand why technicians formed attachments to these meters. This was not a disposable accessory. It was a working companion.
On a typical restoration bench, the battery compartment is the first drama. If the previous owner removed the batteries before storage, you may silently thank them across time. If they did not, you may discover corrosion that looks like a small chemical garden. Cleaning it is slow but satisfying. After the contacts are restored, the resistance ranges may come back to life as if the meter simply needed coffee.
The second common experience is contact trouble. A range may read perfectly, then vanish. Another may respond only after rotating the switch a few times. This is where patience matters. The temptation is to assume a major component has failed, but often the problem is simple oxidation. Careful cleaning, repeated gentle operation, and continuity checks can turn a “dead” AVO into a working instrument.
The movement deserves the most respect. Watching the pointer glide across the scale after years of storage is the reward. It has a calmness that digital meters do not offer. When measuring a slowly rising voltage, the needle tells a story. It accelerates, eases, overshoots slightly, and settles. You are not just reading a number; you are watching behavior.
Using an AVO 8 also changes how you think about measurement. With a digital meter, it is easy to trust the display without thinking about input impedance, range selection, or circuit loading. The AVO 8 politely forces you to remember that every measurement interacts with the circuit. On DC voltage ranges, its sensitivity is high for an analog meter, but it is still not the same as a modern high-impedance digital multimeter. That distinction matters in high-resistance circuits.
The most enjoyable part of the experience is the sense of continuity. This is an instrument from an era when service manuals, test benches, and repair culture were deeply connected. The AVO 8 was not designed to be mysterious. It was designed to be used by people who understood electricity and expected their tools to last. Tearing one down is not just repair work; it is a conversation with a practical design tradition.
Of course, the AVO 8 is not perfect. It is heavy. It is slower to read than a digital meter. It needs careful range selection. It does not belong casually near modern high-energy electrical installations unless the user understands its limits and safety requirements. But on the right bench, for the right job, it remains deeply satisfying.
The final lesson from an AVO 8 teardown is simple: old does not automatically mean obsolete. Sometimes old means visible, serviceable, and beautifully overbuilt. The AVO 8 may not replace your everyday digital multimeter, but it can still earn a respected place on the bench. And if nothing else, it will make every lightweight plastic meter nearby sit up a little straighter.
Conclusion
An AVO 8 teardown reveals why this analog multimeter became such a respected classic. Beneath the sturdy case is a thoughtful electromechanical design built around a sensitive movement, robust switching, precision resistors, protective cut-out features, and serviceable construction. It is a meter from a time when instruments were expected to be repaired, calibrated, and used for decades.
For collectors, restorers, electronics hobbyists, and vintage test-equipment fans, the AVO 8 offers more than nostalgia. It provides a hands-on lesson in measurement fundamentals. It shows how analog meters manage voltage, current, resistance, protection, scaling, and human readability without a microprocessor in sight.
If you open one, go slowly. Respect the movement, document every step, clean carefully, and test safely. The AVO 8 may be vintage, but when restored and used properly, it still has plenty to teach. Not bad for a meter that looks like it could survive both a workshop accident and a stern lecture from your grandfather.


