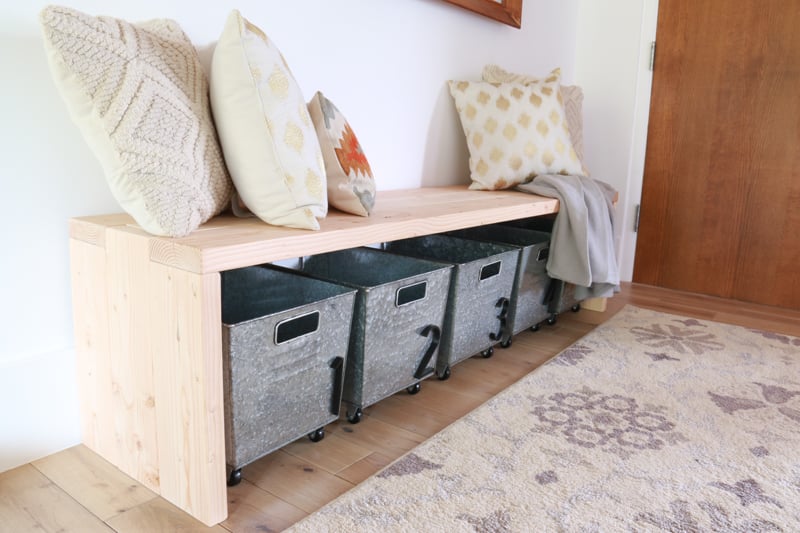

A waterfall bench is one of those projects that looks expensive enough to make guests assume you own a design studio, yet it can be built with basic lumber, a few screws, and a weekend-sized amount of determination. The “waterfall” name comes from the shape: the seat appears to flow over each end and down to the floor, creating a clean U-shaped silhouette.
This easy DIY 2×6 waterfall bench tutorial uses ordinary 2×6 boards, hidden support pieces, and straightforward cuts. It works beautifully as an entryway bench, patio bench, dining bench, mudroom seat, or minimalist accent piece at the foot of a bed. In other words, it is furniture with a surprisingly impressive résumé.
The finished bench in this guide measures about 60 inches long, 22 inches deep, and 18 inches high. That is a comfortable size for two adults, a row of muddy shoes, or one cat who believes the entire household exists to serve its furniture needs.
Why Build a 2×6 Waterfall Bench?
A DIY waterfall bench is popular because it combines a modern furniture look with beginner-friendly construction. You do not need complicated mortise-and-tenon joinery, a giant workshop, or a mysterious woodworking ancestor whispering measurements into your ear.
The 2×6 boards create a chunky, substantial appearance that feels more expensive than standard thin pine boards. They are also easy to find at most home improvement stores, reasonably affordable, and strong enough for a practical bench when the frame is reinforced correctly.
The design is adaptable, too. Build it from cedar for an outdoor garden bench, use pine or Douglas fir for an indoor entryway bench, or choose pressure-treated lumber for a budget-friendly patio project. Just remember that pressure-treated boards can be wet when purchased, so they may need time to dry before staining or painting.
DIY 2×6 Waterfall Bench Project Overview
- Finished size: Approximately 60 inches long x 22 inches deep x 18 inches high
- Skill level: Beginner to intermediate
- Estimated build time: One weekend
- Best for: Entryways, patios, porches, dining areas, mudrooms, bedrooms, and gardens
- Main lumber: 2×6 boards
- Recommended finish: Exterior stain, clear sealer, paint, or interior furniture finish
For an indoor bench, choose straighter boards with fewer knots and less twisting. For an outdoor waterfall bench, cedar is naturally weather-resistant, while pressure-treated pine is usually more affordable. Whichever lumber you choose, inspect each board carefully. A board that resembles a potato chip may have personality, but it is not ideal furniture material.
Tools and Materials for a 2×6 Waterfall Bench
Materials
- Five 2×6 x 8-foot boards
- Two 2×4 x 8-foot boards for hidden support rails
- Two 2×2 x 8-foot boards for cleats and reinforcement
- 2 1/2-inch exterior-rated wood screws
- 3 1/2-inch structural or exterior screws
- Exterior-rated wood glue, if building for a covered porch or indoor area
- Wood filler, optional
- 80-grit, 120-grit, and 180-grit sandpaper
- Wood stain, paint, or clear protective finish
- Exterior wood sealer for an outdoor bench
- Rubber feet or furniture pads, optional
Tools
- Tape measure
- Pencil and speed square
- Miter saw or circular saw with a straightedge guide
- Drill and driver bits
- Countersink bit
- Orbital sander or sanding block
- Clamps
- Safety glasses, hearing protection, and a dust mask
Use corrosion-resistant screws for any outdoor version, especially if you are working with pressure-treated lumber. Regular drywall screws are not suitable for outdoor furniture. They may seem affordable at first, but so is a paper umbrella until the weather becomes interesting.
2×6 Waterfall Bench Cut List
Measure twice, mark clearly, and cut once. Then measure again because wood has a special talent for making confident people humble.
2×6 Boards
- Four pieces at 60 inches long for the bench seat
- Six pieces at 22 inches long for the two waterfall sides
2×4 Support Rails
- Two pieces at 57 inches long
2×2 Cleats
- Four pieces at 14 1/2 inches long for the side panels
- Three pieces at 19 inches long for under-seat cross supports
Step 1: Select Straight, Dry Lumber
Before you cut anything, sort through your lumber. Look down the length of each board and avoid pieces that are badly bowed, twisted, cracked, or deeply checked at the ends. Small knots can add character, but giant loose knots can become tiny surprise craters later.
For the cleanest modern look, choose boards with similar grain patterns and color. Arrange the four long 2×6 boards side by side on the floor before cutting or assembling. This lets you decide which faces should be visible on the finished bench seat.
If you plan to stain the bench, test the stain on an offcut first. Different boards can absorb color differently, especially pine. A five-minute test can save you from accidentally creating a bench that looks like it spent the night in a barrel of grape juice.
Step 2: Cut the Bench Pieces
Cut the four seat boards to 60 inches. Then cut six shorter 2×6 pieces to 22 inches. These shorter boards will form the two waterfall sides.
Use a square to mark each cut line. If you use a circular saw, clamp a straightedge guide to the board so the cuts stay clean and consistent. Small inaccuracies can add up quickly, and a waterfall bench with uneven ends starts looking less like furniture and more like a very expensive geometry mistake.
After cutting, lightly sand the cut edges to remove splinters. Do not fully sand everything yet; you will have better access after assembling the main structure.
Step 3: Build the Waterfall Side Panels
Each side panel uses three 22-inch 2×6 boards stacked horizontally. When stacked, the boards create a panel about 16 1/2 inches tall and 22 inches deep. Once the 1 1/2-inch-thick seat is added on top, the finished bench height becomes approximately 18 inches.
Lay three 22-inch boards flat on a work surface with their best sides facing outward. Keep the edges flush. On the inside face of the panel, position two 14 1/2-inch 2×2 cleats vertically. Place one cleat a few inches from the front edge and the other a few inches from the back edge.
Pre-drill holes through the 2×2 cleats, then drive 2 1/2-inch screws into each 2×6 board. The cleats should hold the three boards together without visible fasteners on the outside face.
Repeat the process for the second waterfall side panel. When finished, you should have two matching wood panels that resemble sturdy little walls. Congratulations: you have built the bench’s legs, although they are much more stylish than regular legs and require no socks.
Step 4: Add the Hidden 2×4 Support Rails
The hidden support rails are important because they reduce flex in the long seat and help turn this project from “pretty bench” into “bench that does not complain when people sit on it.”
Stand the two side panels upright, spaced about 57 inches apart. Position one 57-inch 2×4 rail near the front edge, underneath where the seat will sit. Position the second rail near the back edge. Install both rails on edge, so the 3 1/2-inch side runs vertically.
Pre-drill through the side panels into the ends of each 2×4 rail. Attach each end with 3 1/2-inch structural screws. Check the assembly for square before tightening every screw completely.
At this point, the bench base should stand on its own. If it rocks, do not ignore it and hope the floor will somehow become more supportive. Find the cause now. Usually, the problem is an uneven cut, a twisted board, or one side panel sitting slightly out of square.
Step 5: Assemble the 2×6 Bench Seat
Lay the four 60-inch 2×6 boards face down on a flat surface. Arrange them edge to edge, leaving a very small gap between boards. A gap around 1/16 inch is enough for visual separation and gives outdoor wood a little room to move with seasonal moisture changes.
Position the three 19-inch 2×2 cross cleats underneath the seat. Place one near each end and one near the center. Keep the cleats set back slightly from the front and rear edges so they remain hidden when the bench is upright.
Pre-drill through each cleat and drive 2 1/2-inch screws upward into the seat boards. Be careful not to use screws that are too long. You want a sturdy seat, not surprise screw tips poking through the top like tiny metal volcanoes.
Once the seat boards are secured, flip the assembled seat over and inspect the top. Adjust any boards that are slightly uneven before attaching the seat to the base.
Step 6: Attach the Seat to the Waterfall Bench Base
Place the seat assembly on top of the two waterfall side panels and support rails. Make sure the overhang looks even on both ends. The side panels should sit directly beneath the seat, creating the continuous waterfall effect.
From underneath the bench, drive screws upward through the 2×4 rails and into the underside of the seat boards. Use enough screws to secure the seat evenly, but avoid placing screws where they could break through the top surface.
You can also add a small amount of exterior-rated glue between the seat and the top edges of the side panels if the bench will live indoors or in a protected area. For fully exposed outdoor furniture, screws are especially useful because they allow future repairs if the wood moves or a board needs replacing.
Step 7: Sand Every Edge That Might Meet Human Skin
Start with 80-grit sandpaper to soften sharp edges, remove saw marks, and level any slightly uneven board joints. Move to 120 grit, then finish with 180 grit for a smoother surface.
Round over the front edge of the seat and the outer corners of the waterfall sides. You do not need to turn the bench into a cloud, but a slight eased edge makes it more comfortable and helps prevent splinters.
Pay extra attention to the seat surface. This is where people will sit, perch, set grocery bags, fold laundry, tie shoes, and possibly leave mysterious crumbs that nobody claims responsibility for.
Step 8: Finish Your DIY Waterfall Bench
For an indoor bench, a stain and clear protective topcoat can highlight the grain while protecting against spills and scuffs. For a modern painted look, use a quality primer and durable furniture or porch paint.
For an outdoor 2×6 waterfall bench, use an exterior stain or sealer designed for exterior wood. Follow the product instructions for drying conditions, application method, and recoating intervals. Exterior finishes are not magical force fields; sunlight, rain, and temperature changes will eventually ask for maintenance.
Apply finish to every exposed surface, including the bottom edges and end grain. End grain absorbs moisture more easily, so sealing it helps the bench last longer outside.
Easy Customizations for a Waterfall Bench
Make It Shorter for an Entryway
Cut the seat boards to 42 or 48 inches instead of 60 inches. A shorter version works well in a small foyer, hallway, or apartment entry.
Build a Longer Dining Bench
For a bench longer than 60 inches, add a center support panel or an additional leg assembly. Longer benches need more support to reduce sagging and improve stability.
Add a Backrest
Attach vertical 2×4 supports to the rear rail and add horizontal boards across the back. This turns the simple waterfall bench into a more relaxed patio seat.
Create a Floating Look
Set the waterfall sides slightly inward from the ends of the seat. This creates a small overhang and gives the bench a lighter, more contemporary appearance.
Use a Two-Tone Finish
Stain the seat a warm walnut shade and paint the waterfall sides matte black or white. The contrast makes a simple lumber project look more custom without requiring complicated joinery.
Common DIY Waterfall Bench Mistakes to Avoid
Skipping the hidden rails: The bench may look fine at first, but a long unsupported seat can flex over time. Use the 2×4 rails or add another center support for longer versions.
Using warped lumber: A twisted board can make assembly frustrating and create gaps that are hard to hide. Spend extra time choosing lumber before you leave the store.
Forgetting to pre-drill: Screwing near board ends without pilot holes can split the wood. A few minutes of pre-drilling saves a surprising amount of frustration.
Using interior screws outdoors: Outdoor furniture needs exterior-rated or structural fasteners that can handle moisture and treated lumber.
Finishing too soon: If pressure-treated lumber is still wet, stain may not absorb evenly. Let it dry according to the manufacturer’s guidance before applying finish.
Ignoring the bottom: Seal the underside and bottom edges, especially for outdoor benches. Water does not care whether a surface is visible.
Practical Lessons From Building a DIY 2×6 Waterfall Bench
The best part of a simple 2×6 waterfall bench is that it teaches useful woodworking lessons without demanding perfection. It is a project that looks clean and intentional even when you are still learning how to make consistent cuts. The bold, boxy shape is forgiving. A tiny knot, a bit of grain variation, or a slightly rustic finish often makes the bench look more interesting rather than less polished.
The first lesson is that lumber selection matters more than people expect. Beginners often focus entirely on the cut list, but the project really begins at the lumber rack. Choosing flatter boards with reasonably straight edges makes every later step easier. The side panels sit tighter, the seat boards line up better, and sanding becomes less of a marathon. A few minutes spent sorting boards can save an hour of trying to persuade crooked lumber to behave.
The second lesson is that hidden structure is just as important as visible style. A waterfall bench looks wonderfully simple from the outside, but the 2×4 rails and 2×2 cleats underneath do the quiet work. They prevent the seat from flexing, keep the boards aligned, and make the furniture feel solid when someone sits down. This is a useful principle for many DIY furniture projects: the parts nobody sees are often the reason the beautiful parts survive daily life.
Another practical discovery is that sanding changes the entire personality of the bench. Straight from the saw, 2×6 boards can look like basic construction lumber. After sanding the corners, smoothing the seat, and applying finish, the same boards can look intentional and furniture-grade. You do not need to sand every surface into a mirror. You simply need to remove sharp edges, splinters, and rough marks so the bench feels pleasant to touch.
Finishing also gives the project its final identity. Clear sealer creates a casual, natural look. Dark stain can make inexpensive pine resemble more expensive hardwood. Paint can turn the bench into a bright entryway statement or a sleek modern patio piece. The structure stays the same, but the finish changes the mood completely. That is why testing your finish on scraps is worth the effort. It is much easier to change your mind on an offcut than on a completed bench that has already consumed your Saturday.
Finally, this project is a reminder that practical furniture does not need to be complicated. A few boards, a square layout, hidden reinforcement, and a patient approach can produce something useful for years. The bench may begin as a place to sit while putting on shoes, but it often becomes a drop zone for bags, a temporary table during parties, a plant stand, a photo prop, or the preferred nap location of a household pet. That is the charm of DIY furniture: once you build it, life finds more uses for it than you planned.
Conclusion
An easy DIY 2×6 waterfall bench proves that modern-looking furniture does not require advanced woodworking skills or expensive materials. With straight boards, careful measuring, hidden support rails, exterior-rated screws, and a durable finish, you can build a sturdy bench that works indoors or outdoors.
Take your time choosing lumber, pre-drill before driving screws, reinforce the seat properly, and finish every exposed surface. The result is a clean, useful piece of furniture that looks custom-built because, happily, it is.


