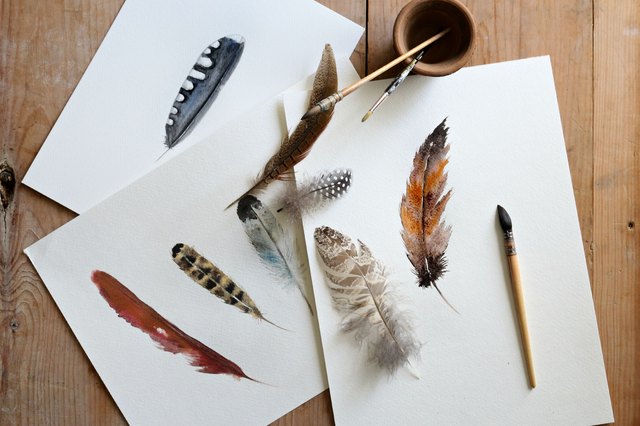

Painting bird feathers in watercolor is one of those projects that looks delicate, elegant, and possibly designed to humble every beginner within a five-mile radius. But here is the good news: feathers are not as mysterious as they seem. Once you understand their basic structure, the right watercolor techniques, and how to layer color without turning your paper into sad soup, you can create feathers that look soft, airy, detailed, and full of personality.
This guide will walk you through how to do a watercolor painting of bird feathers from sketch to final details. You will learn what supplies to use, how to observe feather anatomy, how to paint realistic barbs and soft edges, and how to avoid common mistakes. Whether you want to paint a blue jay feather, owl feather, peacock plume, or an imaginary rainbow feather that no bird on Earth has officially approved, the process is flexible, fun, and beginner-friendly.
Why Bird Feathers Are Perfect for Watercolor Practice
Bird feathers make excellent watercolor subjects because they combine several important painting skills in one small project. You get to practice light washes, controlled brushwork, wet-on-dry details, soft color blending, negative painting, lifting, and glazing. In other words, one feather is basically a tiny watercolor gym membership, minus the monthly fee and the awkward treadmill eye contact.
Feathers also teach patience. A convincing watercolor feather is rarely painted in one pass. It usually starts with a pale base wash, then builds depth through transparent layers. Because watercolor is known for its luminous, see-through quality, layering is one of the best ways to create natural feather texture without overworking the paper.
Understanding Feather Anatomy Before You Paint
Before grabbing a brush, take a moment to understand what you are painting. A typical feather has a central shaft called the rachis. The lower hollow part of the shaft is called the calamus, or quill. On either side of the rachis are the vanes, made up of many fine strands called barbs. Those barbs may connect through even smaller structures called barbules, which help create the smooth surface seen in many flight feathers.
For artists, the most important takeaway is simple: feathers are built from a center line outward. Most brushstrokes should follow that natural direction. If your strokes grow from the rachis toward the outer edge, your feather will immediately look more believable. If the strokes wander around randomly like they are looking for parking, the feather may start looking more like seaweed, which is a different tutorial entirely.
Supplies You Need for a Watercolor Feather Painting
You do not need a studio full of expensive supplies to paint bird feathers, but a few good materials will make the process easier and more enjoyable.
Recommended Materials
- Watercolor paper: Use 100% cotton paper if possible, preferably 140 lb cold press. It handles washes, lifting, and layering better than thin student paper.
- Watercolor paints: A basic palette with blues, browns, grays, yellows, reds, and a dark neutral is enough.
- Brushes: Use a round brush size 4 or 6 for washes, a smaller round brush size 0 or 1 for details, and a liner brush for fine barbs.
- Pencil: Choose a hard pencil such as 2H or HB for a light sketch.
- Eraser: A kneaded eraser is ideal because it softens pencil lines without damaging paper.
- Two water jars: One for rinsing dirty brushes and one for clean water.
- Paper towel: Useful for blotting, lifting highlights, and rescuing dramatic puddle incidents.
- Optional masking fluid: Helpful for preserving bright white highlights along the shaft or feather edges.
- Optional white gouache: Useful for final highlights if you lose the white of the paper.
Choose a Feather Reference
Start with a clear reference image or a real feather. Look for a feather with a simple shape if you are new to watercolor. A small brown feather, dove feather, or blue jay feather is easier than a highly patterned owl feather or a peacock eye feather. Those are gorgeous, but they arrive with a lot of tiny details and a mild attitude.
Study your reference before painting. Notice the overall shape, where the feather is widest, whether the vane is symmetrical or uneven, and where the colors shift. Many feathers are not perfectly balanced. Flight feathers often have one side narrower than the other, and small imperfections make the painting look more natural.
Step 1: Sketch the Basic Feather Shape
Begin by lightly drawing the central shaft. This line should usually curve slightly rather than stand perfectly straight. A gentle curve gives your watercolor feather a natural sense of movement.
Next, sketch the outer shape of the feather. Think of it as a long, tapered form. The top may be rounded, pointed, or slightly ragged depending on the type of feather. Draw the vane on each side of the shaft, keeping your pencil marks light. You do not need to draw every barb. In fact, please do not. Your wrist has better things to do.
Add a few breaks along the outer edge. Real feathers often have tiny gaps, splits, and uneven tips. These small details will make your watercolor painting feel organic instead of stiff.
Step 2: Apply a Light Base Wash
Mix a pale version of your main feather color. For a brown feather, try a diluted warm brown with a touch of gray. For a blue feather, mix a light blue-gray. For a white feather, use very pale gray, beige, or blue shadows instead of pure white paint.
Using a round brush, paint a light wash over the feather shape, working around any areas you want to keep bright. Follow the direction of the barbs, pulling strokes from the rachis outward. This first layer should be soft and transparent. It is not the time for drama. Save the drama for the final details or for when you accidentally dip your brush in coffee.
Let the first wash dry completely. This is important. If you add detail too soon, the lines will blur. That can be beautiful for soft effects, but not when you want crisp feather texture.
Step 3: Paint the Rachis and Quill
The rachis is the visual backbone of your feather. Paint it with a slightly darker or warmer color than the base wash. Leave a thin highlight on one side if possible. This makes the shaft look rounded rather than flat.
For the calamus, or quill end, use a pale beige, cream, or light gray. Add a tiny shadow on one side to give it dimension. Keep this area smooth and simple. Over-detailing the quill can distract from the delicate barbs.
Step 4: Build Texture with Wet-on-Dry Strokes
Once the base wash is dry, switch to a smaller brush. Mix a slightly darker version of your feather color and begin adding fine strokes from the rachis outward. These strokes represent the barbs. Keep them tapered and varied. Some should be long, some short, some barely visible.
Use wet-on-dry technique for this stage. That means your paper is dry and your brush carries wet paint. This gives you more control and sharper lines. The key is to avoid making every stroke identical. Real feathers have rhythm, not copy-paste energy.
Follow the natural angle of the feather. Near the top, barbs may curve upward. Near the middle, they may extend outward. Near the bottom, they may angle downward. This directional flow is what makes the feather believable.
Step 5: Add Color Variation
Feathers often contain subtle color shifts. A brown feather may include gold, gray, cream, and nearly black markings. A blue feather may lean turquoise in one area and navy in another. Even black feathers can show hints of purple, green, or blue when light hits them.
Use glazing to add these variations. A glaze is a transparent layer of watercolor painted over a dry layer. For example, you might add a pale golden glaze over part of a brown feather or a soft gray-blue glaze near the tip. Keep the layers thin so the painting stays luminous.
If you are painting a patterned feather, such as an owl or hawk feather, map the darker bands lightly first. Paint the bands with soft edges in some areas and sharper edges in others. Nature loves variety. It rarely uses a ruler unless humans are watching.
Step 6: Create Soft Edges and Broken Feather Tips
A realistic watercolor feather should not have a hard outline everywhere. Some edges can be crisp, but others should fade softly or break apart. To create a soft edge, dampen a clean brush and gently touch the edge of a painted area, letting the pigment dissolve slightly into the paper.
For broken tips or separated barbs, use negative painting. Paint the darker space around a light gap instead of painting the gap itself. This technique is excellent for creating tiny splits along the feather edge while preserving the brightness of the paper.
You can also lift pigment with a damp brush or paper towel. If an area becomes too dark, wet it gently, blot it, and repeat as needed. Lifting works best before the paint fully stains the paper, so act calmly but not at the speed of a startled pigeon.
Step 7: Deepen Shadows
To give your feather dimension, add shadows where the vane meets the rachis and where feather sections overlap or bend. Use a diluted gray, brown, blue, or purple depending on your palette. Avoid using flat black everywhere. Black can be useful, but too much of it may make the feather look heavy.
Shadows should still follow the feather structure. Paint them in thin strokes or transparent bands. The darkest values usually appear near the central shaft, at patterned markings, or along the underside of curled edges.
Step 8: Add Final Details
When all layers are dry, add the finest details with a small brush or liner brush. This is where your watercolor bird feather begins to sparkle. Add a few dark barbs, tiny separations, and accents along the rachis. Keep your hand relaxed. If the lines look too stiff, try holding the brush farther back from the tip.
If needed, add small highlights with white gouache or white watercolor. Use this sparingly. A few bright touches can look magical; too many can look like the feather got into a fight with correction fluid.
Color Ideas for Different Bird Feathers
Blue Jay Feather
Use soft blue, ultramarine, gray, and dark navy. Blue jay feathers often have strong contrast, so preserve pale areas carefully and add dark bands in controlled layers.
Owl Feather
Use warm browns, ochre, gray, and sepia. Owl feathers have soft, mottled patterns, so blend some areas gently and avoid making every marking too sharp.
Peacock Feather
Use turquoise, green, gold, deep blue, and violet. Build the eye pattern slowly with transparent glazes. Metallic-looking effects can be suggested through strong contrast and clean highlights.
Cardinal Feather
Use warm red, orange-red, and muted brown shadows. Add cooler shadows to prevent the red from looking flat.
White Feather
Do not paint the feather white. Paint the shadows around the white. Use pale gray, blue-gray, lavender, or beige to describe the form while letting the paper provide the brightest highlights.
Common Mistakes When Painting Watercolor Feathers
Using Too Much Water
Watercolor loves water, but feathers require control. If your paper is too wet during detail work, your fine lines will spread. Let layers dry before adding sharp barbs.
Painting Every Single Strand
You do not need to paint every barb. Suggest texture with selective details. The viewer’s eye will complete the rest, which is very generous of it.
Making the Feather Too Symmetrical
Real feathers often have uneven sides, bent shafts, missing barbs, or ragged edges. A little imperfection makes the painting more convincing.
Overworking the Paper
Too many layers, scrubbing, or repeated corrections can damage watercolor paper. Work in light layers and stop before the surface becomes tired.
Ignoring the Direction of Growth
Always paint outward from the rachis. Directional brushwork is one of the biggest secrets to realistic feather texture.
Beginner-Friendly Watercolor Feather Exercise
If you are new to watercolor, try this simple practice exercise before painting a detailed feather. Draw three small feather shapes on one sheet of paper. Paint the first feather in one color only, focusing on shape and brush direction. Paint the second feather with two colors blended softly. Paint the third feather with bands, highlights, and broken edges.
This exercise helps you separate the skills: shape, color, and detail. It also gives you permission to experiment without the pressure of creating a masterpiece. Sometimes the best practice page is messy, useful, and slightly chaotic, like a kitchen after making pancakes.
How to Make Your Watercolor Feather Look More Realistic
Realism comes from observation, not from adding endless detail. Look closely at your reference and ask: Where is the lightest area? Where is the darkest area? Which edges are sharp? Which edges are soft? What direction do the barbs follow?
Use contrast carefully. A feather with only pale values may look flat, while a feather with strong dark accents near the shaft and tips will feel more dimensional. Also pay attention to lost-and-found edges. Some areas can disappear into the background while others stay crisp. This creates a natural, elegant look.
How to Paint a Loose and Whimsical Feather
Not every watercolor feather needs to be scientifically accurate. Loose feathers are wonderful for greeting cards, journals, wall art, bookmarks, and creative sketchbooks. To paint a whimsical feather, exaggerate the curve of the shaft, use unexpected colors, and let wet-on-wet blends create soft transitions.
Try dropping violet into blue, gold into pink, or teal into green while the first wash is still damp. Once dry, add a few fine lines and dots. The goal is not perfect realism. The goal is charm. Whimsical feathers can look dreamy, decorative, and joyful, especially when grouped in a small composition.
Composition Ideas for Feather Paintings
A single feather can be beautiful, but you can also create a larger watercolor composition. Paint three feathers arranged diagonally across the page. Create a circular wreath of small feathers. Add a feather next to a handwritten quote. Paint a collection of feathers from different birds as a nature journal study.
For a clean modern look, leave plenty of white space. For a more natural style, add light shadows beneath the feathers so they appear to rest on the page. Keep backgrounds simple unless you want the feather to blend into a dreamy abstract wash.
Experience Notes: What Painting Bird Feathers Teaches You
After painting several watercolor feathers, one lesson becomes very clear: patience is not optional. The first wash often looks too pale, too simple, or frankly unimpressive. That is normal. Watercolor paintings frequently go through an awkward middle stage where everything looks unfinished and slightly suspicious. The trick is to keep building gradually instead of trying to fix everything with one dark, heroic brushstroke.
One of the most useful experiences is learning how much detail to leave out. Beginners often believe realism means painting every tiny strand, but that can make the feather stiff and overworked. A better approach is to paint the main structure, add selective texture, and let soft washes do some of the talking. The eye is excellent at filling in missing information. Give it a few good clues, and it will happily do unpaid labor.
Another important experience is discovering that the paper matters. On low-quality paper, delicate feather details can bloom, buckle, or turn muddy quickly. On good watercolor paper, the paint behaves more predictably. You can lift highlights, add glazes, and create fine lines without the surface giving up halfway through the project. This does not mean beginners must buy the most expensive materials, but it does mean paper deserves respect.
Painting feathers also improves brush control. Because barbs radiate from the central shaft, you practice pulling tapered strokes in a consistent direction. Over time, your hand becomes steadier and your strokes become more confident. A feather is small enough to finish in one sitting, but detailed enough to teach serious technique. That makes it an ideal subject for artists who want visible progress without committing to a giant landscape with seventeen trees and emotional clouds.
Color mixing becomes easier too. Brown feathers, for example, are rarely just brown. They may contain ochre, sepia, gray, cream, rust, or even violet shadows. Blue feathers may include navy, turquoise, slate, and pale gray. When you observe these subtle shifts, your paintings become richer. You also begin to notice that nature almost never uses a flat color straight from the tube. Nature mixes. Nature layers. Nature has excellent taste.
One practical experience is learning to stop at the right time. Watercolor does not always reward extra fussing. Sometimes the feather looks fresh and lively after five good details, but heavy after twenty more. A helpful habit is to step away for a few minutes before adding final marks. When you return, you may realize the painting already says enough. This is both an art lesson and a life lesson, though admittedly less dramatic than a movie montage.
Finally, painting bird feathers builds observation skills. You begin to see feathers not as simple shapes but as structures with movement, rhythm, softness, and function. The central shaft, the barbs, the broken edges, the shadowed overlaps, and the tiny imperfections all become part of the story. That is what makes watercolor feather painting so satisfying. It is not just a pretty project; it is a small study of nature’s engineering, translated through water, pigment, and a brush that may or may not be behaving today.
Conclusion
Learning how to do a watercolor painting of bird feathers is a rewarding way to practice both control and creativity. Start with a light sketch, build transparent washes, follow the direction of the barbs, and add details only after each layer dries. Pay attention to the feather’s anatomy, but do not let technical terms intimidate you. The goal is to understand enough structure to paint with confidence.
Whether you choose a realistic owl feather, a bright blue jay feather, or a loose fantasy feather, watercolor gives you the perfect balance of softness and detail. With practice, you will learn how to preserve highlights, create delicate texture, and bring a simple feather to life on paper. And if your first attempt looks more like a leaf wearing a disguise, congratulationsyou are officially learning.
Note: This article is written in original American English and synthesized from established watercolor technique principles, artist education resources, and bird-feather anatomy references.


